Retail operations · AI automation guide
From Data to Action: A Practical Guide to AI in Retail Operations
Learn how to use AI to turn repetitive retail work into workflows you can automate—with practical examples, copy-ready prompts, and clear points for human review.
A down jacket has been sitting in a store for months. Marking it down might recover cash, but at what cost? Moving it to another store might help—or just move the problem.
Meanwhile, a store manager has finished every task from last week's review. Gross margin is still below target. A replenishment receipt has been recorded, but part of the planned delivery is still missing. A customer complaint has been resolved, while the training it prompted is still open.
Retail teams rarely struggle to produce another report. The harder part is what comes after it: checking the evidence, choosing a response, handing work to the right person, and finding out what happened.
This guide shows how to approach AI automation in that everyday work: identify the repetitive steps, define the rules, and keep human judgment where it matters. Using Enter, you will work through practical examples in inventory, store performance, replenishment, customer feedback, and forecasting. Each includes a demo, step-by-step instructions, screenshots, and prompts you can adapt to your own team.
Start with the work you need to move forward
Enter is an AI app-building platform from Converge. Describe the application you need in natural language, add files or visual references, and work in the same workspace to preview, edit, and publish it. You can start without writing code yourself.
The applications in this guide make the process visible; building a collection of tools is not the goal. Enter's AI helps you create the workflows. Within them, defined rules handle repeatable calculations and tracking, while AI-assisted classification can help organize feedback. Your team still checks the evidence, approves consequential actions, and reviews results. Treat these demos as starting points to validate—not ready-made, fully autonomous systems.
Choose the workflow closest to your day:
| When your team is asking… | Start with this walkthrough |
|---|---|
| Which slow-moving stock should we act on, and how? | 1. Flag stock and compare disposition options |
| Did last week's store action plan actually help? | 2. Connect performance gaps to actions and reviews |
| Did the replenishment order arrive in full? | 3. Calculate replenishment and track receipt gaps |
| Has the problem behind a complaint been addressed? | 4. Organize feedback and follow up on remediation |
| Which forecast should purchasing use? | 5. Explain changes and preserve forecast versions |
Start with one recurring task. Follow the relevant example, replace its inputs and rules with your own, and decide which steps can run automatically and which require confirmation.
About the examples: These are demo walkthroughs, not reports of measured customer outcomes. Refinement prompts describe requirements to configure and test; the walkthroughs describe the states shown in the captured examples. Figures and statuses describe the captured examples. Screenshot dates and labels are fixed demo references, not the current week. Original screenshots are retained, including any non-English builder UI; the instructions and captions are in English. Start with sample or appropriately anonymized data. Before using an app for live operations, validate its calculations, saved records, permissions, and approval behavior with your team.
1. Decide what to do with slow-moving inventory
Open the inventory disposition demo
An inventory report can tell you how many units remain. It may not tell you why they are stuck at a particular store, whether a markdown beats a transfer, or who is waiting to approve the plan.
Build a tool that keeps the same SKU and store in view from the first warning through the decision and its eventual outcome. The important question is not just “What is slow-moving?” It is “What should we do with this stock next?”
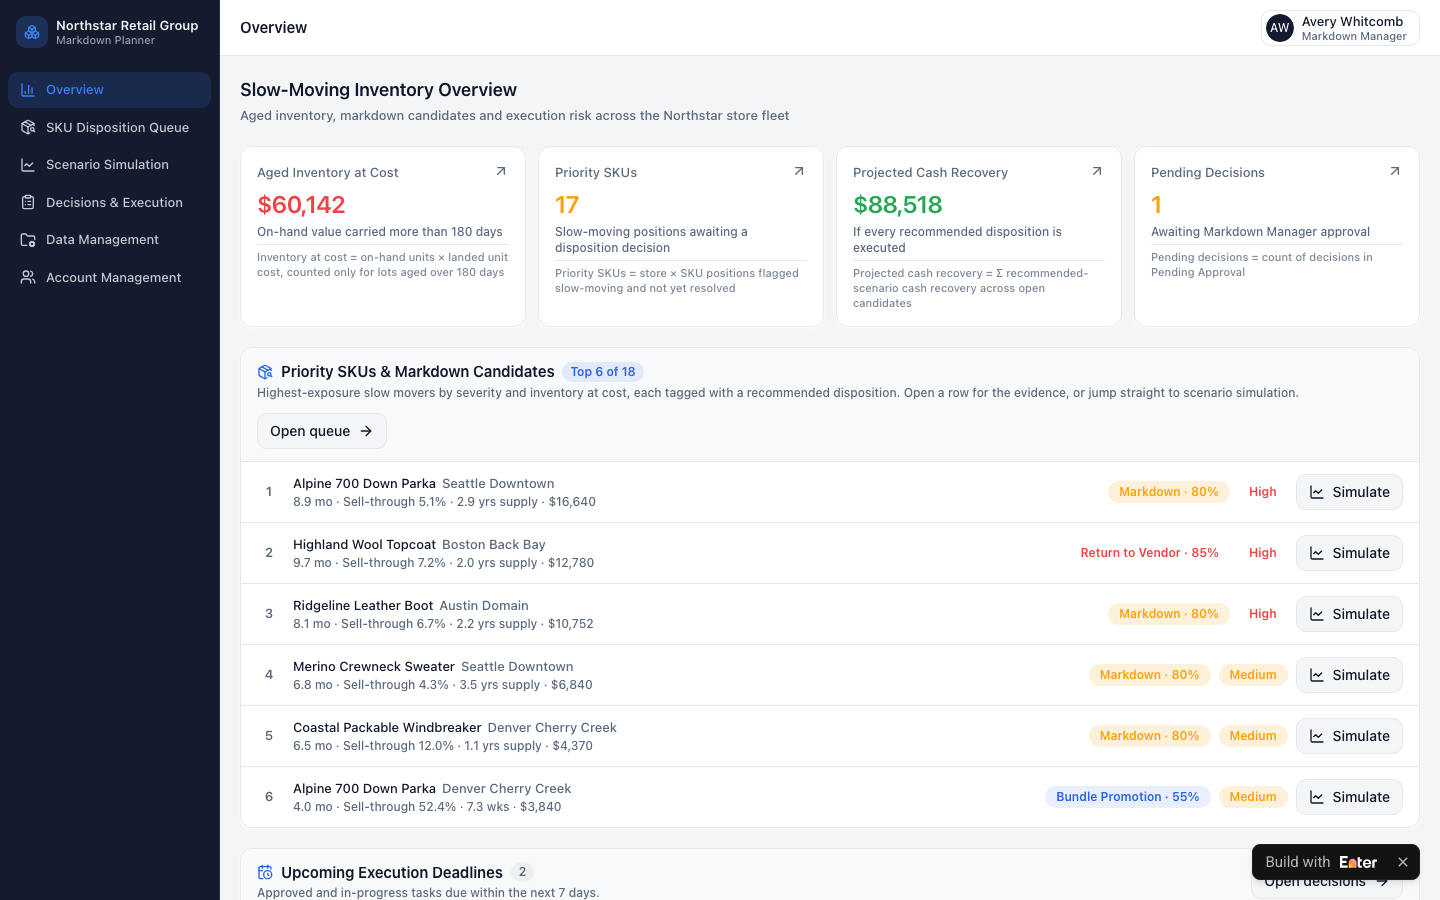
Step 1. Map the decision from stock to outcome
Give the inventory and merchandising teams three connected jobs:
- Find the stock: inspect store-level inventory and sales, then understand why a specific position was flagged.
- Choose a response: compare keeping the current price, a markdown, a store transfer, a bundle promotion, and a return to the vendor. Submit the chosen option for review.
- Follow it through: after approval, assign store execution and record units handled and actual cash recovered.
Use the sample inventory and sales workbook, or provide your own relevant records. Define what counts as slow-moving for your business and which disposition options you can actually use. The same stock position should remain linked across the whole workflow.
Step 2. Generate the first version
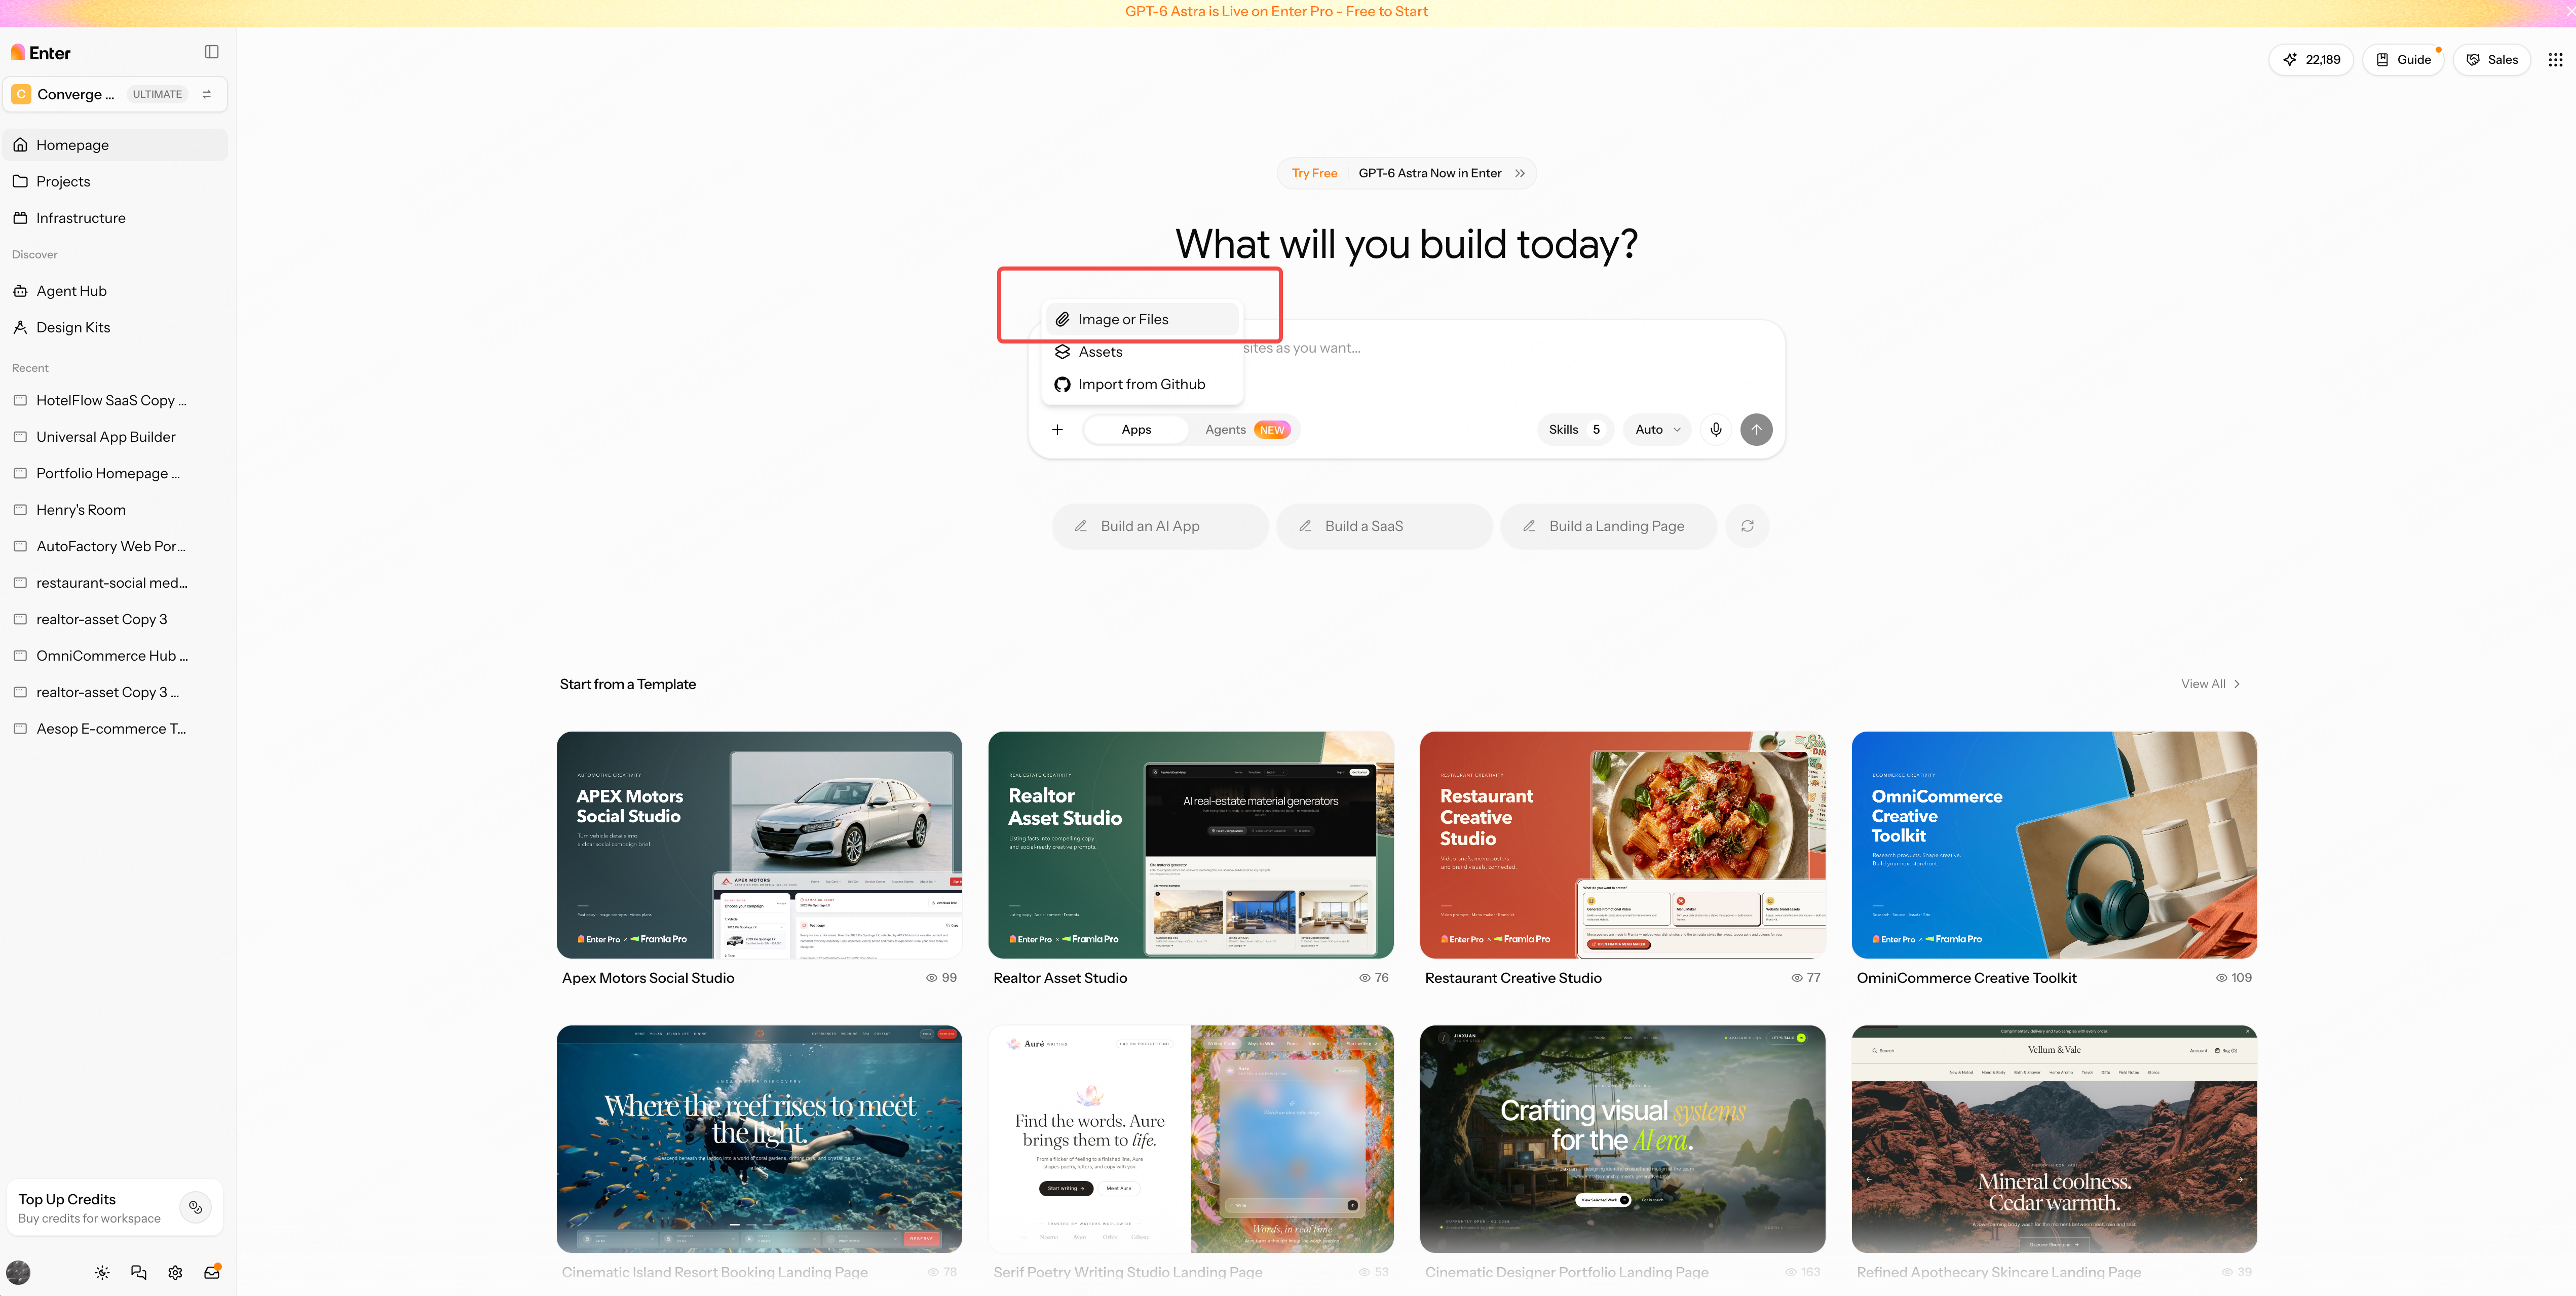
Open Enter, choose New Project, and upload the workbook with the + control beside the input box. Copy the starter prompt below, adapt the roles and rules, and submit it.
Ask Enter to plan before building. Review the proposed pages, calculations, permissions, and missing information. When the plan matches your workflow, select Build Now.
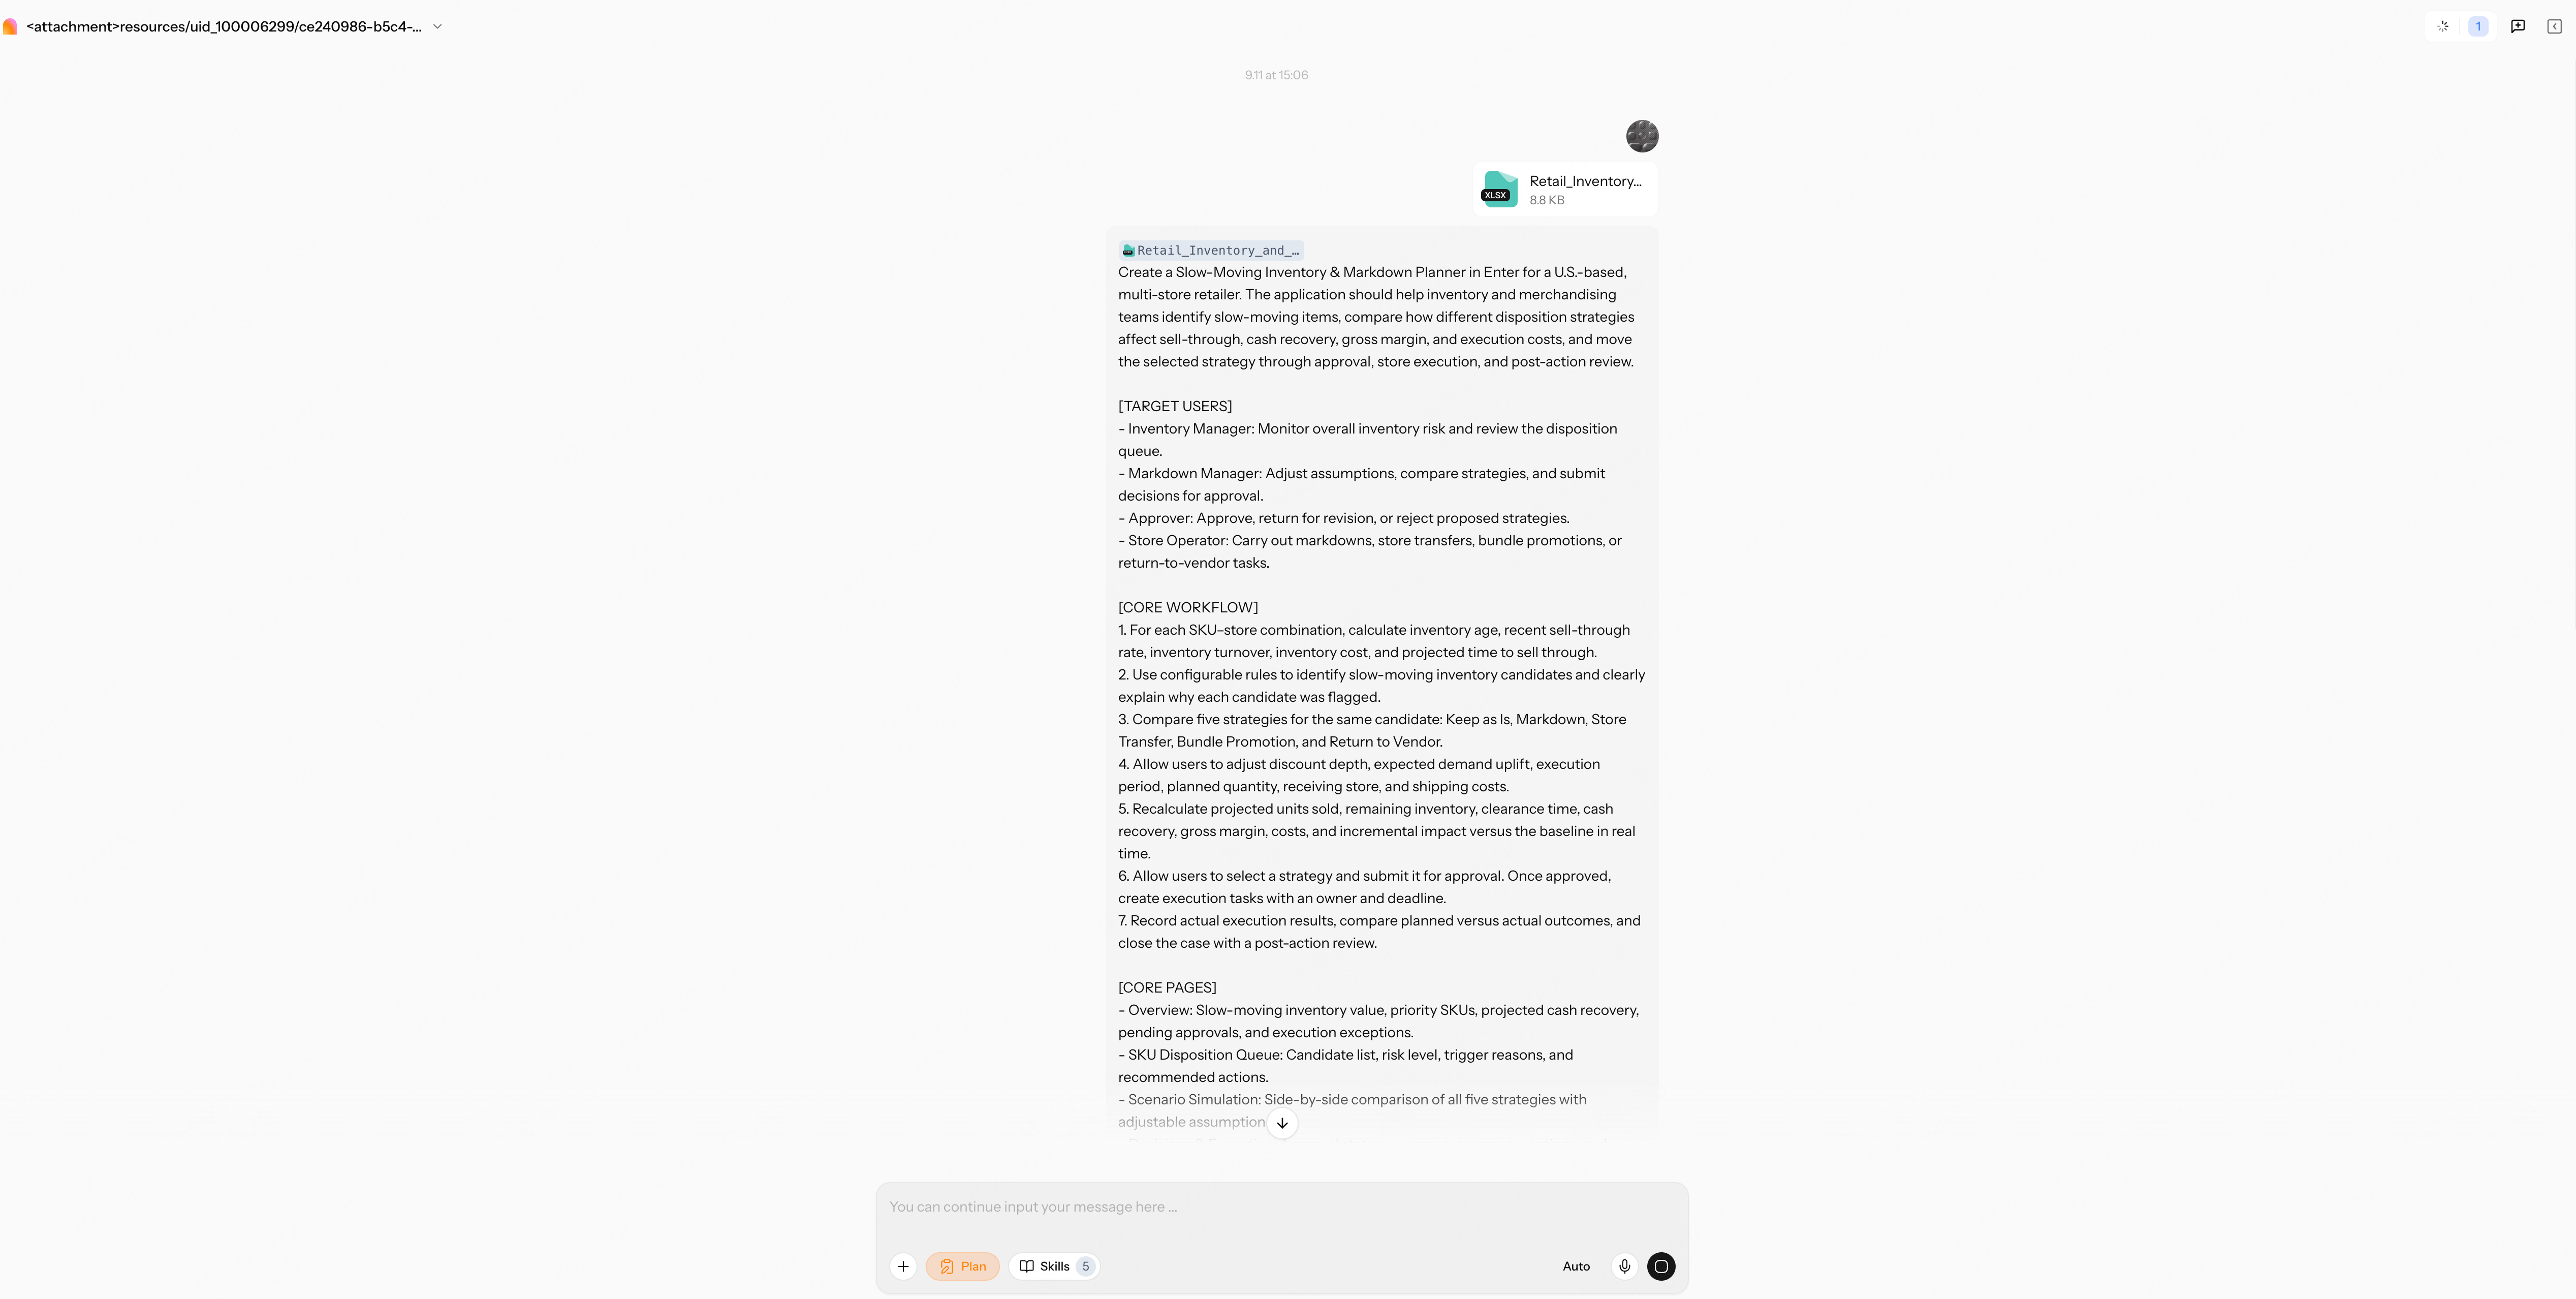
Step 3. Make the business rules useful
3.1 Explain why this stock was flagged
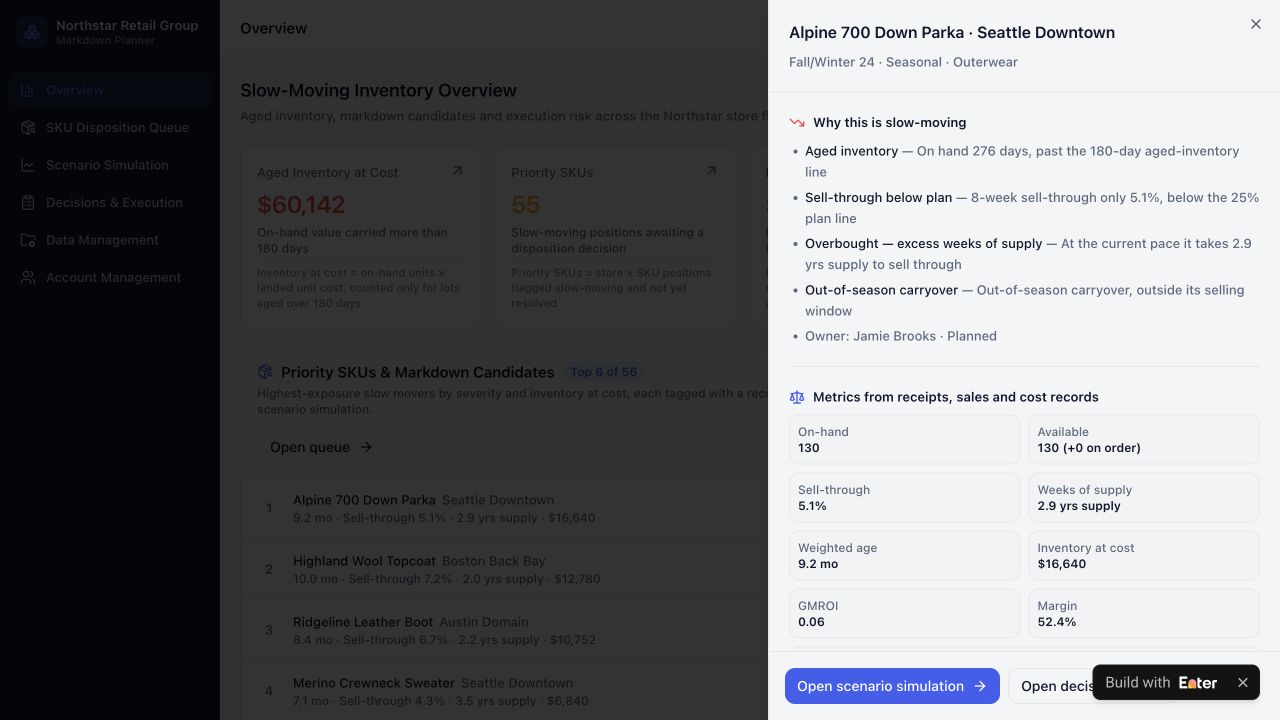
The same jacket might sell well in one store and sit untouched in another. A product-wide risk label is not enough. Show inventory age, recent sell-through, cost, and the exact rule triggered for each SKU–store position.
Before using this refinement, replace the eight-week window and thresholds with your team's usual measures:
For each SKU-store inventory position, show on-hand units, inventory age, 8-week sell-through, inventory cost, and the exact rules that flagged it.
Keep the same position selected when opening Scenario Simulation. Show missing data explicitly instead of inventing a reason.
You should be able to open a position, explain why it needs attention, and carry that same record into the simulation. Missing evidence should be visible—not filled in with a plausible-sounding explanation.
3.2 Compare the trade-offs, not just the cash
A bigger cash-recovery estimate does not automatically make a strategy better. Markdowns reduce margin. Transfers cost money and depend on demand at the receiving store. Vendor returns may recover only part of the cost.
Compare all five options for the same stock, quantity, and time horizon, with “keep as is” as the baseline. Remove unavailable options and supply your actual shipping costs, return recovery rates, and fees.
Compare all five strategies using the same inventory position, planned quantity, and evaluation period.
When an assumption changes, recalculate projected units sold, remaining stock, cash recovery, gross margin, and execution costs.
Show formulas and assumptions. Include shipping and receiving-store demand for transfers, and recovery rates and fees for vendor returns. Label all outputs as estimates.
Changing a discount should update projected sales, remaining stock, cash recovery, and margin together. The team should see both what it might gain and what it would give up.
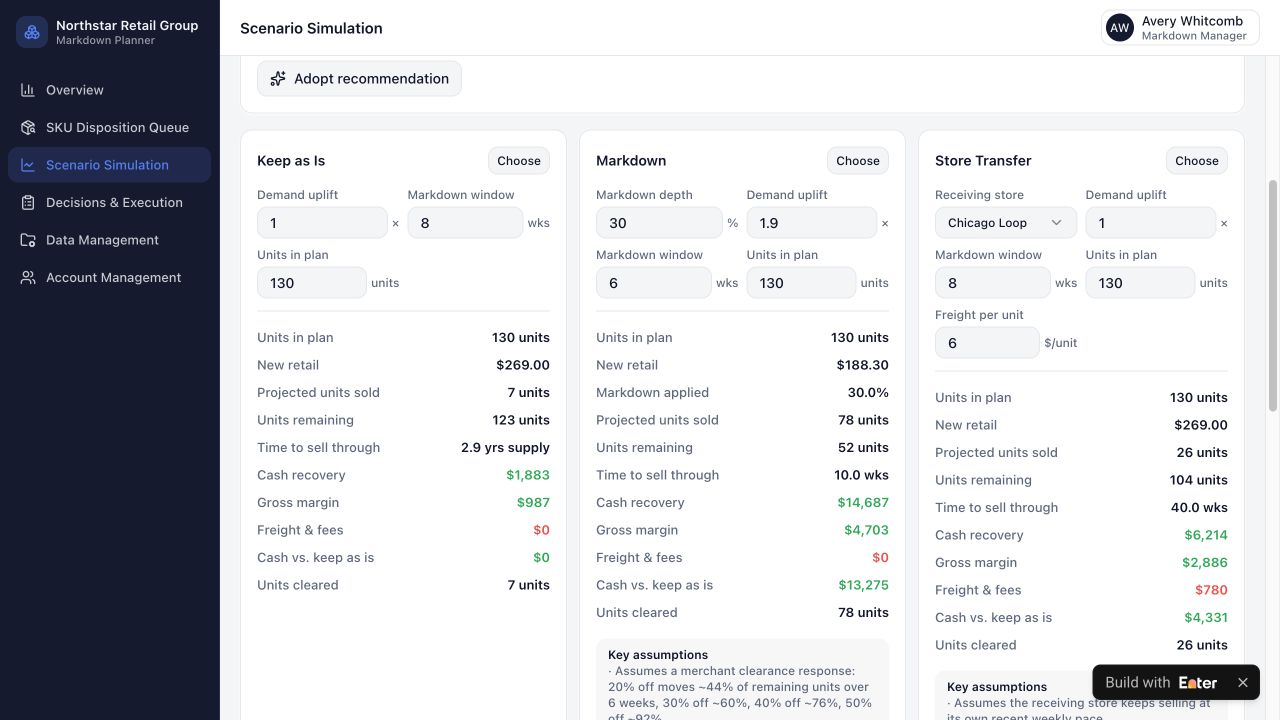
3.3 Preserve the decision through approval
Once someone chooses a strategy, they should not have to rebuild it in a chat message for the approver. Save the inputs and estimates as they stood at submission. Later changes to a simulation must not quietly change what the manager is reviewing.
Specify who approves, who executes, and which actual results the store must record:
Submitting a strategy must save a snapshot of its SKU-store position, inputs, projected results, and rationale.
Require explicit approval before creating an execution task with an owner and deadline. Returned or rejected proposals must not start execution.
Record actual outcomes separately from estimates so the team can review the difference later.
The expected result is a reviewable proposal, followed by an owned, dated task only after approval. The tool calculates; a person decides whether to proceed.
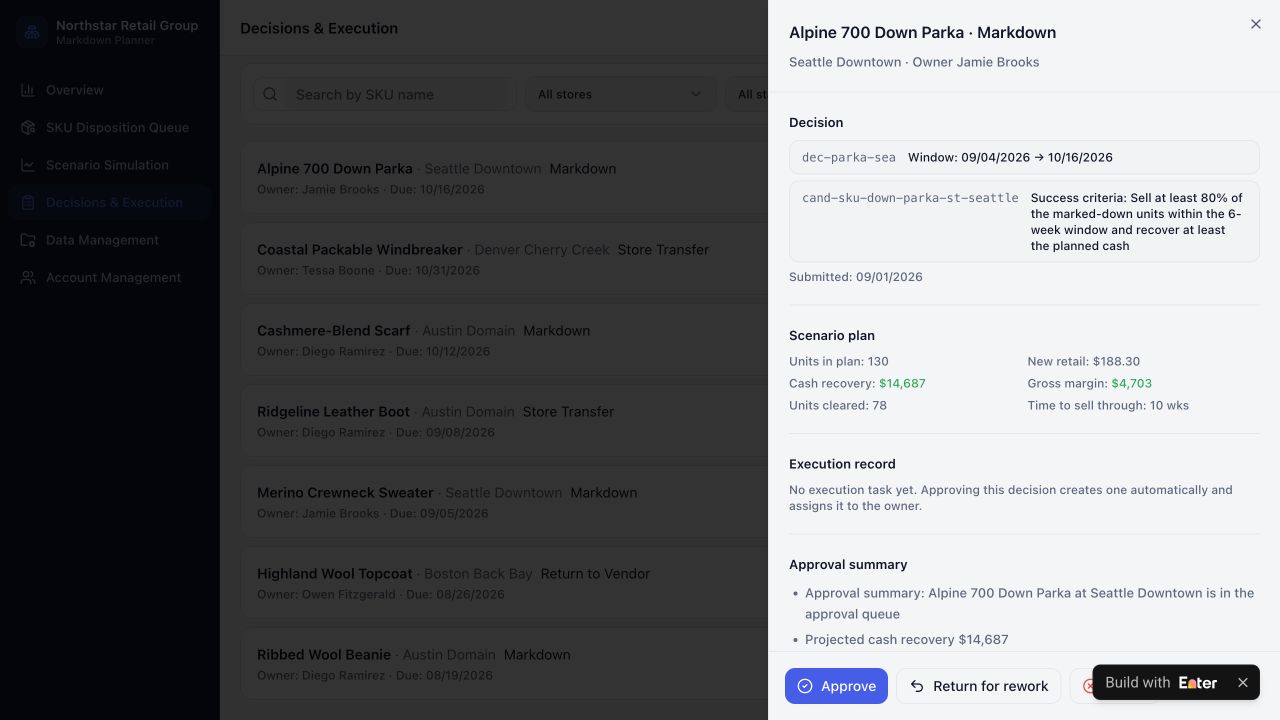
Step 4. Follow one jacket through the demo
Select Avery Whitcomb, the inventory disposition lead, and find Alpine 700 Down Parka at Seattle Downtown.
4.1 Check the evidence
In Overview → Priority SKUs & Markdown Candidates, open the jacket's record.
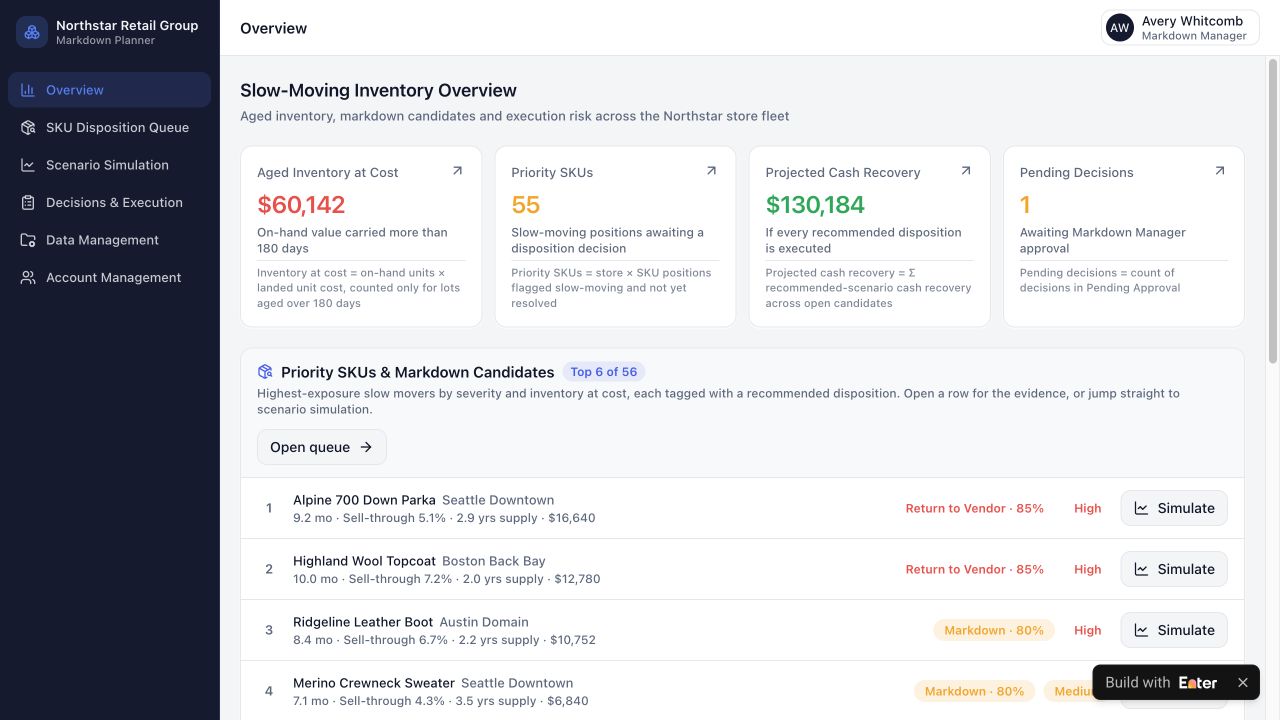
Under Why this is slow-moving, inspect the evidence: more than 180 days in inventory, 5.1% eight-week sell-through, and approximately 2.9 years of projected time to sell through. The screenshot shows an inventory age of 276 days; that value can change with the date.
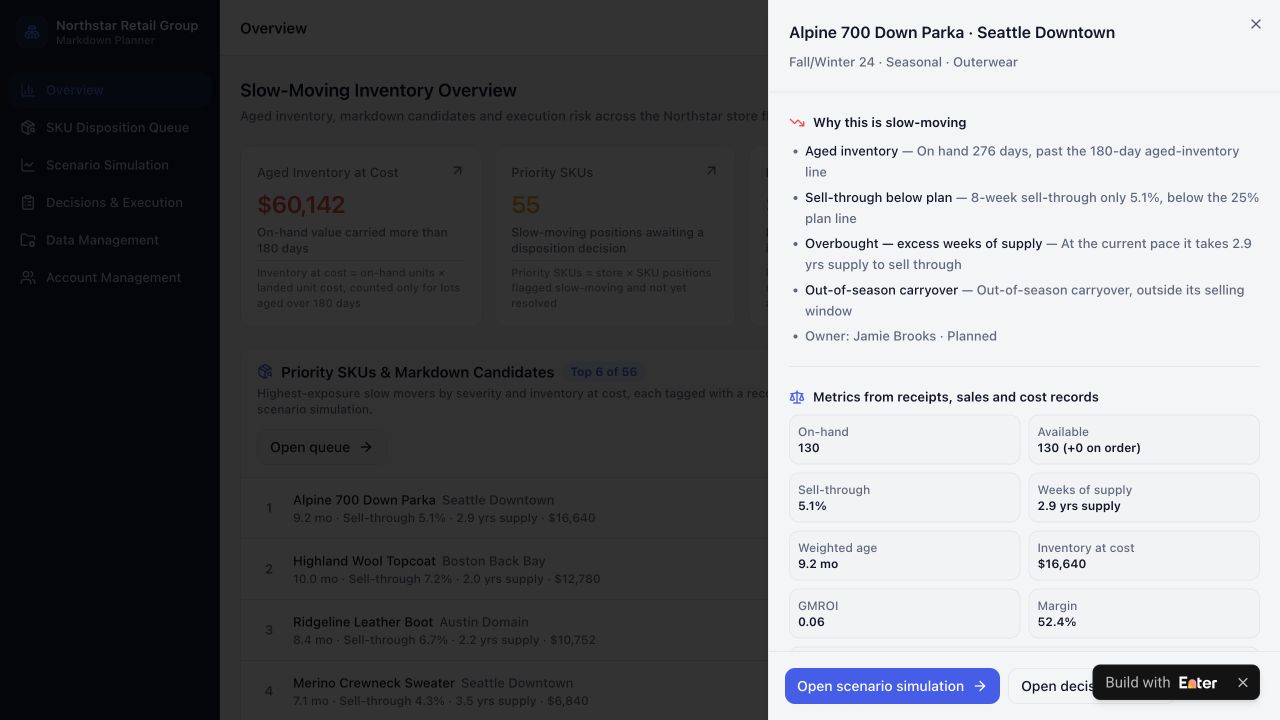
4.2 Compare the estimates
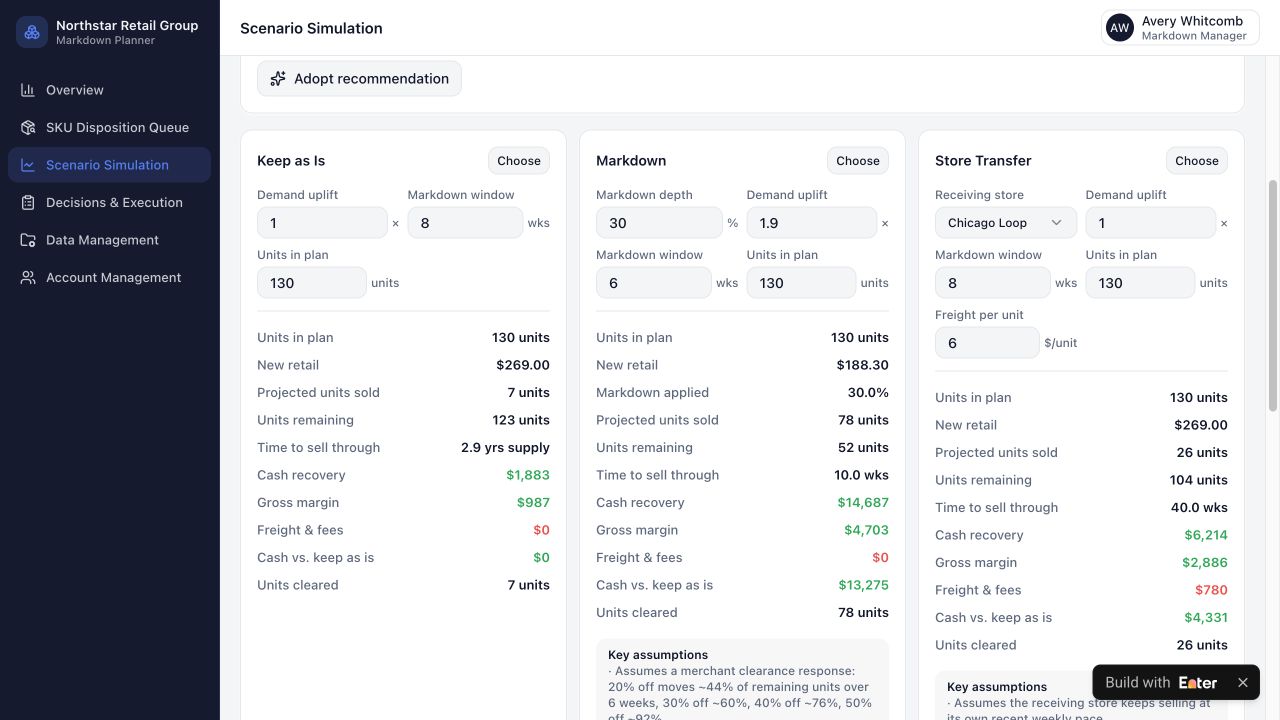
In Scenario Simulation, confirm the product, store, and inventory quantity still match the original record. All five strategies should be available for comparison.
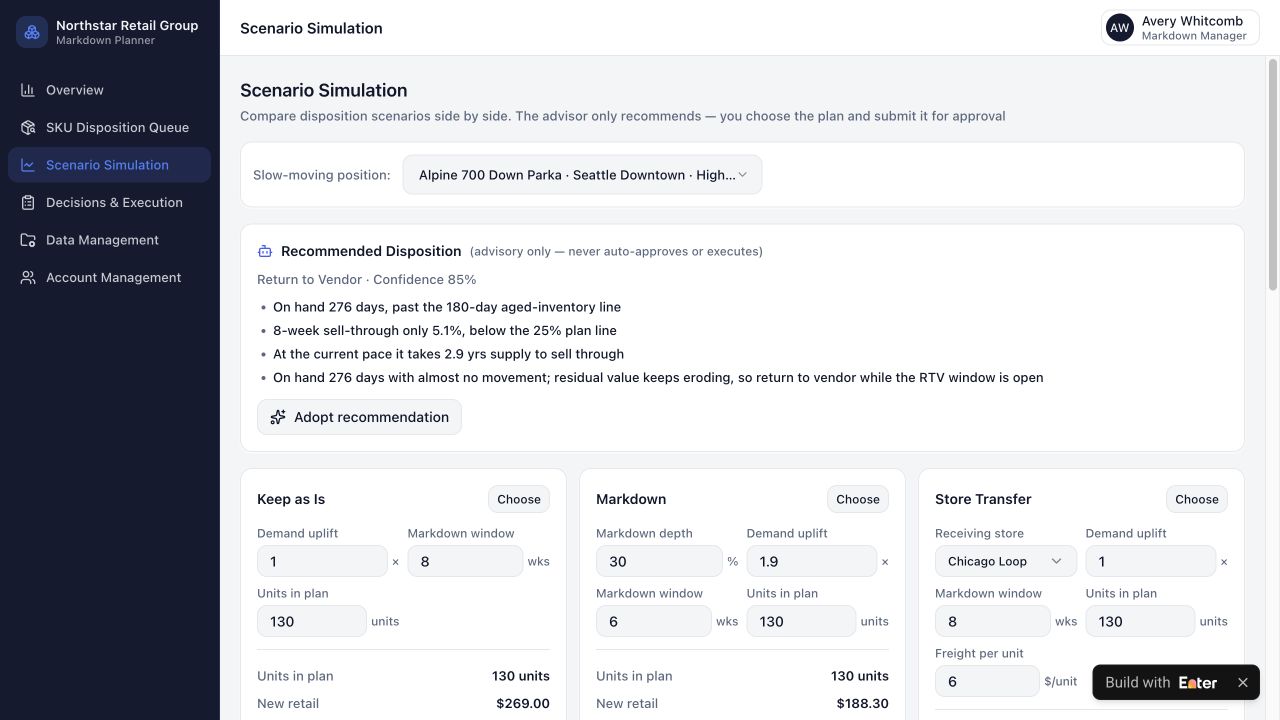
The Markdown example uses 130 units, a 30% discount, and six weeks. It estimates 78 units sold, 52 remaining, and $14,687 in cash recovery. Compare those estimates with keeping the current price, transferring stock, bundling, and returning to the vendor.
4.3 Inspect the approval record
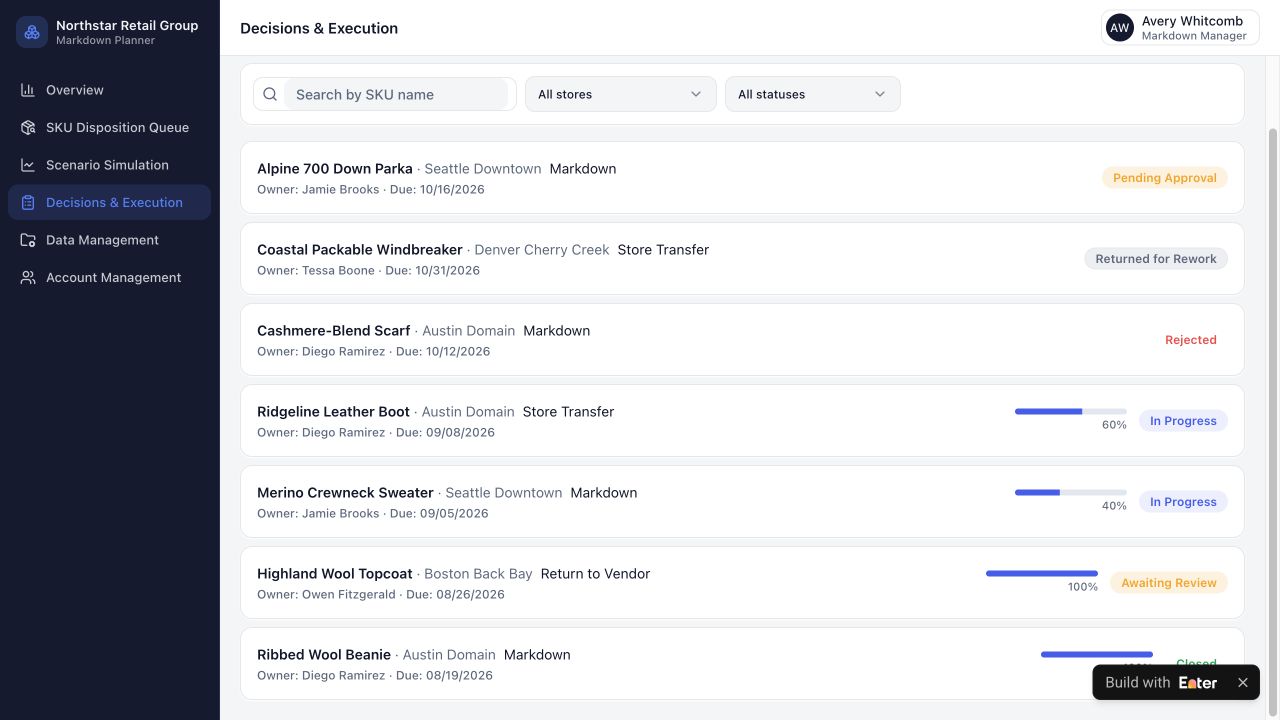
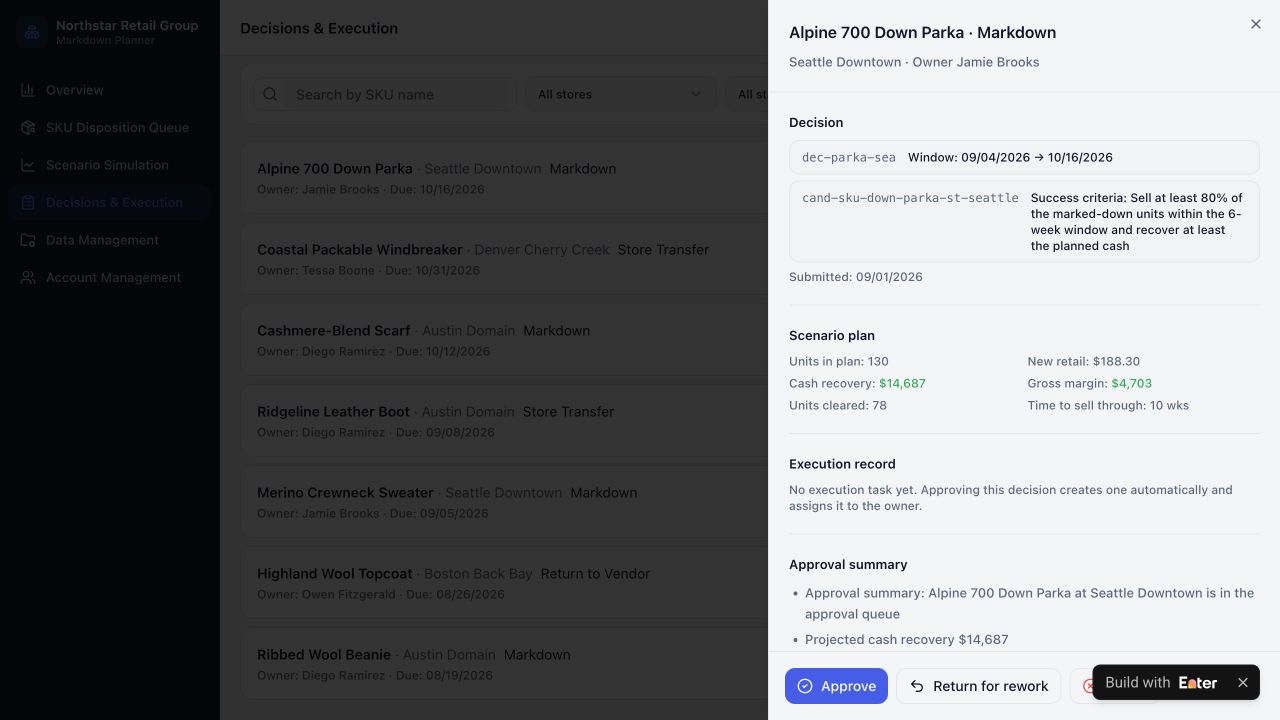
In Decisions & Execution, locate the same product and store. The markdown proposal is Pending Approval.
Open it and check the SKU, quantity, and selected plan. Inspect the approve, return, and reject options. Approval should lead to an execution task; this captured example has not reached execution and has no actual outcome yet.
Step 5. Make it easier to use, then share a trial
In Preview, choose Select to Edit to open Visual Edit. Adjust the copy, type size, and spacing so the inventory lead can find the stock and the approver can understand the proposal without hunting.
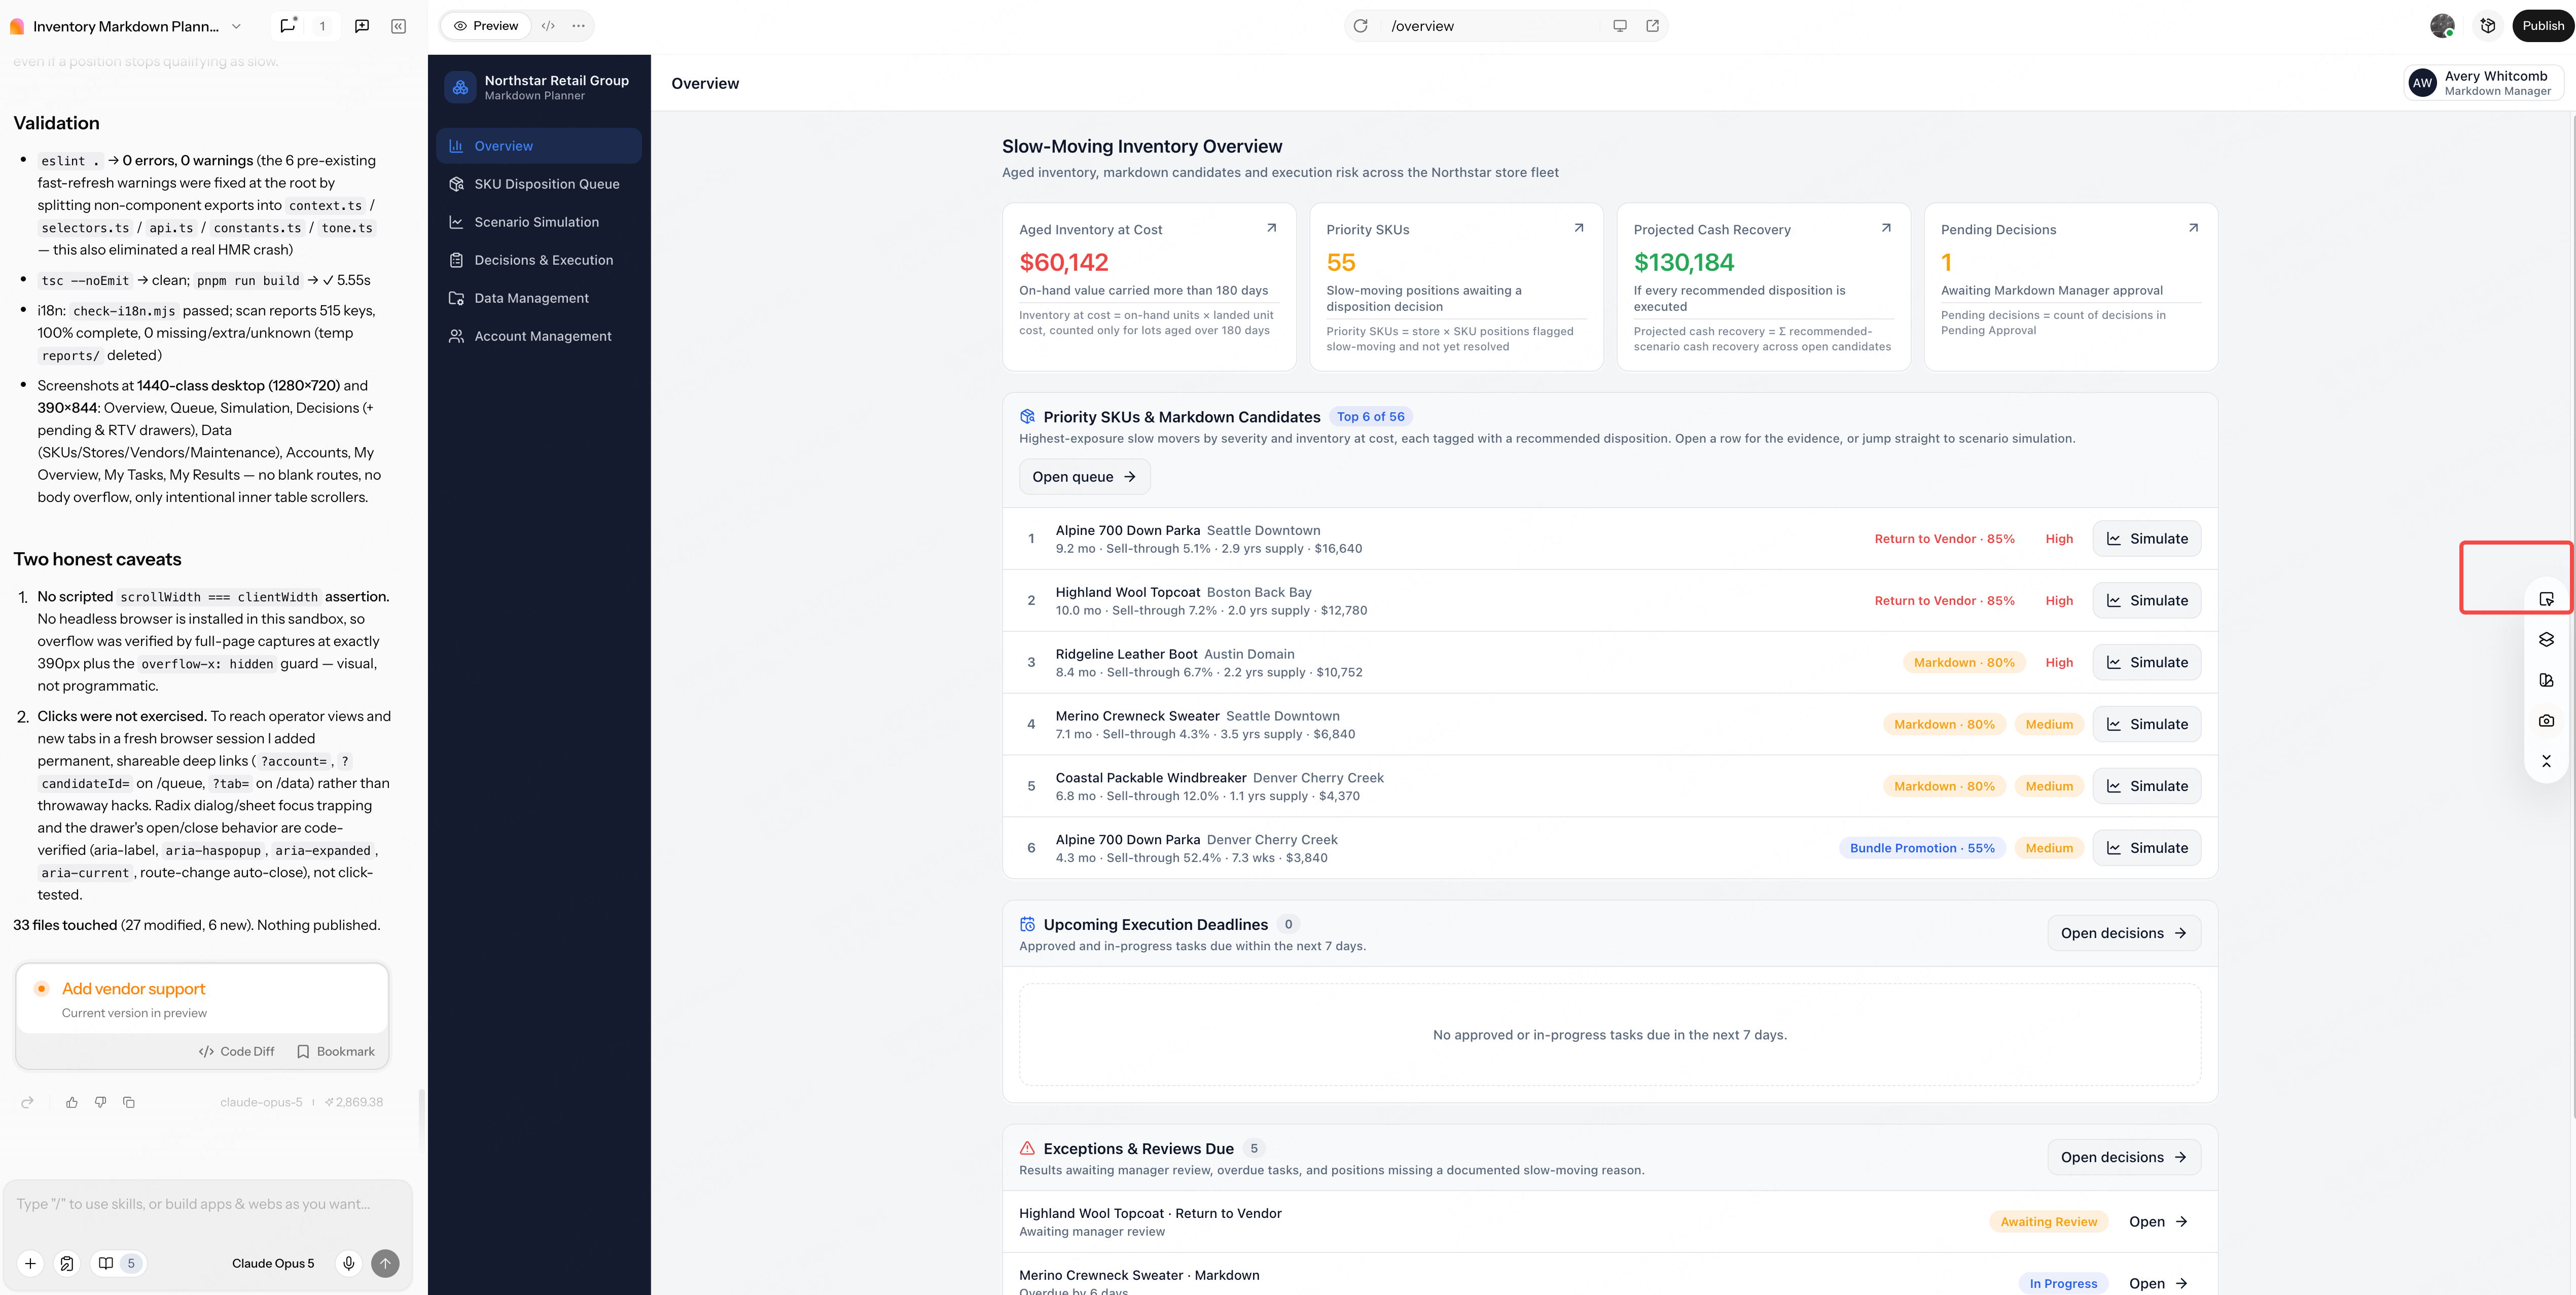
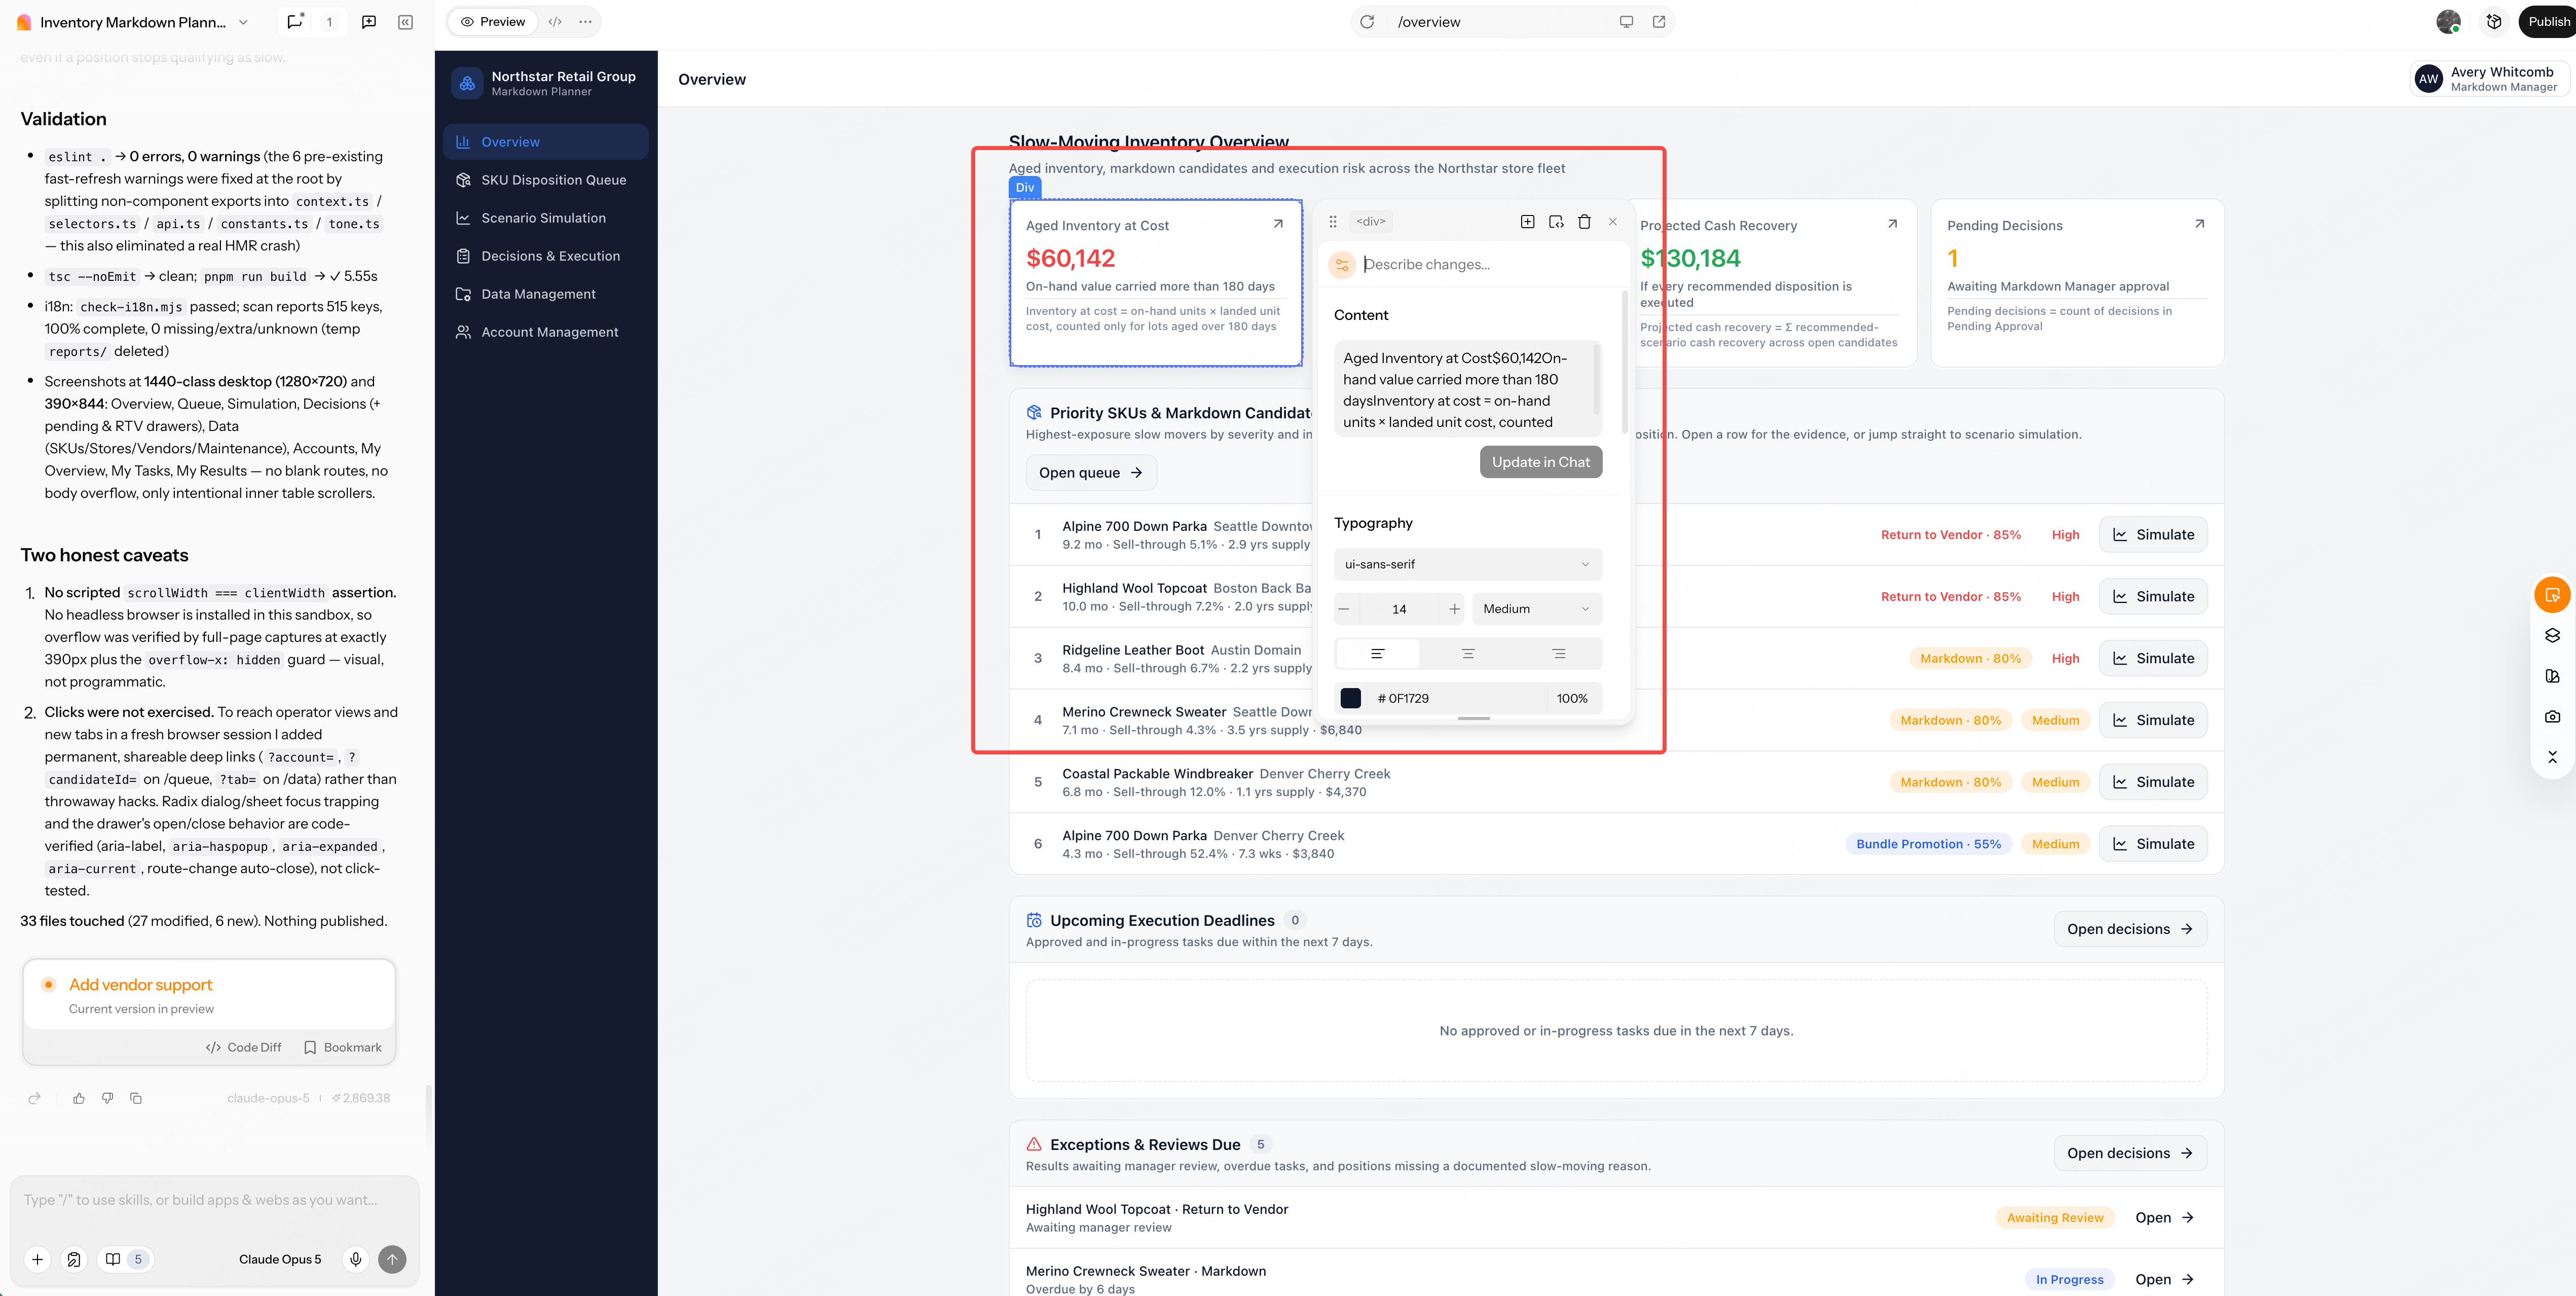
Check desktop and mobile layouts. When the SKU, store, assumptions, and status remain clear on both, use Publish to share the app with a small trial group. Ask them to find one stock position, compare options, and inspect the approval and task flow.
What this example demonstrates: a proposal that can be checked and handed off without reconstructing it from spreadsheets and messages. It does not demonstrate cleared inventory or recovered cash. The next step is still a human decision.
Copy the starter prompt
Replace the roles, slow-moving thresholds, available strategies, and approval responsibilities before submitting. Adapt the region, currency, and interface language to your team.
Open the complete starter prompt
Create a Slow-Moving Inventory & Markdown Planner in Enter for a U.S.-based, multi-store retailer. The application should help inventory and merchandising teams identify slow-moving items, compare how different disposition strategies affect sell-through, cash recovery, gross margin, and execution costs, and move the selected strategy through approval, store execution, and post-action review.

[TARGET USERS]
- Inventory Manager: Monitor overall inventory risk and review the disposition queue.
- Markdown Manager: Adjust assumptions, compare strategies, and submit decisions for approval.
- Approver: Approve, return for revision, or reject proposed strategies.
- Store Operator: Carry out markdowns, store transfers, bundle promotions, or return-to-vendor tasks.

[CORE WORKFLOW]
1. For each SKU–store combination, calculate inventory age, recent sell-through rate, inventory turnover, inventory cost, and projected time to sell through.
2. Use configurable rules to identify slow-moving inventory candidates and clearly explain why each candidate was flagged.
3. Compare five strategies for the same candidate: Keep as Is, Markdown, Store Transfer, Bundle Promotion, and Return to Vendor.
4. Allow users to adjust discount depth, expected demand uplift, execution period, planned quantity, receiving store, and shipping costs.
5. Recalculate projected units sold, remaining inventory, clearance time, cash recovery, gross margin, costs, and incremental impact versus the baseline in real time.
6. Allow users to select a strategy and submit it for approval. Once approved, create execution tasks with an owner and deadline.
7. Record actual execution results, compare planned versus actual outcomes, and close the case with a post-action review.

[CORE PAGES]
- Overview: Slow-moving inventory value, priority SKUs, projected cash recovery, pending approvals, and execution exceptions.
- SKU Disposition Queue: Candidate list, risk level, trigger reasons, and recommended actions.
- Scenario Simulation: Side-by-side comparison of all five strategies with adjustable assumptions.
- Decisions & Execution: Approval status, owners, progress, exceptions, and outcome reviews.
- Data Management: Products, stores, inventory, sales history, costs, and business rules.
- Account Management: User roles and data-access scope.

[DATA AND BUSINESS RULES]
- Use stable IDs to link Products, Stores, Inventory Positions, Sales History, Rules, Scenarios, Decisions, Execution Tasks, and Outcomes.
- Use USD for all monetary values and U.S. conventions for dates and store information.
- Treat all system-generated suggestions as advisory recommendations only. The system must never approve or execute a strategy automatically.
- Every calculated result must clearly show its formula, assumptions, and data source.
- Store Transfer must account for demand at the receiving store and shipping costs. Return to Vendor must account for the recovery rate, fees, and shipping costs.

[VISUAL DIRECTION AND DELIVERABLES]
- Use a clear, trustworthy visual style suitable for an internal retail operations workspace.
- Present complex comparisons with structured cards and tables that emphasize differences, risks, and decision points.
- Support both desktop and mobile layouts.
- Deliver a publishable internal-tool demo.

Before building, first provide the following: a requirements summary, missing information, page architecture, data model, calculation formulas, role permissions, state transitions, and acceptance criteria. Do not begin generating pages yet.
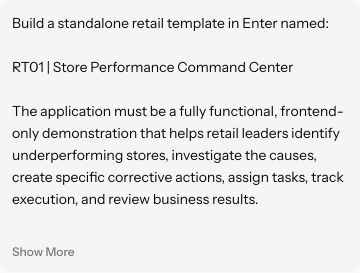
2. Find out whether store action plans are working
Open the store performance demo
A weekly store review can produce a good discussion and still change very little. A manager spots a margin gap. Someone writes “improve gross margin.” A week later, the tasks are complete—but the metric has not improved.
This tool connects the store's numbers to the exception, the action owner, and the outcome review. The next meeting can start where the last one ended.
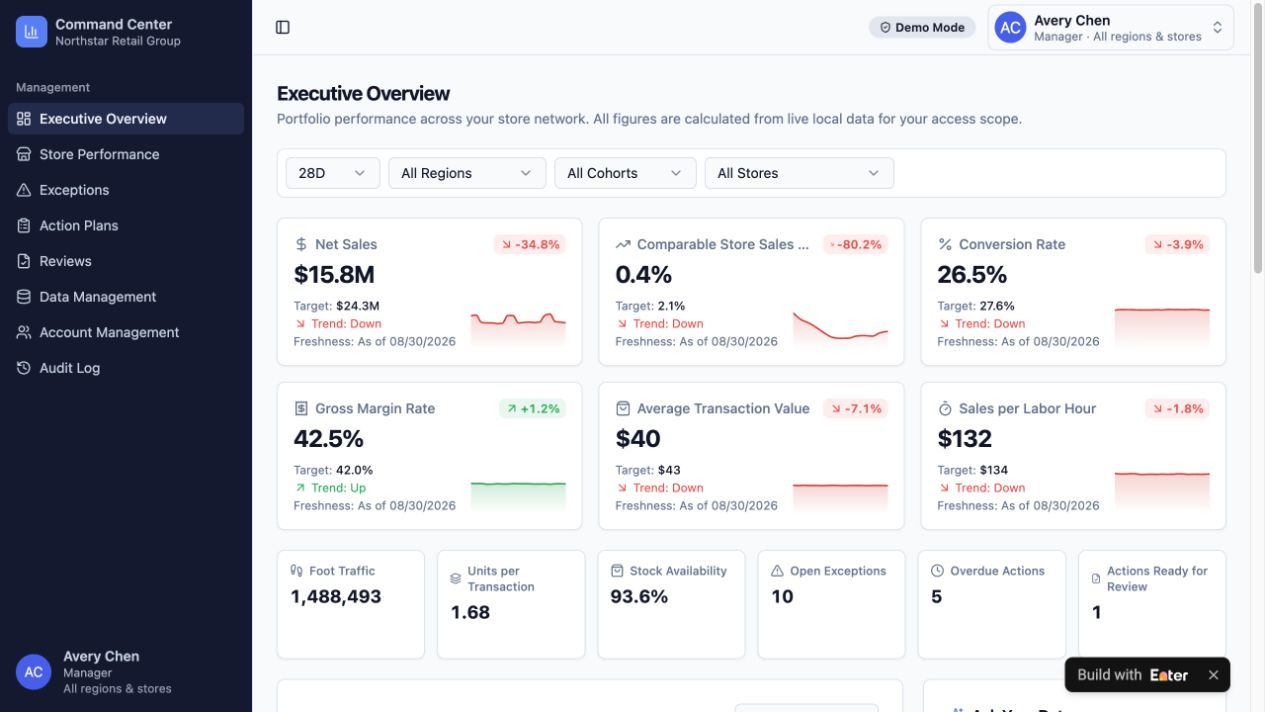
Step 1. Connect the review to the next week's work
Map three jobs: identify a meaningful gap, assign a specific intervention, and review its effect.
Use the store performance input brief or your own data. Define the metrics, their calculation methods, the targets, and the comparison periods where you introduce them. Then specify who investigates, who carries out the action, and who decides whether to close, revise, or escalate it.
A store target and an individual action target do not have to be identical. Keep both visible so nobody mistakes a short-term intervention for a promise to solve every performance issue.
Step 2. Generate the first version
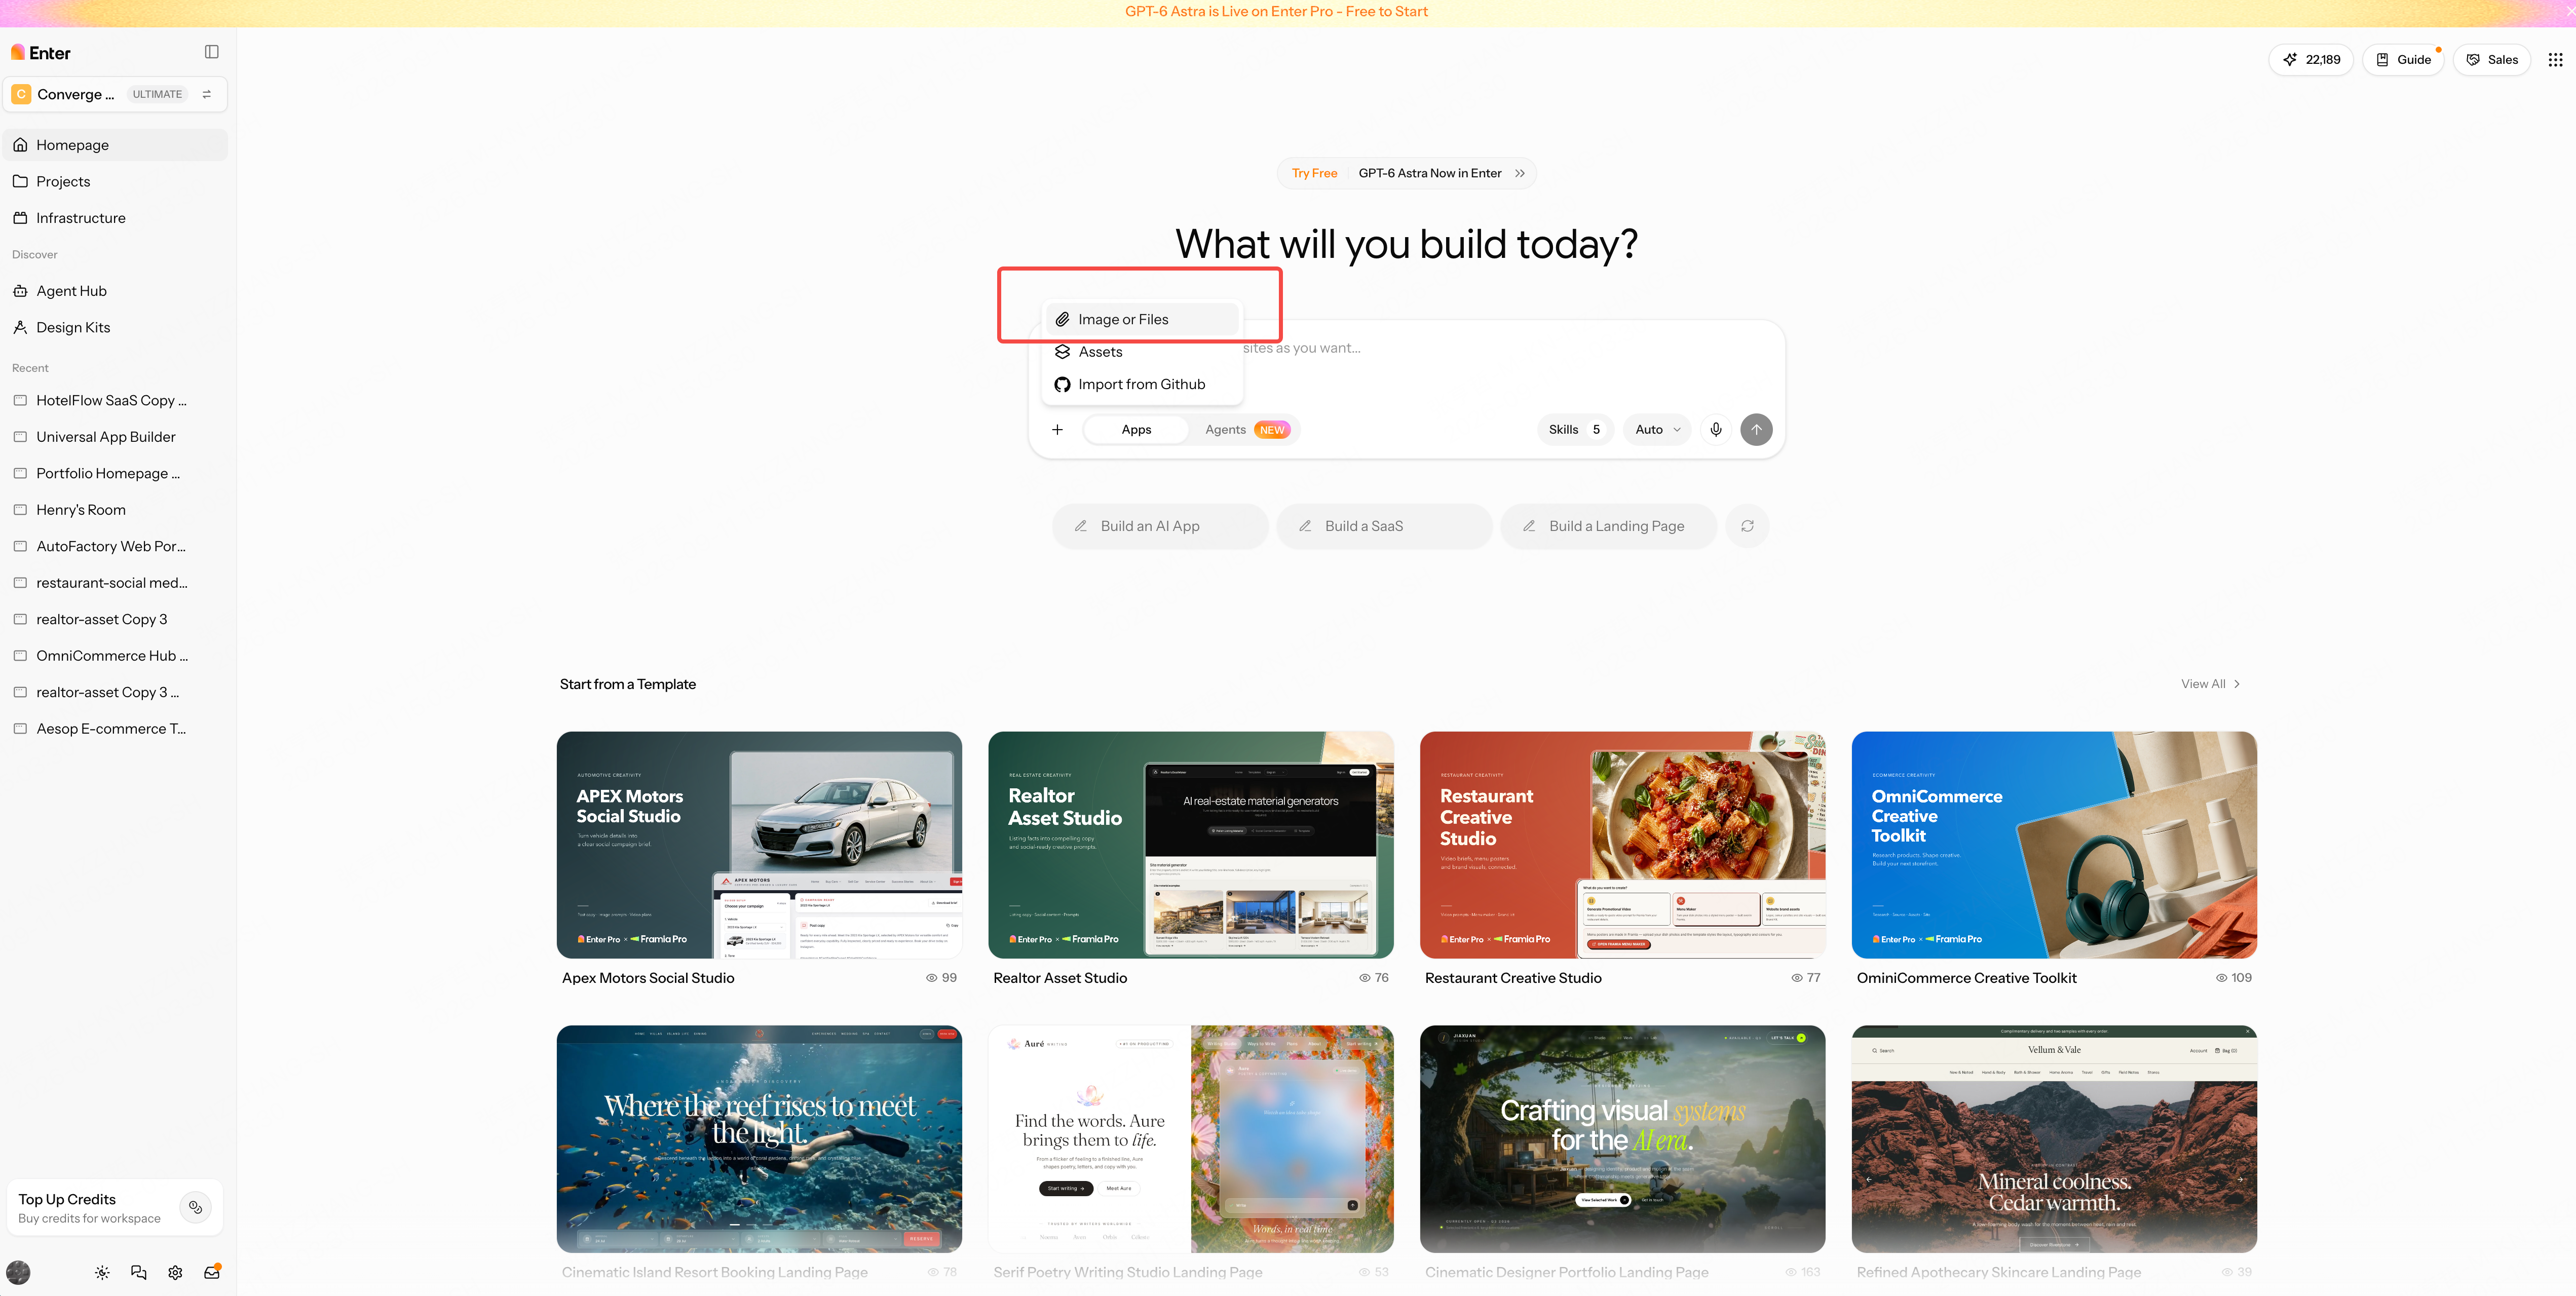
In Enter, choose New Project, upload the brief using +, and submit the starter prompt. Review the build plan and missing inputs before selecting Build Now.
Step 3. Separate the problem, the action, and the result
3.1 Put every metric in context
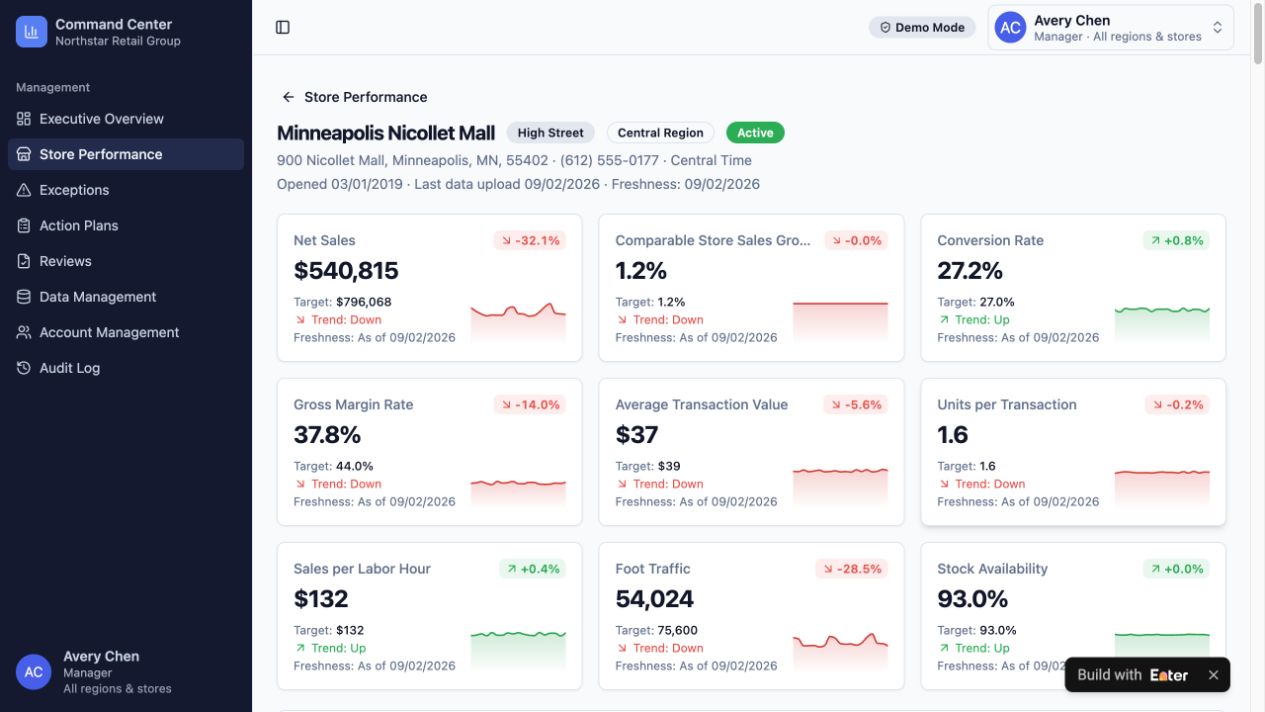
A low ranking is not a diagnosis. Store format, traffic, and the comparison period can all change what a number means. Show actuals beside their targets and dates, with a path back to the source records.
Show actual values, targets, comparison periods, and data freshness for each store metric. Link every exception to its source records and store. Keep date and store filters consistent; do not present correlations as proven causes.
Set your team's metric definitions, targets, and review period before applying this prompt. A manager should be able to investigate a concrete gap—not just click a red number. Possible drivers should remain hypotheses until checked.
3.2 Give someone a specific action
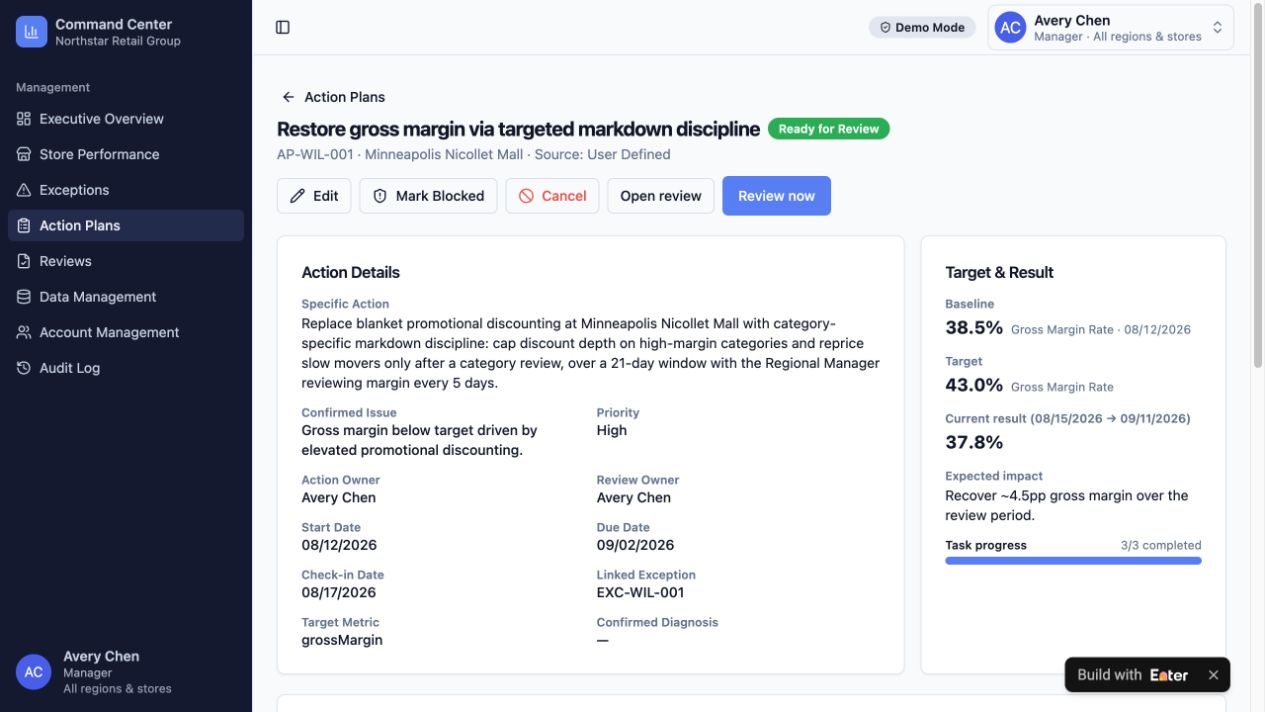
“Improve margin” is a direction, not a task. An actionable plan says what will change this week, who owns it, when it is due, and how the team will judge it.
Link each action plan to its originating exception and store. Save an owner, deadline, baseline, measurable action target, and tasks. Keep the action target separate from the overall store target.
Replace the owner, deadline, and measurable action target with real responsibilities. Opening the plan should show both the work and the original issue that prompted it.
3.3 Review the outcome separately
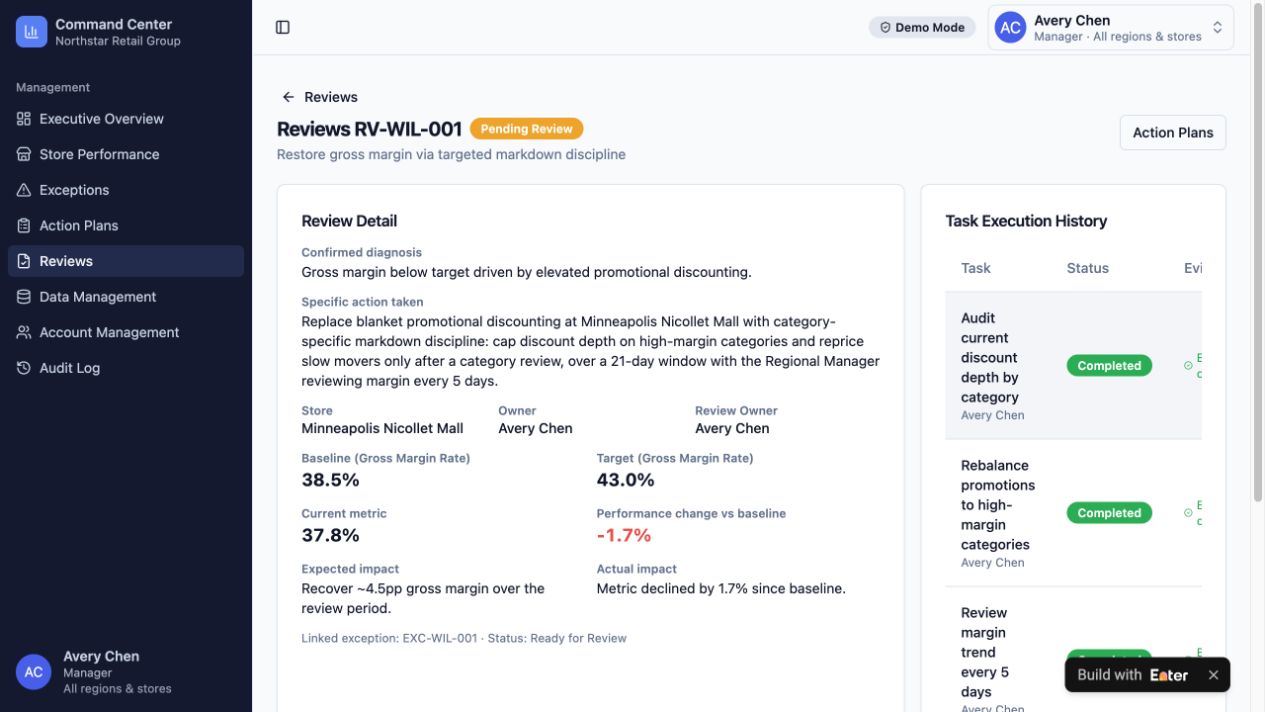
Completed work can still produce a disappointing result. Keep task completion separate from the business review, and decide who reviews the evidence and how often.
Compare the action baseline, target, and actual result using the same metric definition and documented periods. Keep task completion separate from outcome review. Require an explicit manager decision to close, revise, or escalate.
The manager should see the baseline, target, and actual result using consistent definitions and documented periods, then explicitly choose to close, revise, or escalate.
Step 4. Inspect a completed plan with an unresolved outcome
Select Avery Chen, the manager, and open Minneapolis Nicollet Mall.
4.1 Find the margin exception
In Store Ranking, open the store and compare its 37.8% gross margin rate with the 44.0% store target.
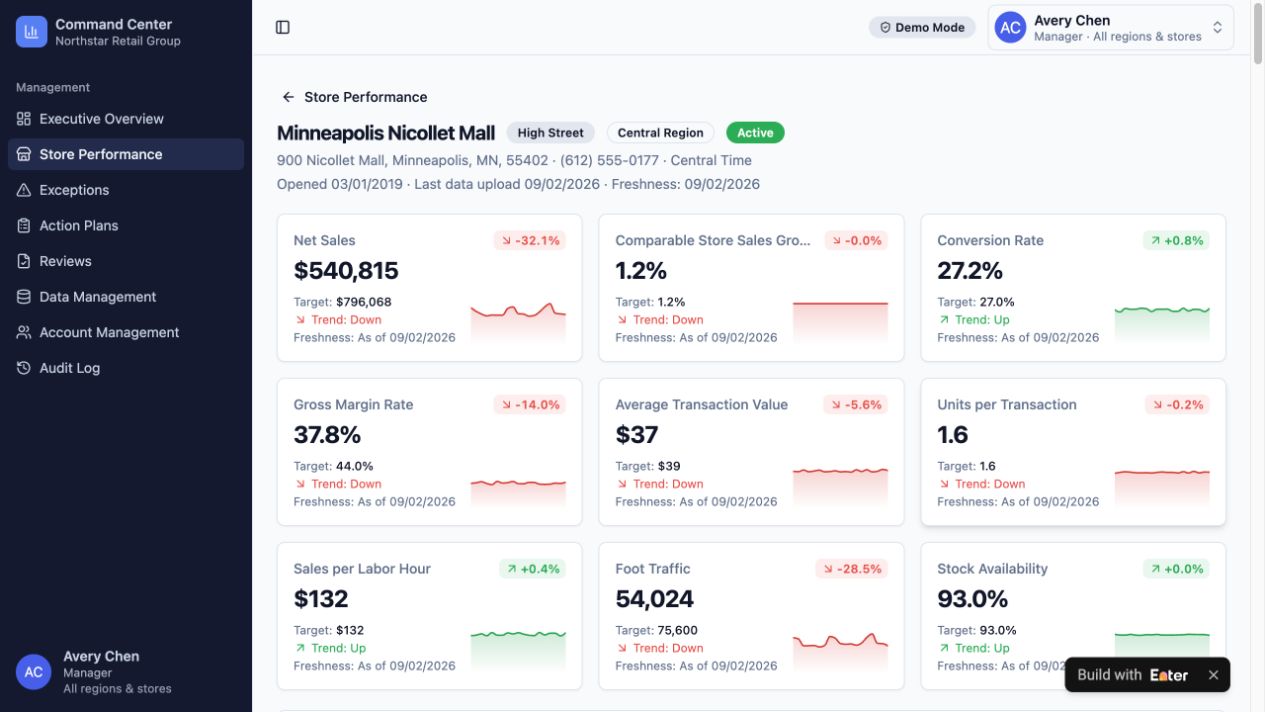
From Open Exceptions, find Gross Margin Rate — EXC-WIL-001, then choose Open Action Plan. The exception retains its own detection period and metric snapshot.
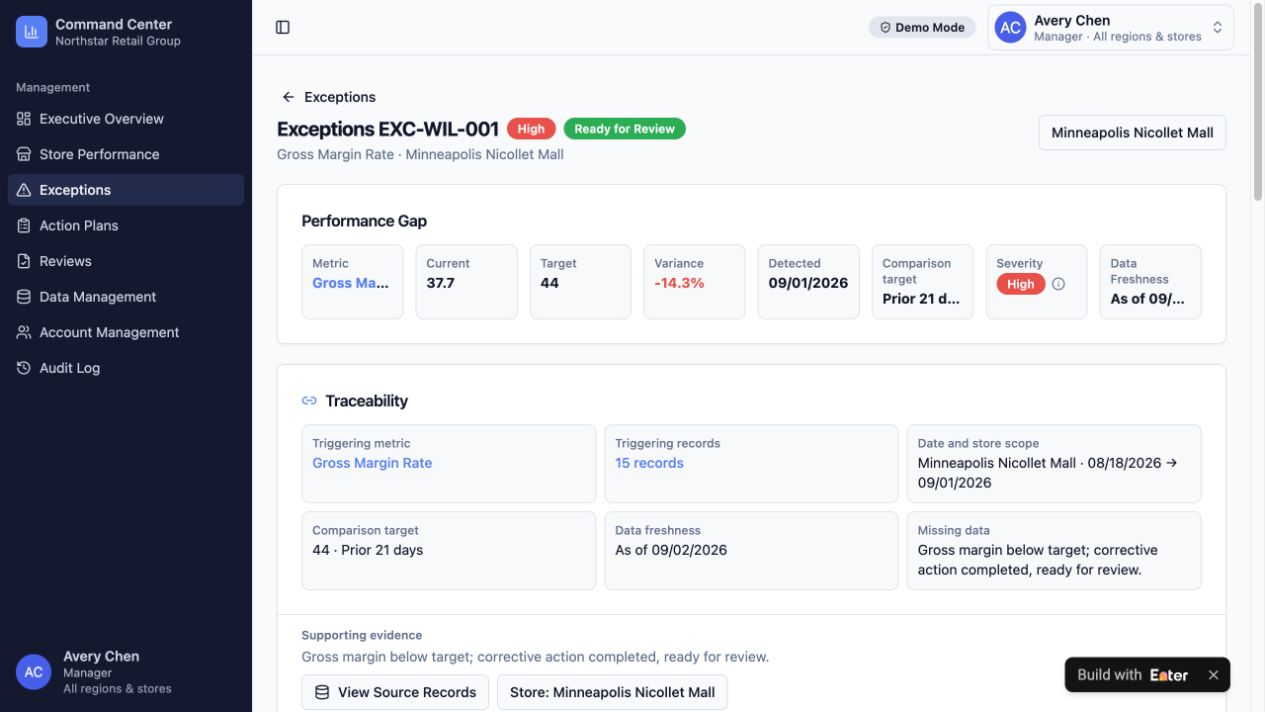
4.2 Check what was done
Open AP-WIL-001. Avery Chen owns it, and all three tasks are complete. The action's baseline gross margin rate is 38.5%, with an action target of 43.0%—distinct from the overall store target of 44.0%.
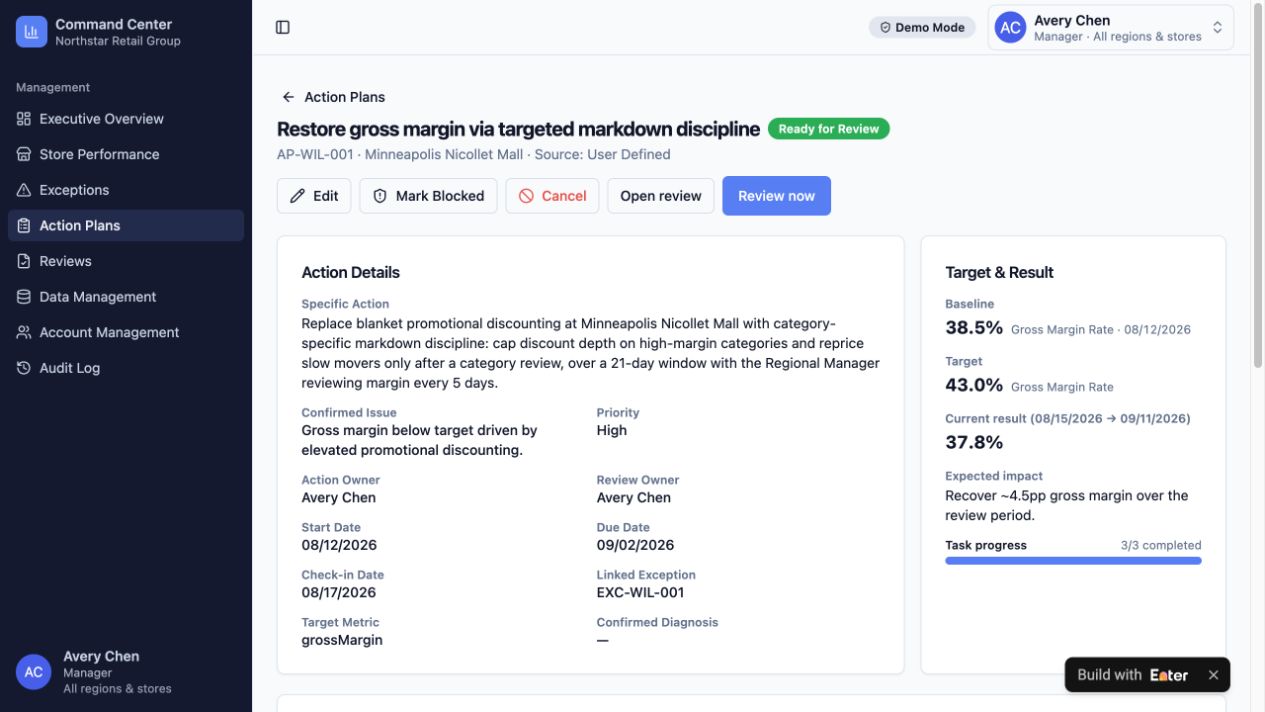
4.3 Read the review, not just the task count
Open RV-WIL-001 through Open review. The actual gross margin rate is 37.8%, below the action target of 43.0%. The status is Pending Review.
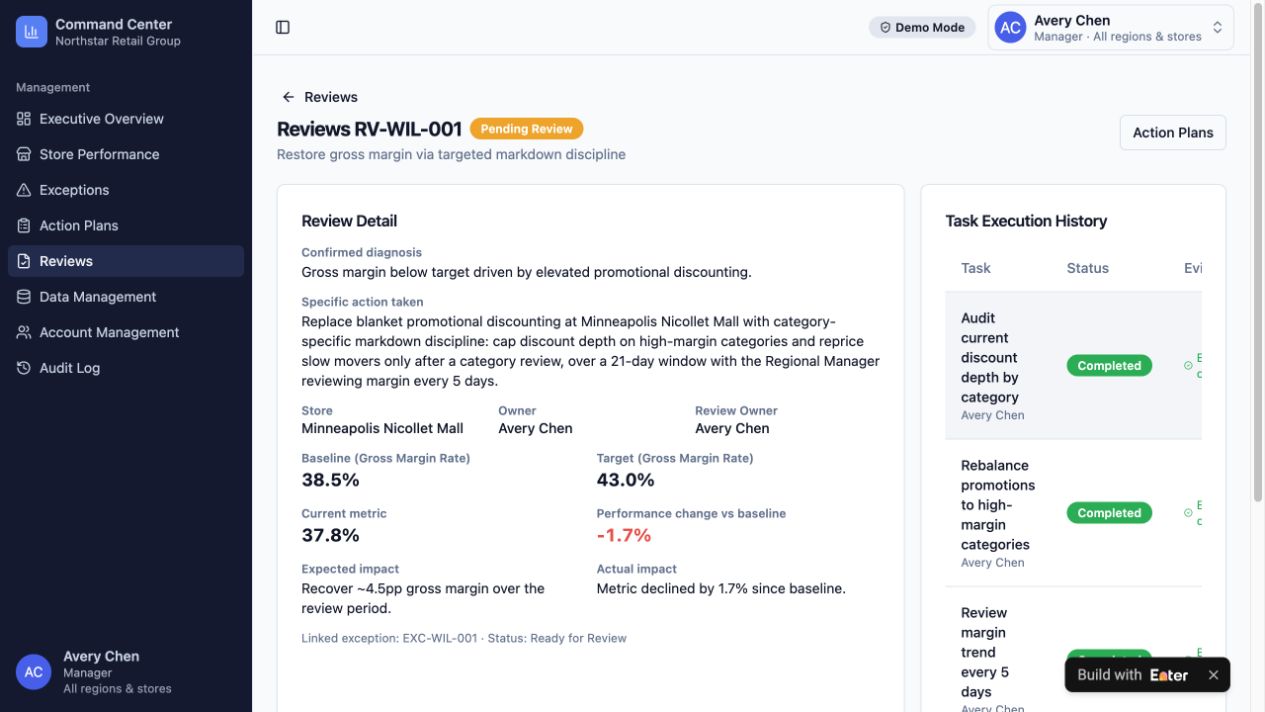
Step 5. Make the next review easier
In Preview → Select to Edit, use Visual Edit to make underperforming stores and open actions easy to find.
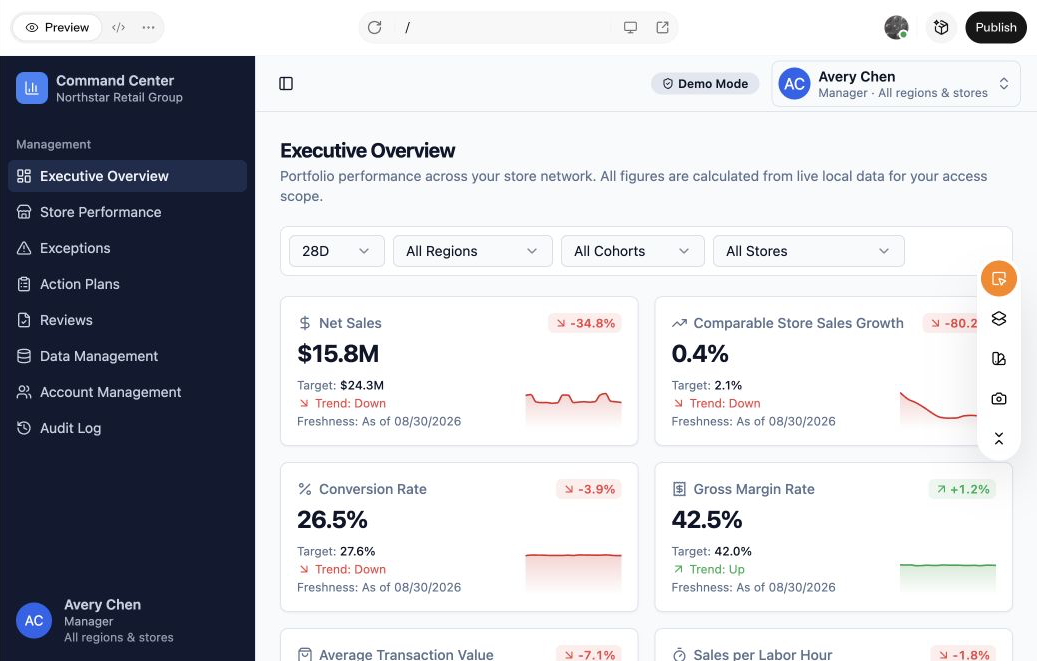
Select Executive Overview and adjust Content and Typography. Keep the heading readable without letting it overpower metrics and outstanding work.
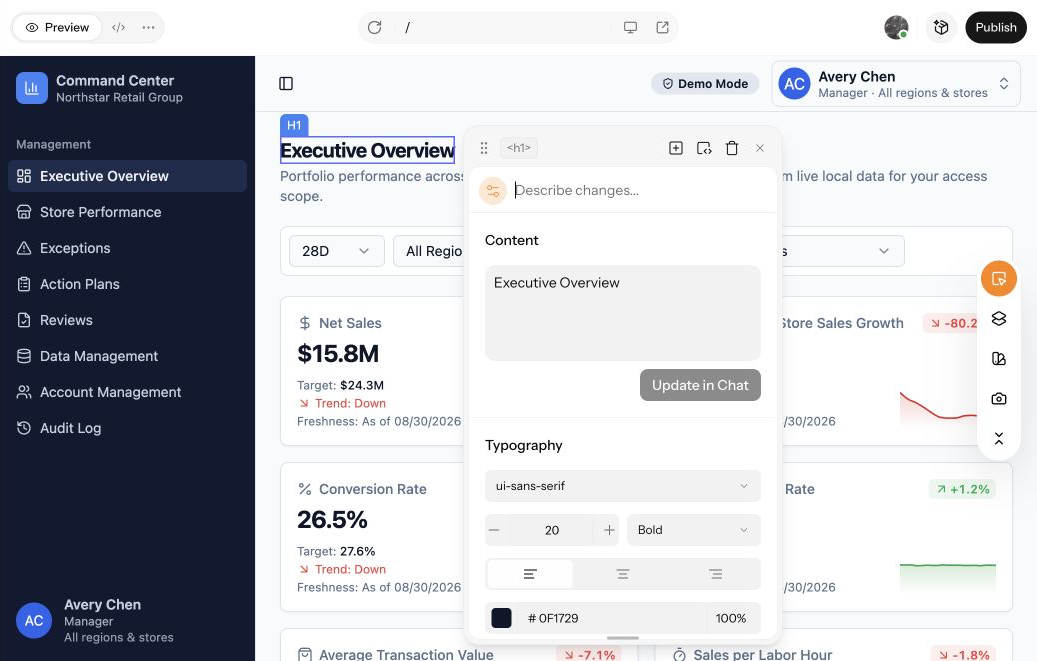
Check the desktop view a manager uses and the mobile view a store operator may use. Publish the trial and ask a colleague to follow one exception through its action and review.
What this example demonstrates: the review shows that the action target was missed despite all tasks being complete. It has not improved the store's margin by itself. It gives the manager the evidence needed to decide what to change next.
Copy the starter prompt
Adapt the team roles, KPI formulas, targets, review cadence, region, currency, and language. Remove pages you do not need.
Open the complete starter prompt
Create a Store Performance Command Center in Enter for a U.S.-based multi-store retailer. Help managers move from a store KPI gap to evidence-backed diagnosis, an owned action plan, and a measured outcome review.

[TARGET USERS]
- Manager: Monitor the portfolio, confirm diagnoses, assign actions, and decide review outcomes.
- Regional Manager: Investigate stores within their region and coordinate corrective work.
- Store Operator: View their store, execute assigned tasks, and submit evidence.
- Administrator: Manage source data, metric definitions, targets, users, and access scope.

[CORE WORKFLOW]
1. Compare store KPIs with explicit targets for the same period and flag material gaps.
2. Open the affected store and trace an exception to its source records, date window, and comparison basis. Show plausible drivers and contradictory or missing evidence.
3. Let a manager confirm the issue and create an action with a specific intervention, owner, baseline, target metric, due date, and acceptance criteria.
4. Track task progress and execution evidence. When ready for review, compare the observed result with the baseline and target, then close, revise, or escalate with a documented reason.

[CORE PAGES]
- Executive Overview: Portfolio KPIs, stores needing attention, open exceptions, overdue actions, and review reminders.
- Store Performance: Rankings, individual store metrics, trends, and links to related exceptions and actions.
- Exceptions: Trigger rules, source records, evidence, driver analysis, and manager decisions.
- Action Plans: Confirmed issue, intervention, owners, dates, tasks, acceptance criteria, and evidence.
- Reviews: Baseline versus target versus actual, execution history, and close/revise/escalate decisions.
- Data Management, Account Management, and Audit Log: Source records, metric definitions, targets, scoped roles, and changes.

[DATA AND BUSINESS RULES]
- Use stable IDs to link stores, daily metrics, targets, exceptions, actions, tasks, and reviews.
- Net sales = gross sales minus discounts and returns. Conversion rate = transactions divided by foot traffic. Gross margin rate = gross profit divided by net sales. Handle zero denominators explicitly.
- Show date range, data freshness, units, formulas, and source links for every KPI. Distinguish percentage-point change from relative percentage change.
- Keep store targets, exception snapshots, action targets, and review windows clearly labelled; do not silently treat them as identical.
- Treat generated diagnoses as hypotheses until confirmed. Recommendations must not automatically create approvals or close cases.
- Require evidence and a conclusion for closure. Revision needs an updated action and deadline; escalation needs an owner and requested decision.
- Demonstrate that all tasks can be complete while a KPI remains below target. Never equate task completion with business success.

[VISUAL DIRECTION AND DELIVERABLES]
- Use a clear internal retail workspace with compact KPI cards, readable tables, visible state labels, and direct links to the next record.
- Support desktop and mobile. Avoid clipped columns, unexplained metrics, and dead-end detail pages.
- Use labelled demo data with internally consistent IDs and dates, USD amounts, and U.S. date conventions.
- Deliver a publishable demo with one complete, traceable store case.

Before building, provide a requirements summary, missing information, page architecture, data model, metric formulas, role permissions, state transitions, and acceptance criteria. Do not begin generating pages yet.
3. Follow replenishment all the way to the receipt
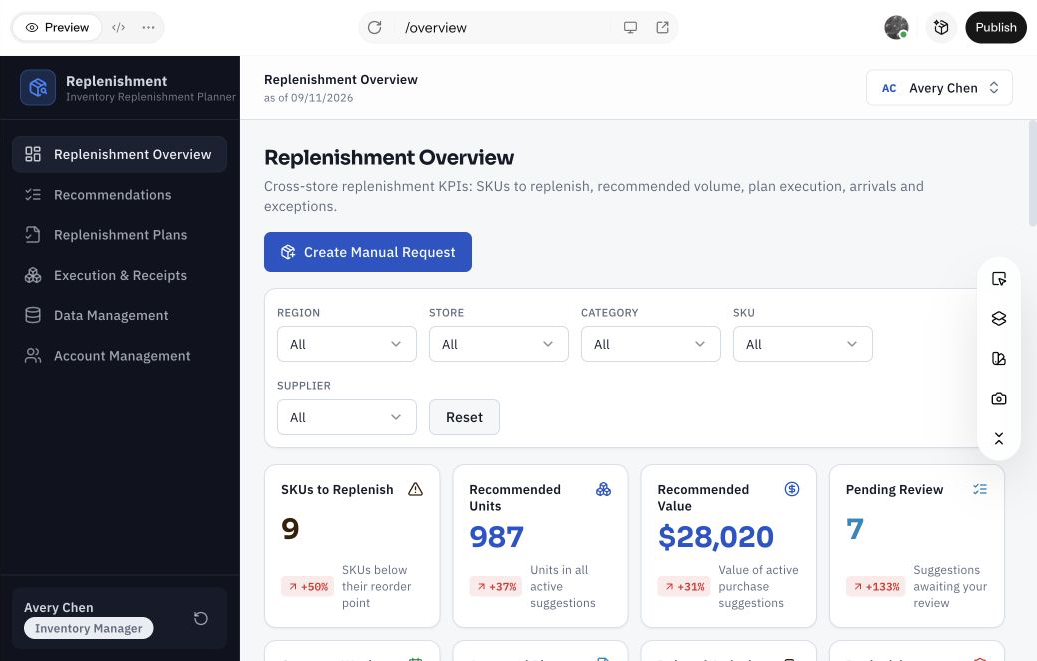
Low stock does not always mean “buy more now.” Another shipment may already be on the way. A calculated quantity may fail a supplier's minimum order or pack-size rules. And a plan for 72 units does not mean the store received 72 units.
Build a replenishment tool that keeps the recommendation, approved plan, actual receipt, and unresolved difference connected.
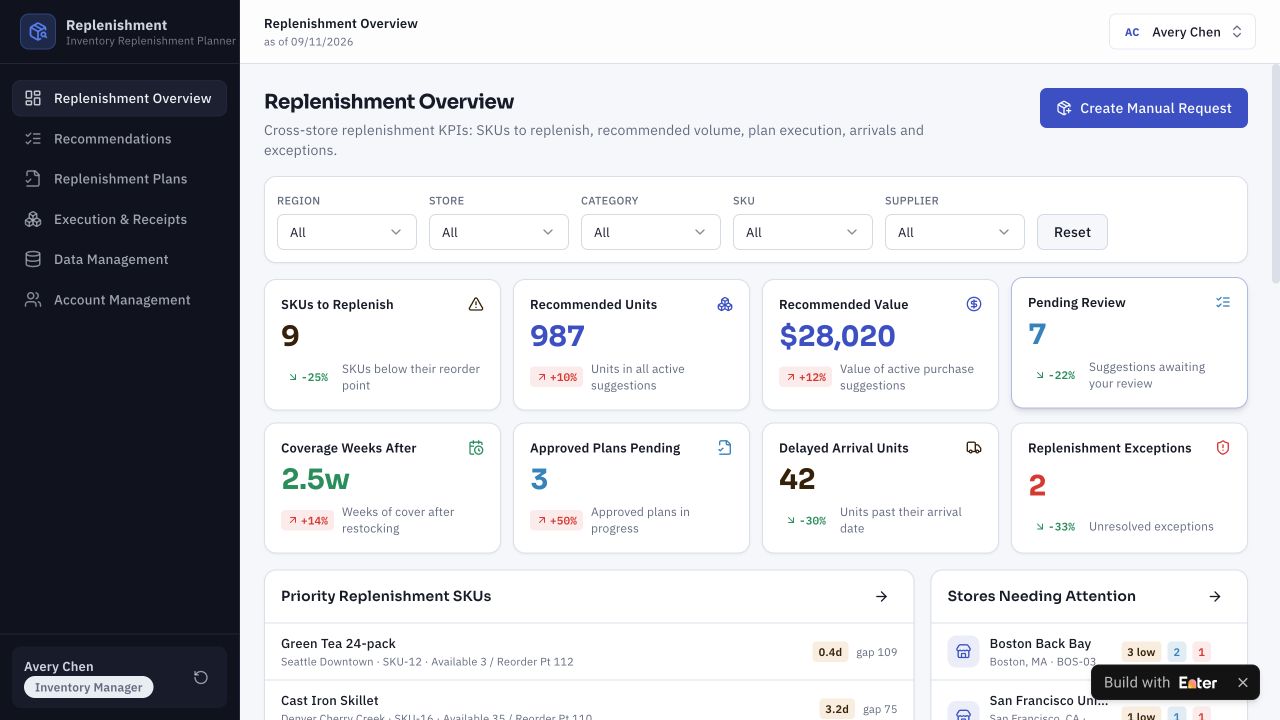
Step 1. Keep the workflow open until the gap is resolved
Structure the work around three questions:
- What is missing? Use available inventory, recent sales, demand, and inbound stock to explain the need.
- What can we supply? Confirm source, operational constraints, budget, and ownership before approval.
- What actually arrived? Record accepted receipts and assign any shortage, damage, or delay for follow-up.
Upload the replenishment input brief, or supply your own records. Describe the planning cycle, lead times, safety-stock rules, and which inbound shipments are eligible to count. Those details belong alongside the calculation—not in a separate document someone has to hunt down.
Step 2. Generate the first version
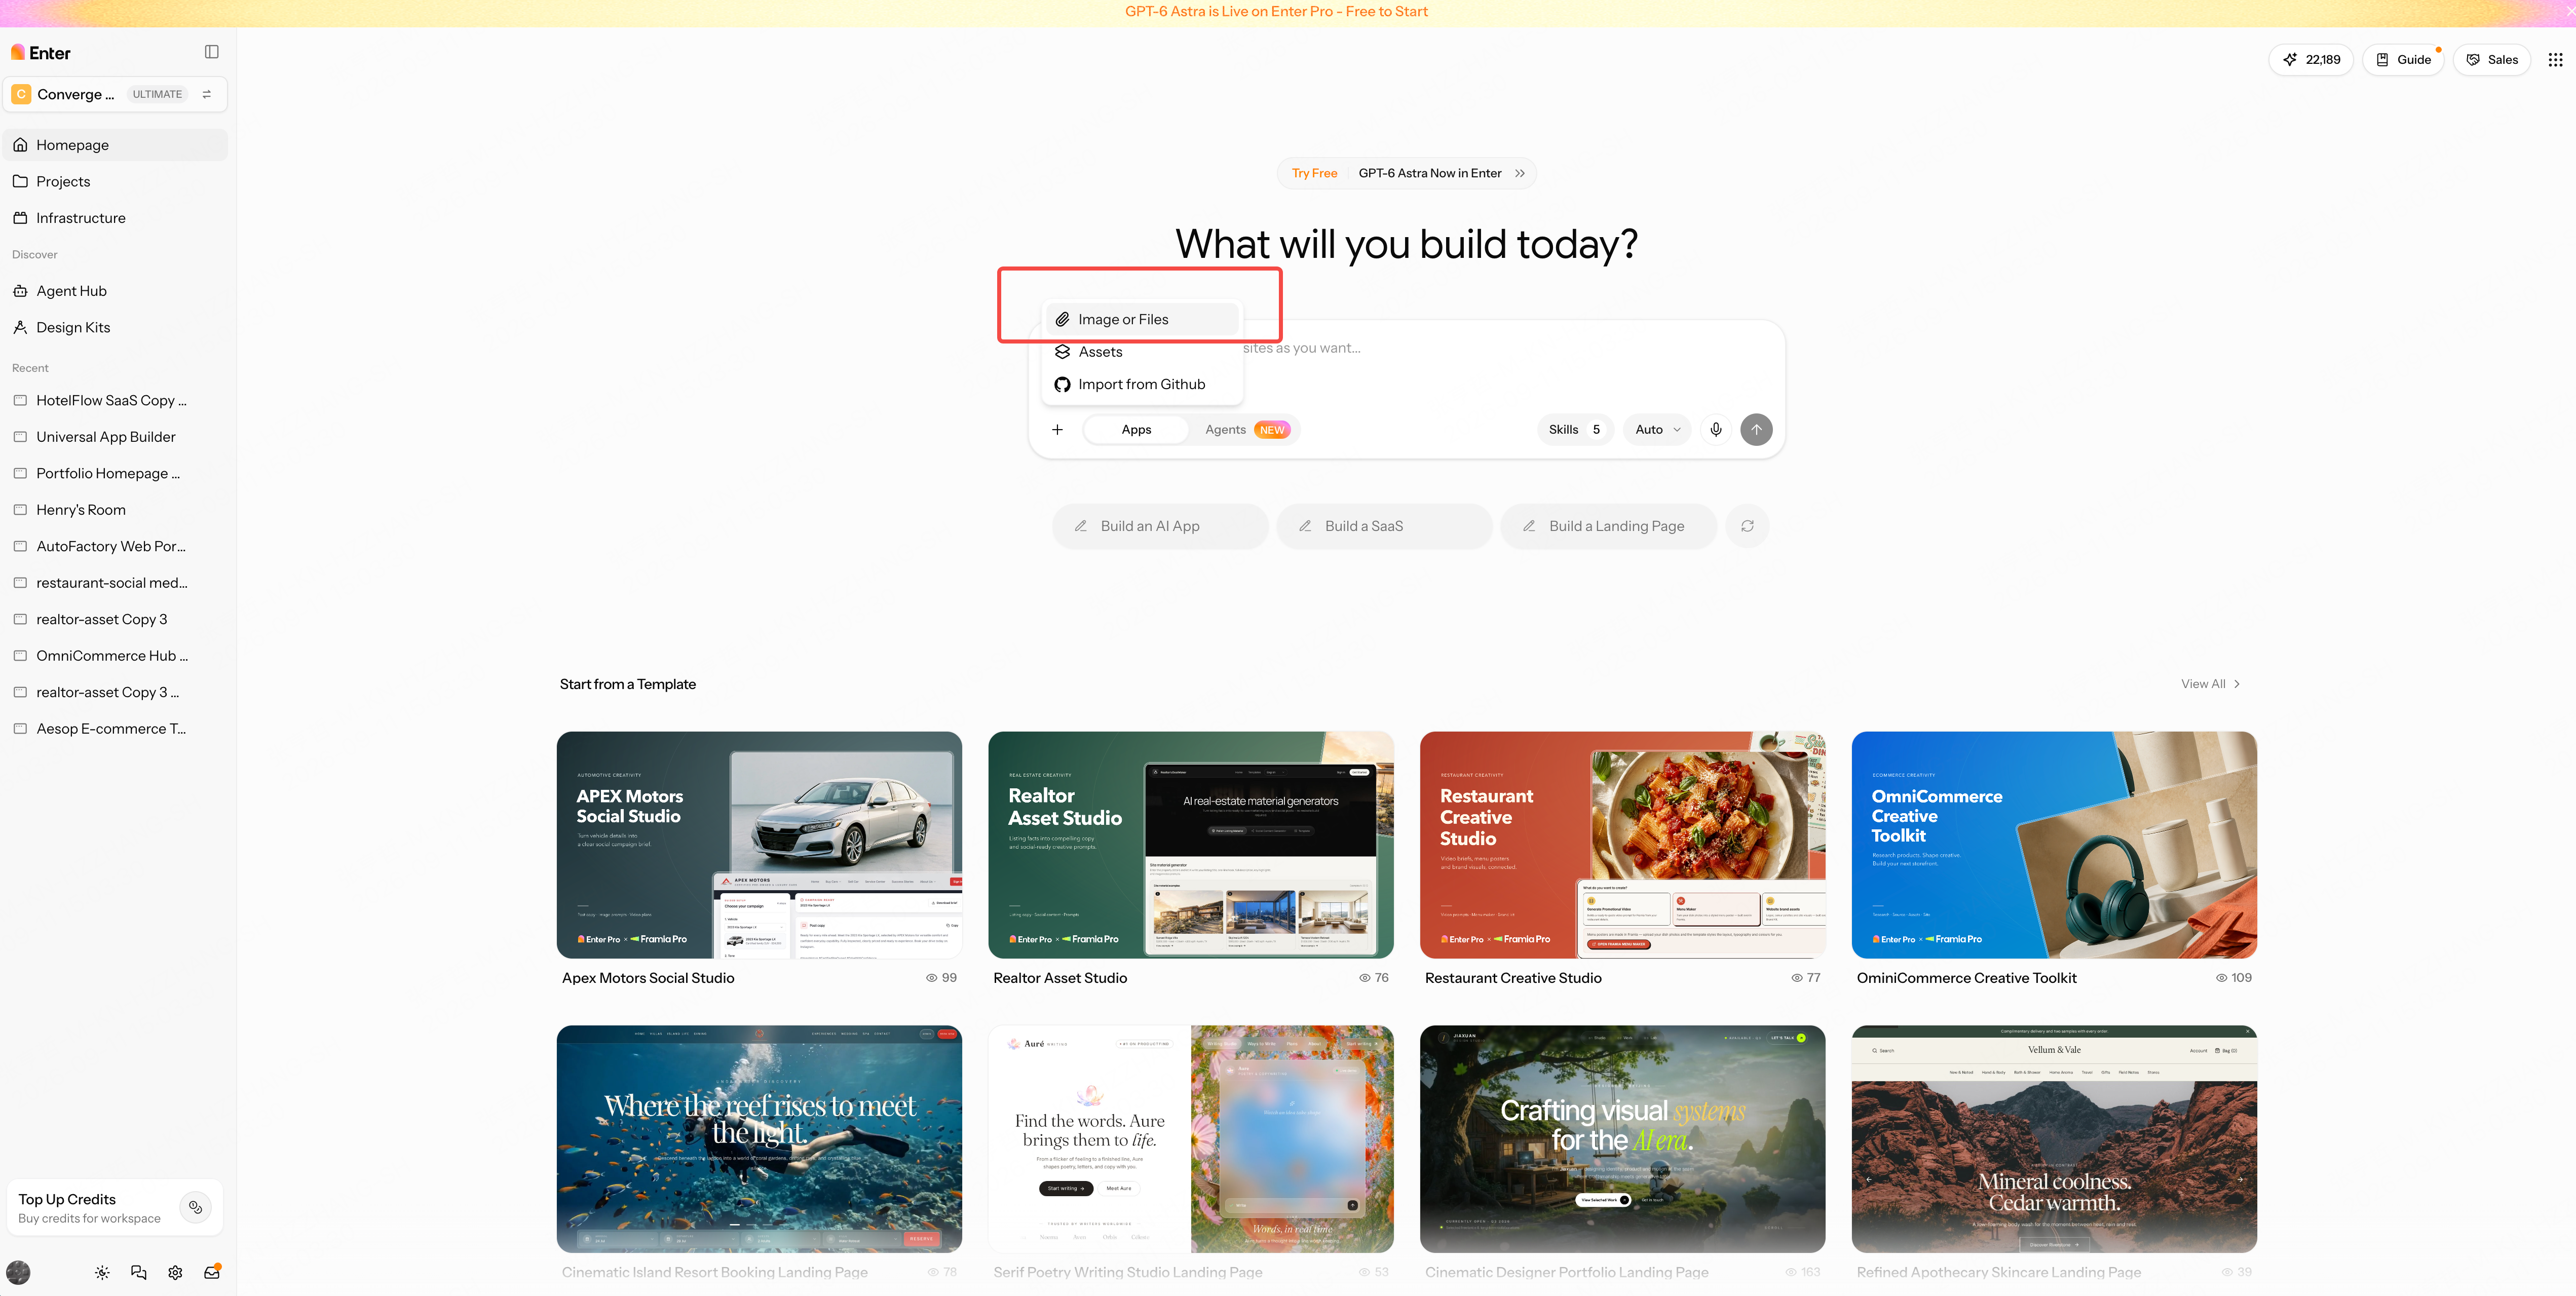
Open Enter, select New Project, add files using +, and submit the starter prompt. Review the proposed workflow and calculation rules, then choose Build Now.
Step 3. Make suggested, planned, and received quantities distinct
3.1 Explain the shortage calculation
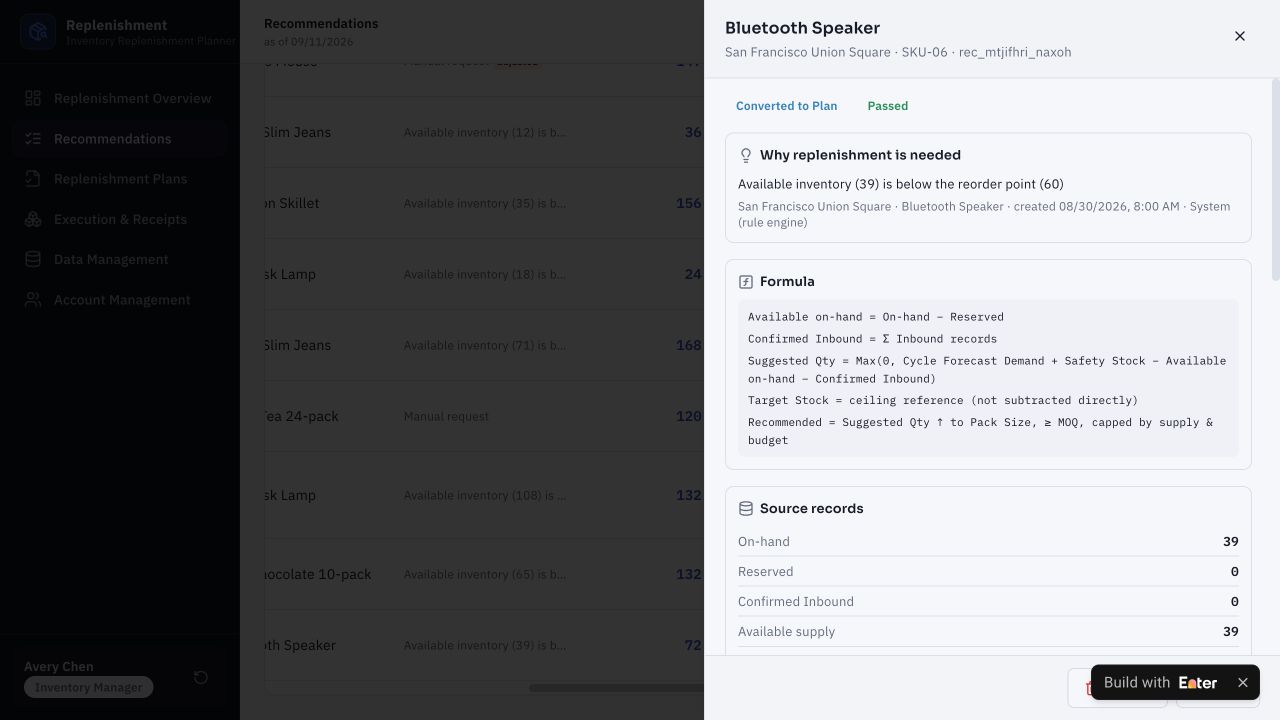
If stock is already in transit, ignoring it can lead to duplicate purchasing. Counting it without checking its arrival date can hide an imminent stockout. Show both the quantity and timing of eligible inbound supply.
Calculate replenishment needs using available stock, eligible inbound quantities and arrival dates, demand, lead time, and safety stock. Show the formula and source values. Flag missing inputs instead of inventing them.
Use your actual cycle, lead time, safety stock, and inbound eligibility rules. The manager should be able to expand a recommendation and understand why that quantity is needed now.
3.2 Turn an approved recommendation into a feasible plan
Theoretical demand is not the same as something a supplier can ship. Add minimum order quantities, pack multiples, supply limits, and budget checks before approval.
Validate pack multiples, minimum order quantities, supply availability, and budget before approval. Convert an approved recommendation into a linked purchase or transfer plan with quantity, source, cost, owner, and expected arrival. Prevent duplicate conversion.
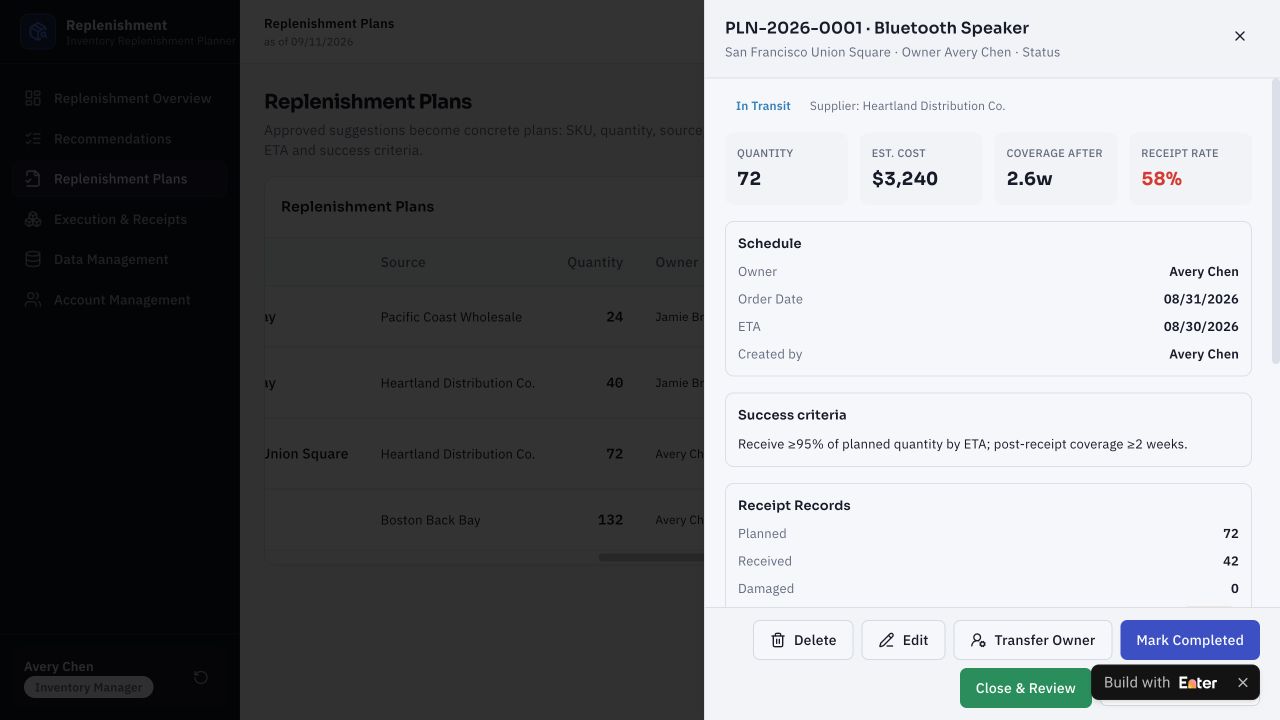
A valid plan should retain the approved quantity, source, cost, owner, and expected arrival. It should also link back to the recommendation and prevent a second conversion from creating duplicate work.
3.3 Update stock from what the store accepted
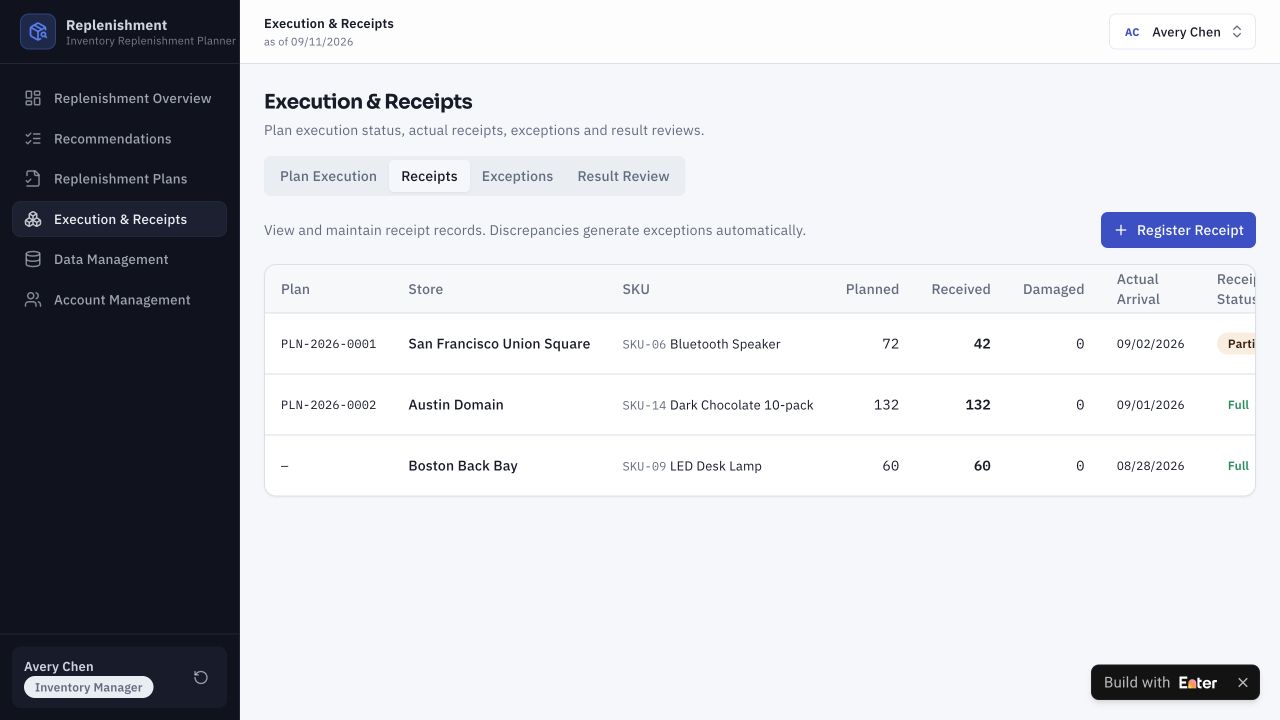
A shipment notice is not a receipt. Add only accepted units to inventory, account for damaged goods, and leave any outstanding difference visible with a named owner.
Link receipts to the original plan. Increase stock only by accepted received units, and prevent double-counting repeated receipt submissions. Track shortages, damage, and delays as linked exceptions with owners and resolution status.
Specify who records receipts and who follows up on shortages. Re-submitting the same receipt must not increase stock twice.
Step 4. Trace a partial speaker delivery
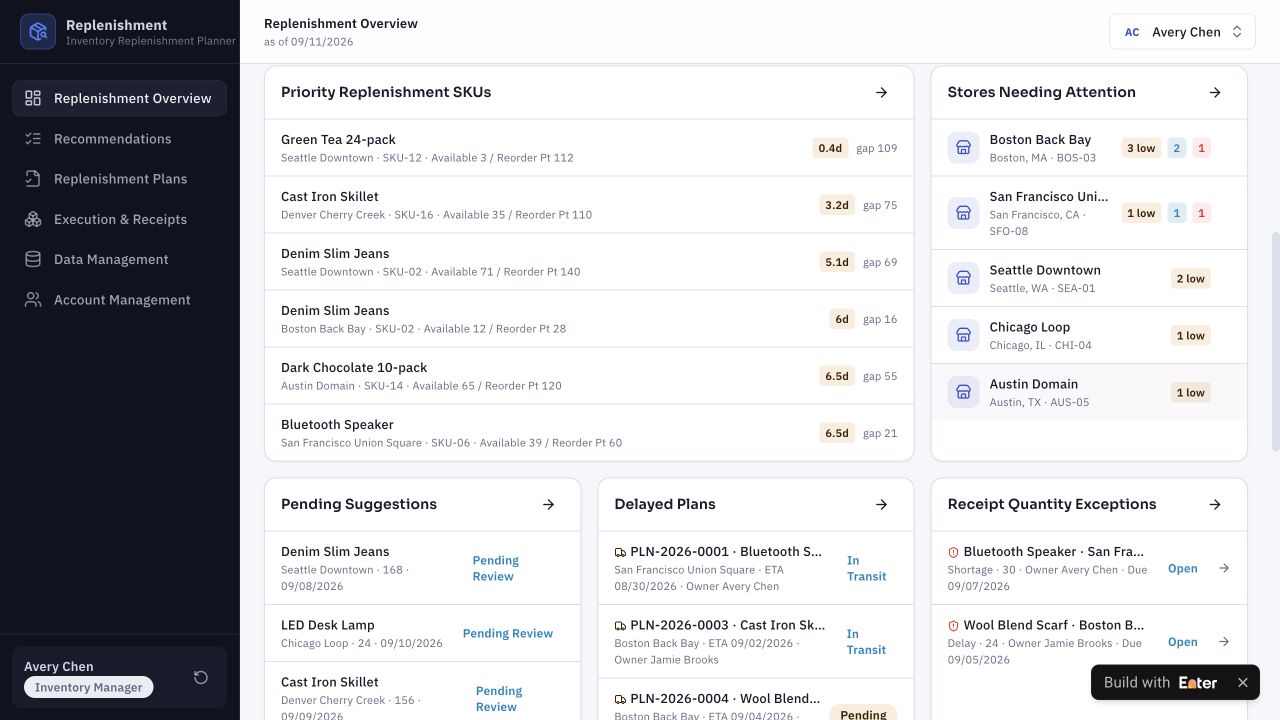
Select Avery Chen, the inventory manager, and find Bluetooth Speaker — SKU-06 at San Francisco Union Square.
4.1 Open the recommendation
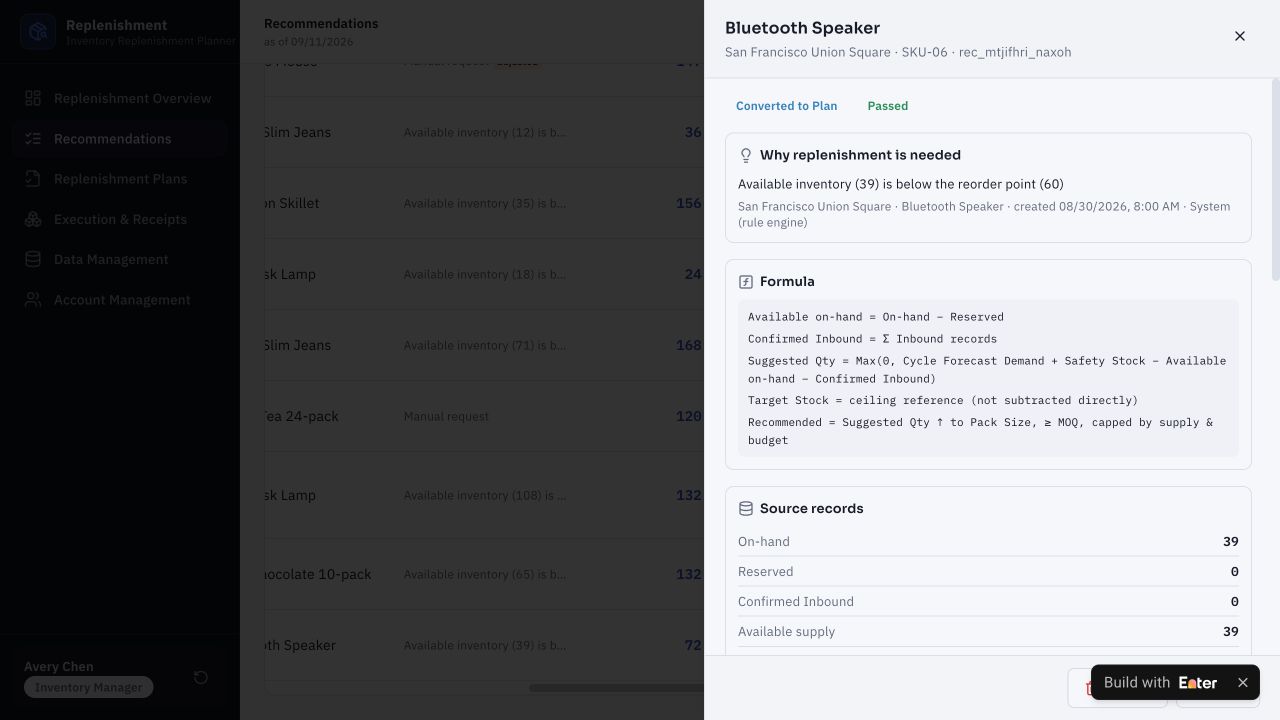
In Priority Replenishment SKUs, check 39 available units against the 60-unit reorder threshold. The threshold signals the need to investigate; it is not, by itself, the calculation for the final order quantity.
In Recommendations, locate the record marked Converted to Plan. Use Record Chain to open PLN-2026-0001.
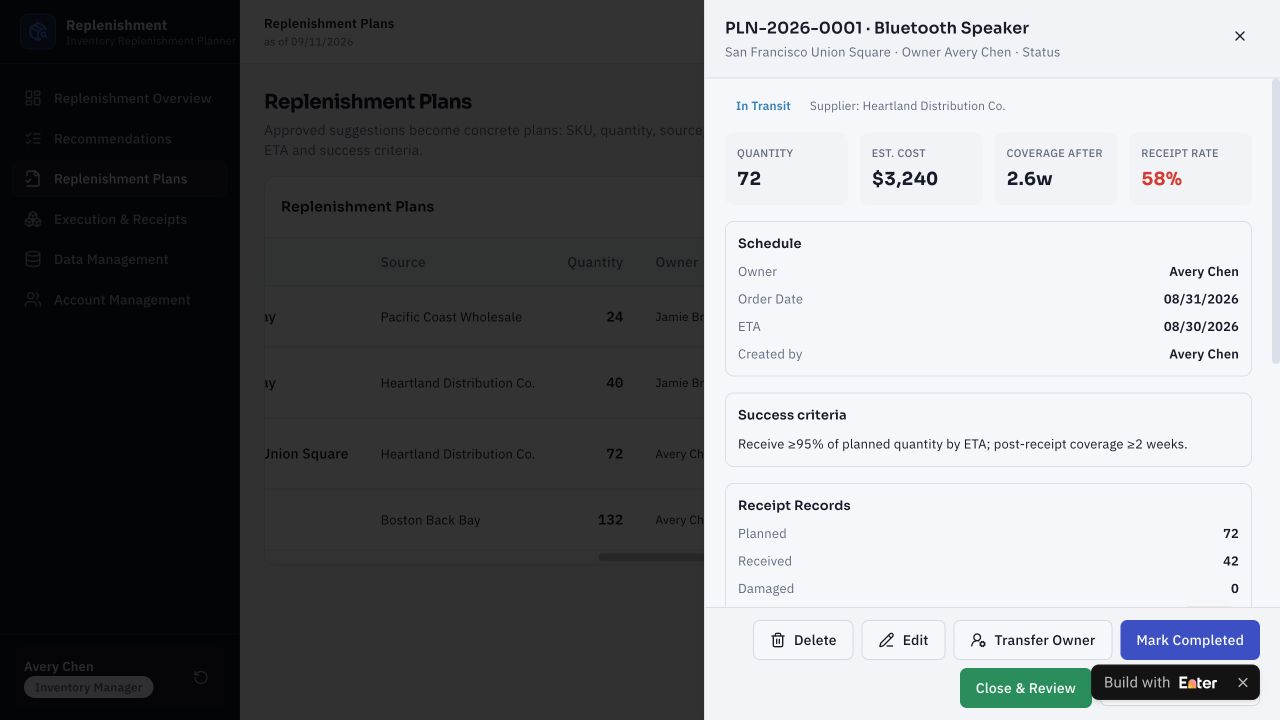
4.2 Check the purchase plan
The plan calls for 72 units at an estimated cost of $3,240, owned by Avery Chen. Review the supplier details and receipt acceptance requirements.
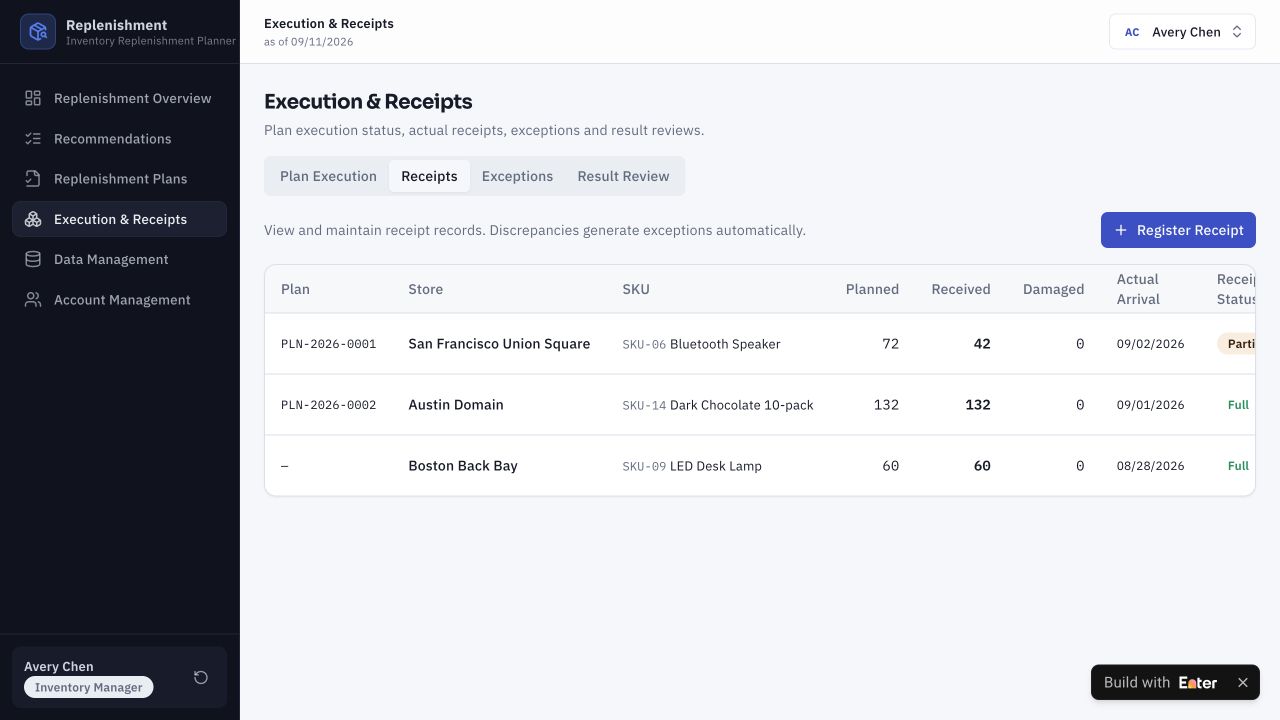
4.3 Check the difference after delivery
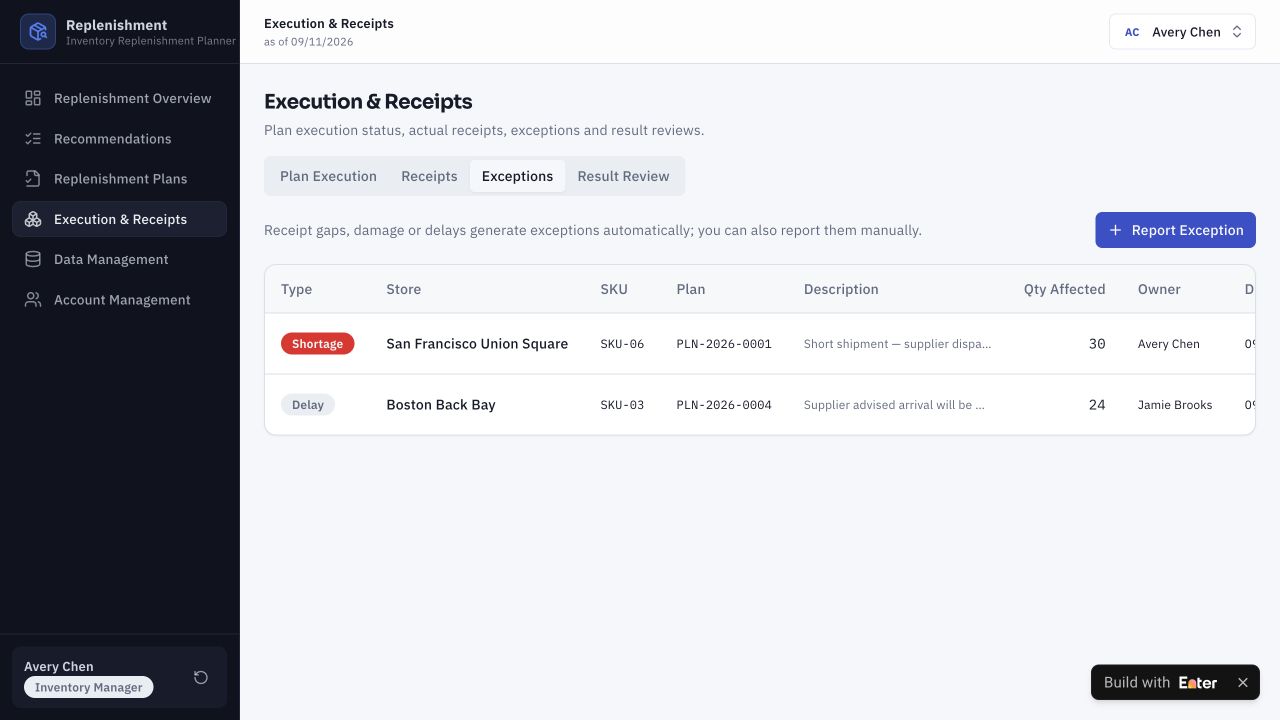
In Execution & Receipts, confirm that only 42 units were received.
In Exceptions, find the 30-unit shortage. It should remain unresolved, linked to the original plan, and assigned to Avery Chen.
Step 5. Design for purchasing and the receiving store
Use Preview → Select to Edit → Visual Edit to bring urgent stock gaps and incomplete receipts forward.
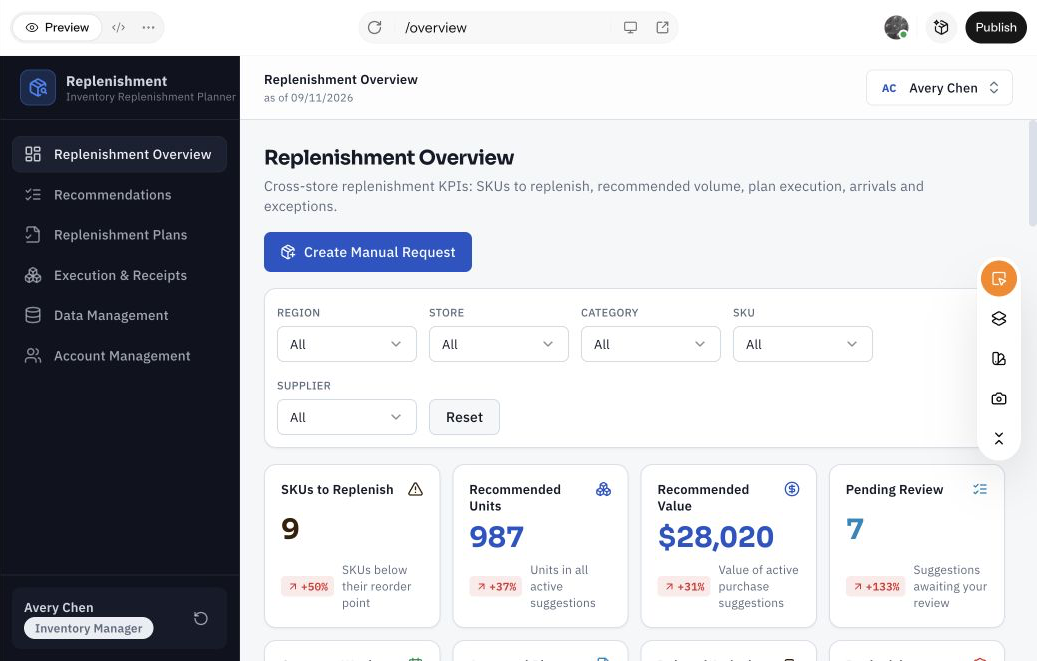
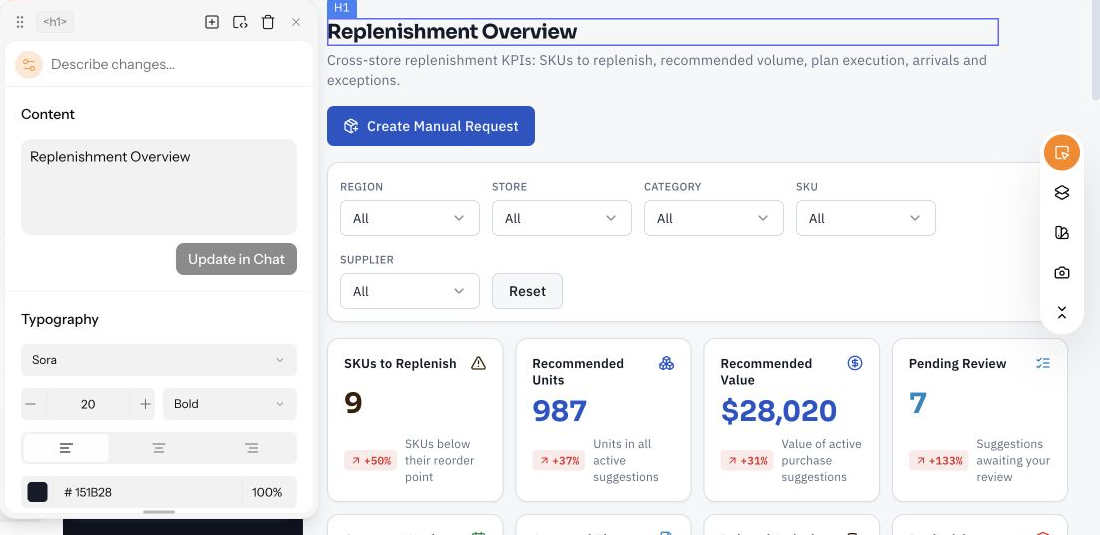
Select Replenishment Overview and adjust Content and Typography. Planned and received quantities should be easy to distinguish.
Check desktop for purchasing and mobile for store receiving, then publish a trial. Ask someone to follow a short delivery back to its plan and owner.
What this example demonstrates: the missing 30 units have not disappeared behind a “received” label. The shortage is not solved yet, but purchasing and the store can work from the same record instead of repeatedly reconciling separate lists.
Copy the starter prompt
Use your own planning cycle, safety stock, supplier minimums, pack sizes, budget rules, and approval roles. Replace the 72/42-unit example if you want to validate a different receipt case. Adapt the locale and currency too.
Open the complete starter prompt
Create an Inventory Replenishment Planner in Enter for a U.S.-based multi-store retailer. Connect store-level inventory shortages to explainable recommendations, human approval, concrete supply plans, receipts, and exception resolution.

[TARGET USERS]
- Inventory Manager: Review recommendations, approve or return them, assign plans, and review outcomes.
- Store Operator: Confirm local needs, request adjustments, and record actual receipts.
- Procurement or Transfer Coordinator: Confirm supply source, delivery dates, and shipment exceptions.
- Administrator: Maintain products, stores, suppliers, rules, costs, and scoped user access.

[CORE WORKFLOW]
1. Identify SKU-store positions below configurable reorder thresholds using inventory, sales history, and expected demand.
2. Explain the suggested quantity and source, check operational constraints, and let operators confirm or adjust the request before manager review.
3. Convert an approved recommendation into a plan with SKU, quantity, source, target store, owner, order date, ETA, and measurable acceptance criteria.
4. Record receipts, compare planned and actual quantities, assign shortage/damage/delay exceptions, and close only after the result has been reviewed.

[CORE PAGES]
- Replenishment Overview: Shortage candidates, suggested quantities and value, pending reviews, delayed arrivals, and unresolved exceptions.
- Recommendations: Trigger reasons, source records, transparent quantity calculation, feasibility checks, and human review.
- Replenishment Plans: Approved plans, source, target, owner, schedule, costs, and receipt progress.
- Execution & Receipts: Plan execution, receipt registration, exceptions, and result review.
- Data Management: Products, stores, inventory, sales, inbound supply, suppliers, costs, and replenishment rules.
- Account Management: Role permissions and store-level access.

[DATA AND BUSINESS RULES]
- Use stable IDs to link inventory positions, recommendations, approvals, plans, receipts, exceptions, and reviews.
- Available inventory = on-hand minus reserved inventory.
- Raw suggested quantity = max(0, cycle forecast demand + safety stock - available inventory - confirmed inbound).
- Apply packaging, MOQ, supply capacity, and budget rules in an explicit order. Show the value before and after every adjustment. Do not hide a mismatch behind a final recommended number.
- Distinguish reorder thresholds, target-stock ceilings, cycle demand, and safety stock.
- Avoid double-counting inbound stock and duplicate plans. Preserve the original approved plan when new data arrives.
- Validate date order and receipt quantities. Flag inconsistent or missing source data rather than silently treating it as valid.
- Receipt gaps must remain traceable to the original plan. Require an owner, deadline, and resolution evidence for each exception.
- Suggestions are advisory. Never place orders, approve requests, or mark receipts complete automatically.
- Include a demo case with a partial receipt: 72 planned, 42 received, and a 30-unit shortage still requiring follow-up.

[VISUAL DIRECTION AND DELIVERABLES]
- Use a clear internal operations workspace with readable quantity comparisons, status badges, and direct links between related records.
- Support desktop and mobile, with usable tables and detail panels.
- Use labelled demo data with consistent IDs and dates, USD values, and U.S. date conventions.
- Deliver a publishable demo that makes the difference between suggested, planned, and received inventory unmistakable.

Before building, provide a requirements summary, missing information, page architecture, data model, calculation rules, role permissions, state transitions, and acceptance criteria. Do not begin generating pages yet.
4. Turn customer feedback into owned follow-up
Open the customer feedback demo
“Poor service” could mean a long queue, an unexplained return policy, or a cashier who never answered a question. A sentiment label helps organize feedback, but it does not tell a store what to fix.
This workspace connects recurring topics to the customer's original words, the team responsible for follow-up, and a documented resolution. It also keeps two different questions separate: has the customer been helped, and has the underlying operational task been completed?
Step 1. Connect understanding, ownership, and resolution
Map the workflow as read and verify → assign and act → record the outcome.
Use the feedback input brief, or provide appropriately anonymized examples from your own channels. Describe the categories you use, which team handles each type of issue, and which stores each role may access. Keep original wording and source details alongside any summary.
A reply, an investigation, and a store-training task can all come from the same complaint. They should be linked, but their statuses should not be interchangeable.
Step 2. Generate the first version
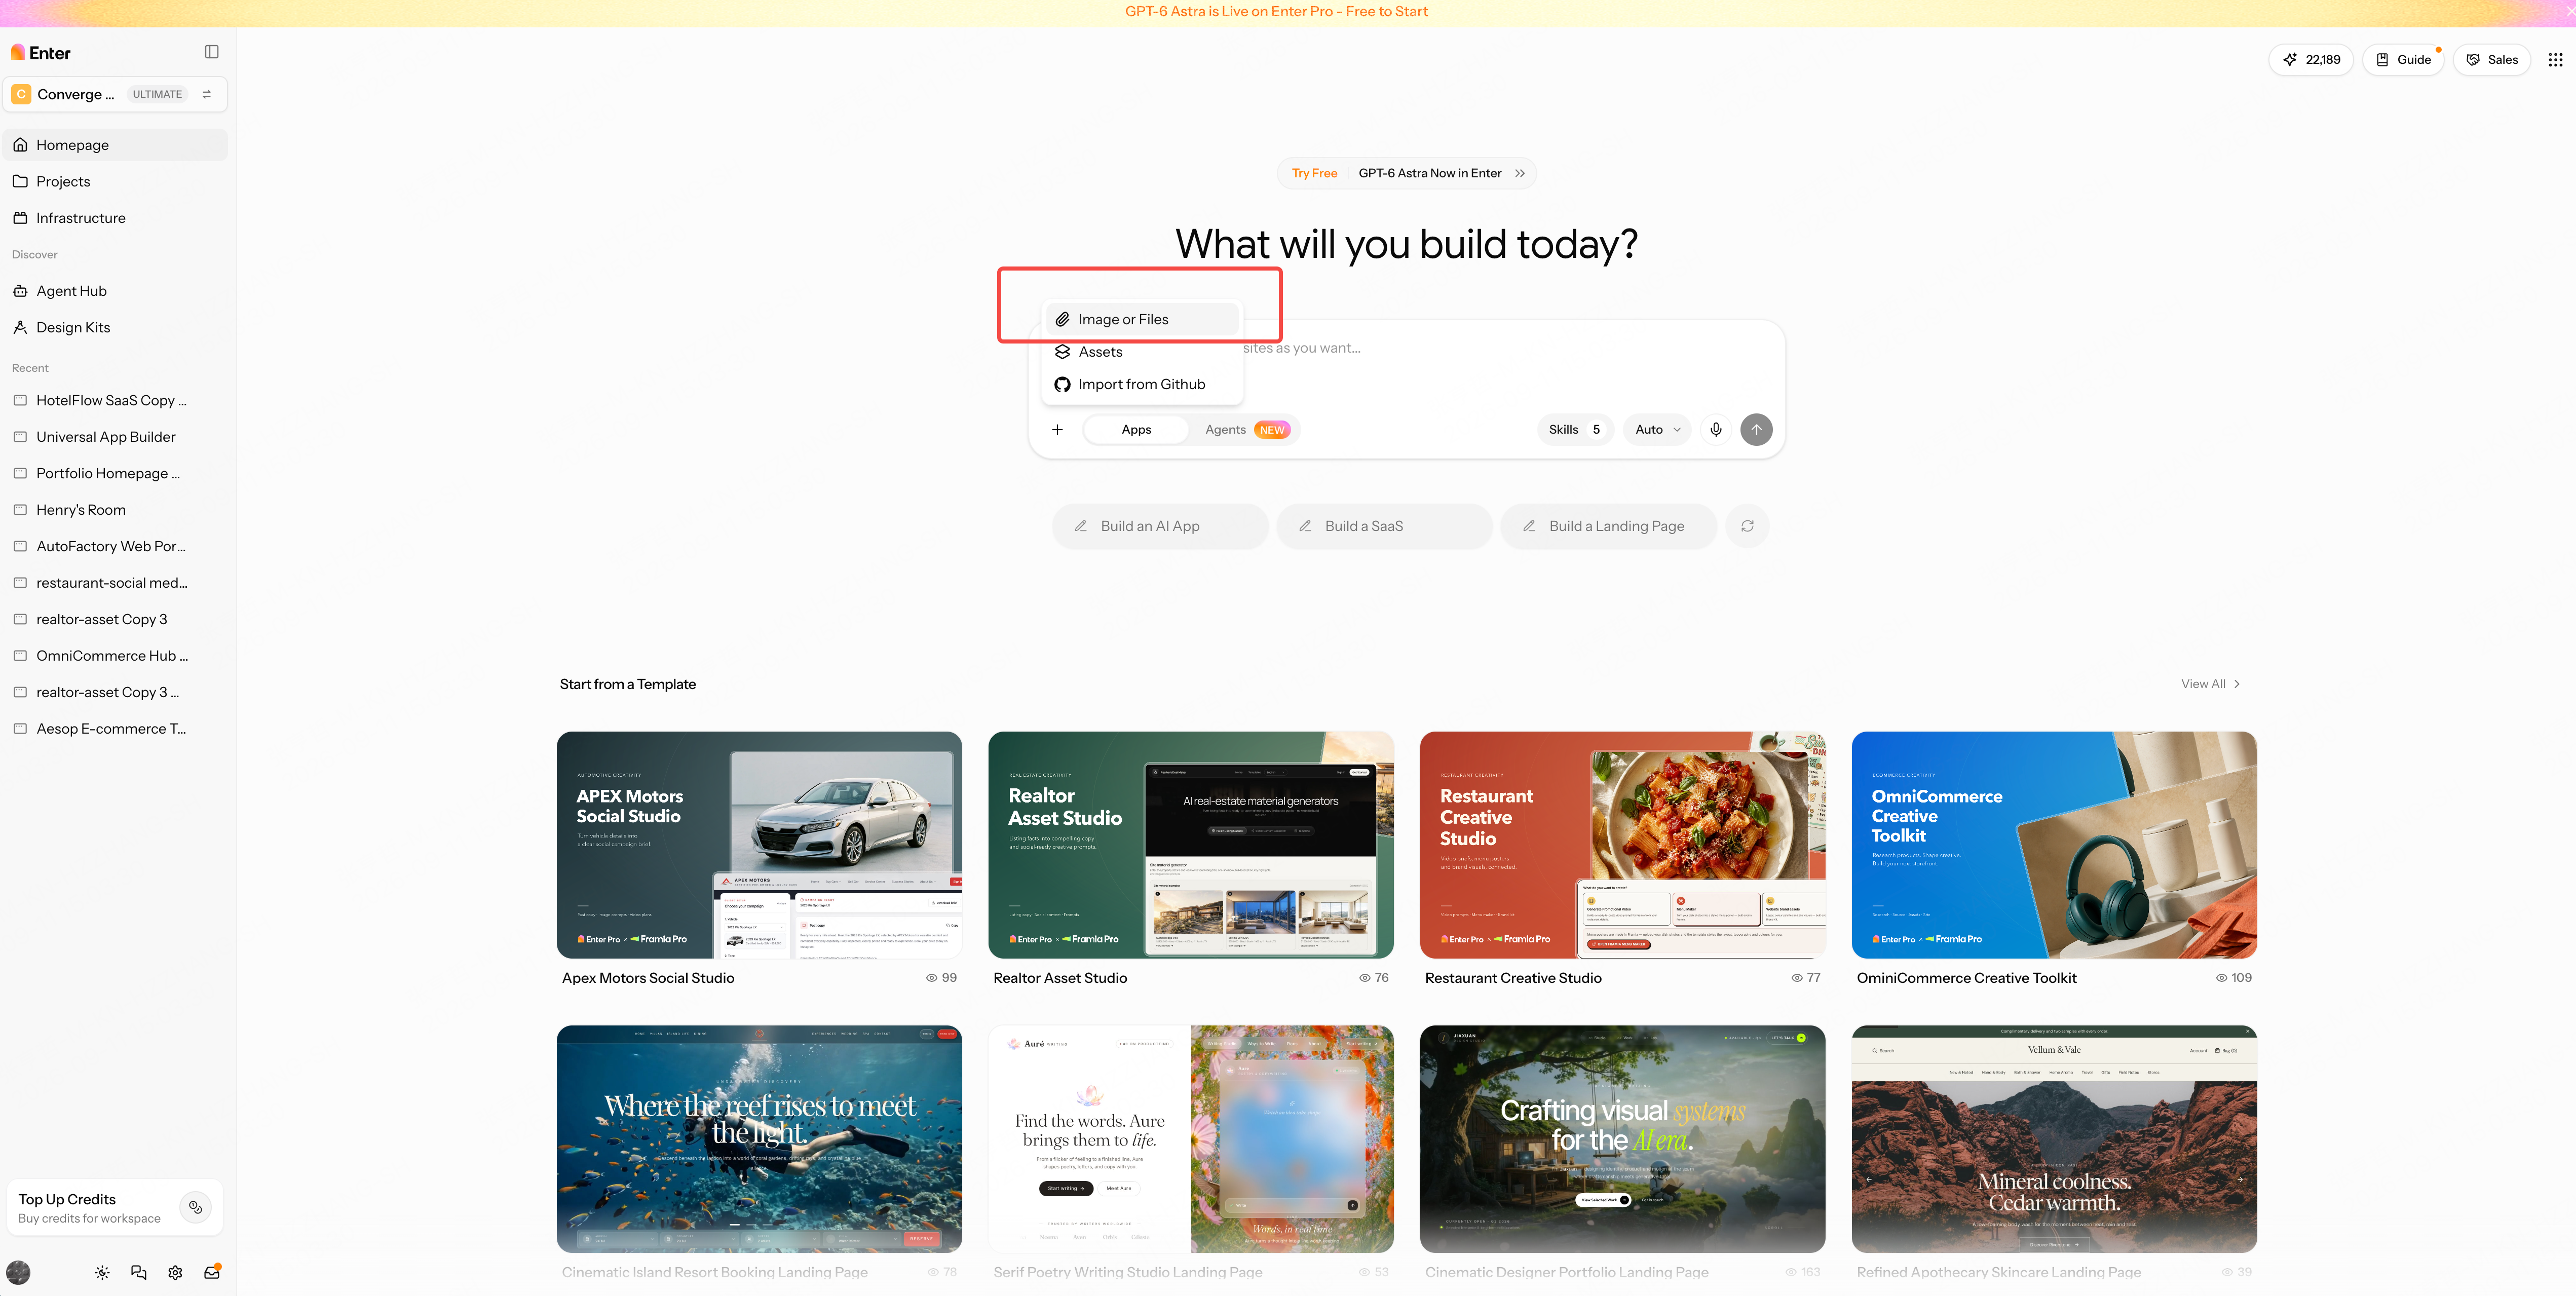
In Enter, select New Project, add the files with +, and submit the starter prompt. Check the proposed roles, topic structure, and closure rules before choosing Build Now.
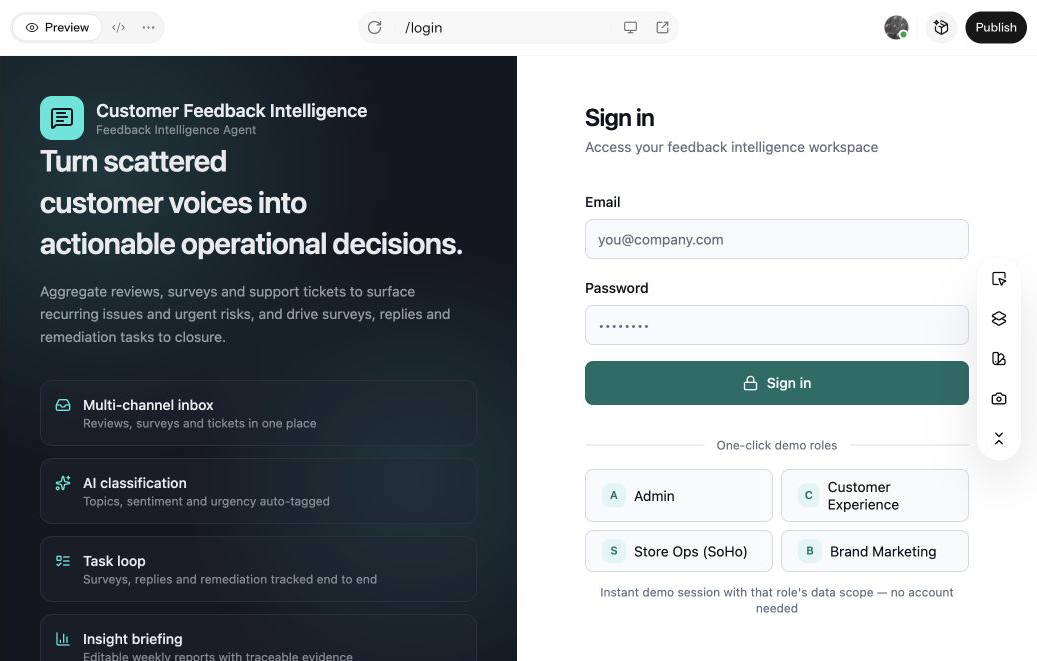
Step 3. Keep the evidence attached to the work
3.1 Group complaints without losing their meaning
Use topics to find patterns, but let people open the original feedback before deciding what to do. AI classifications should be editable, and uncertainty should remain visible.
Group feedback into topics while preserving original text, channel, timestamp, store, and rating. Link each topic to its source records. Make AI labels editable and show uncertainty; do not invent missing product or customer details.
Replace the channels and categories with your own and specify which source fields must be retained. The expected result is a useful summary with a direct way to check it—not a summary that replaces the evidence.
3.2 Assign a task, not another forwarded message
A complaint forwarded to a group may be widely read and still have no owner. Create the follow-up from the feedback or topic itself, with evidence, a deadline, and a clear expected resolution.
Create tasks linked to feedback or topics with an owner, deadline, task type, and expected resolution. Keep source evidence accessible. Enforce role and store access on both records and actions.
Set the receiving team and store-access scope to match your business. The owner should be able to understand the issue without asking someone to retell it, while unauthorized stores' records remain inaccessible.
3.3 Separate the customer response from internal remediation
The customer may have received an explanation or refund while staff training is still outstanding. Closing one record must not quietly close the other.
Keep feedback handling status separate from remediation task status. Closing a task requires an explicit user action and a saved resolution note describing the work and outcome. Keep unresolved and overdue work visible; do not auto-send customer replies.
Define who confirms closure and what the resolution note must contain. Keep unresolved and overdue tasks visible, and do not send customer replies automatically.
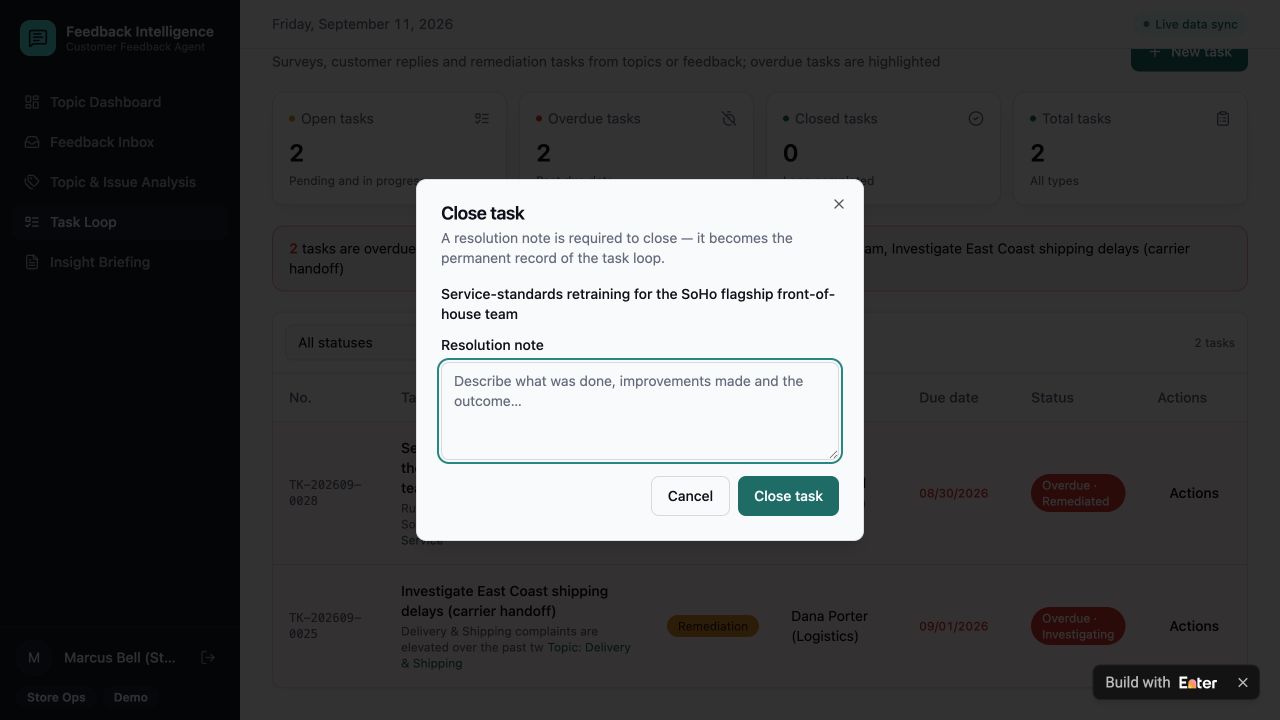
Step 4. Follow a service complaint to its training task
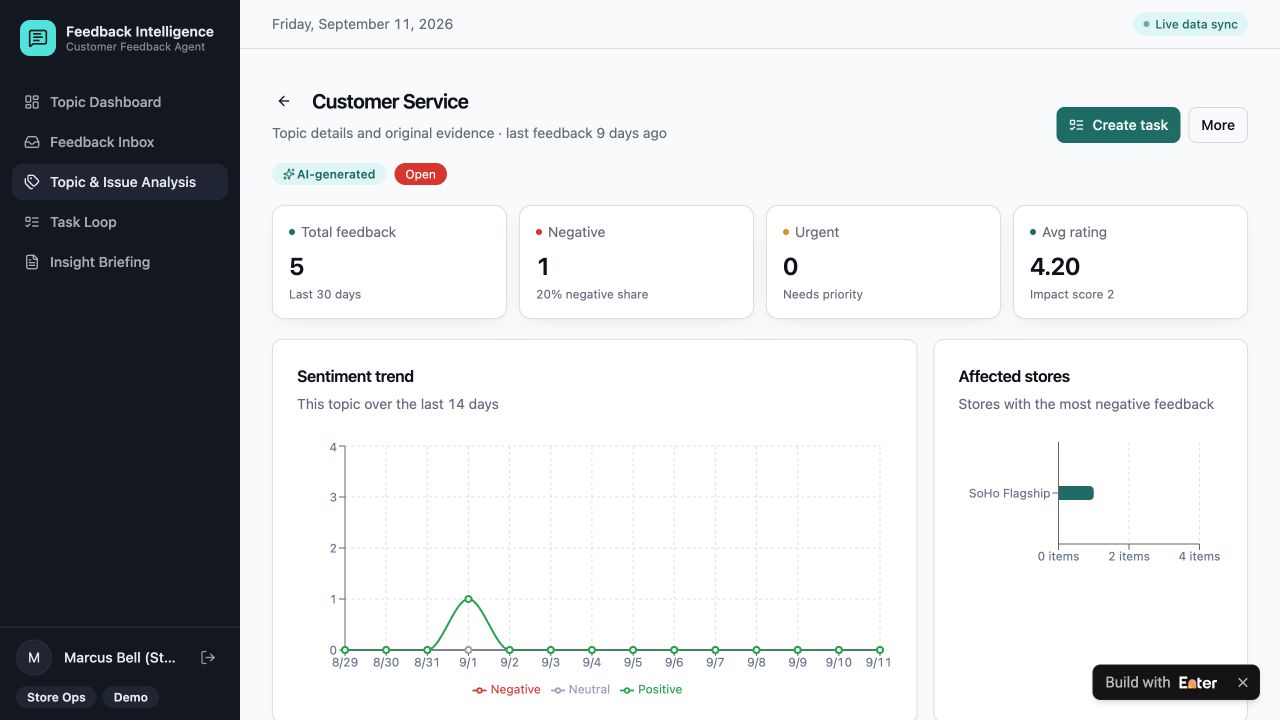
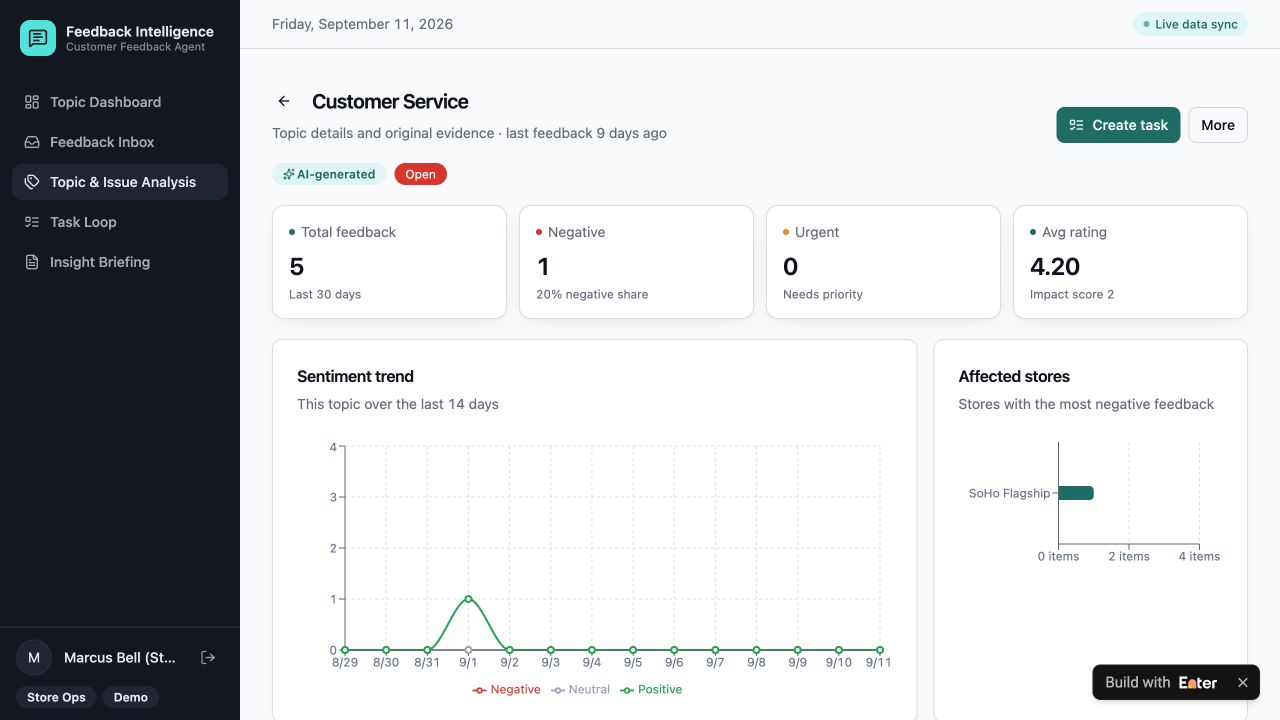
Select Marcus Bell, the store operator, and inspect SoHo Flagship.
4.1 Read the original complaint
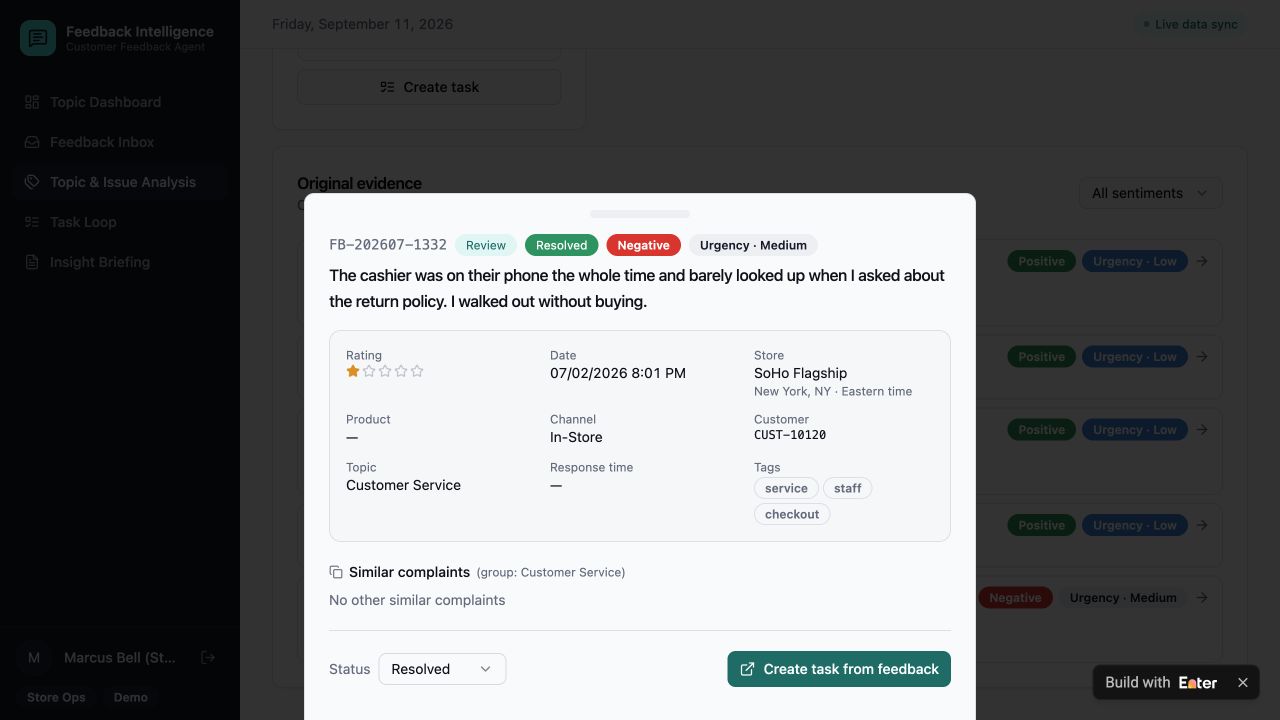
Under Customer Service, find the store and select Original evidence.
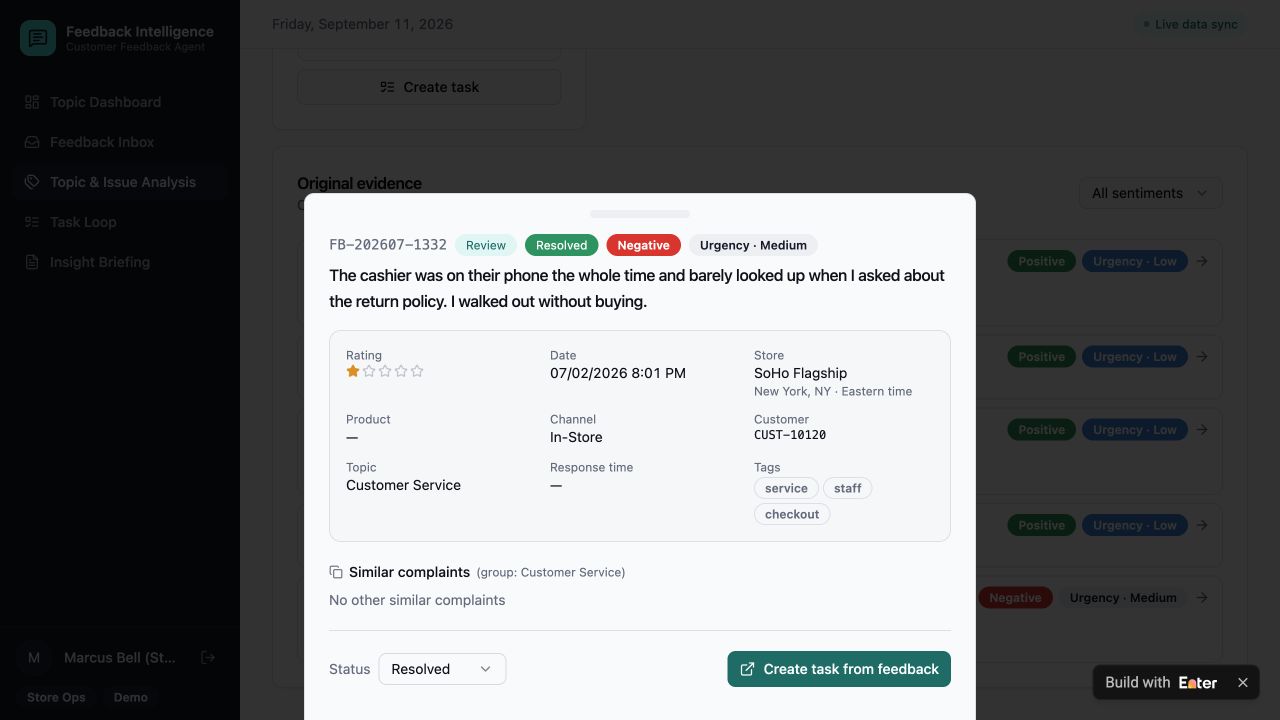
Open FB-202607-1332. The customer reported asking about the return policy while the cashier looked at their phone and did not respond; the customer left without purchasing. Verify that wording in the record rather than relying on a generic negative-service label.
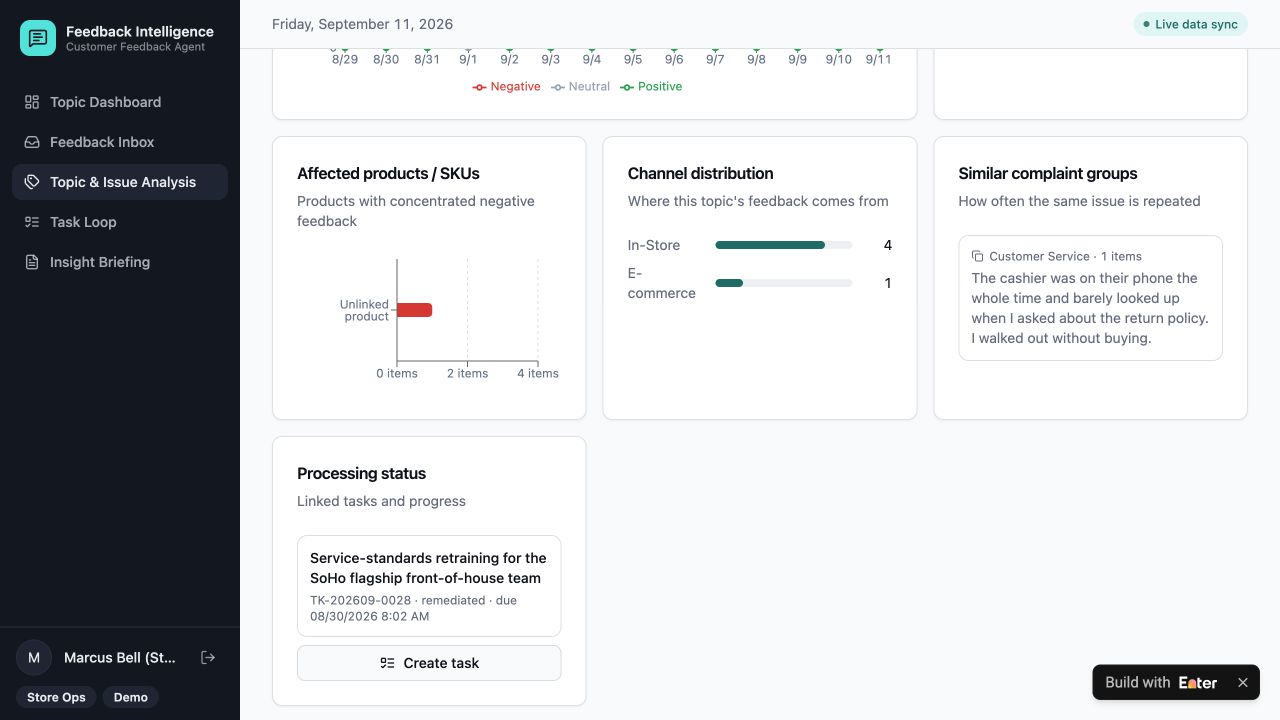
4.2 Find the internal follow-up
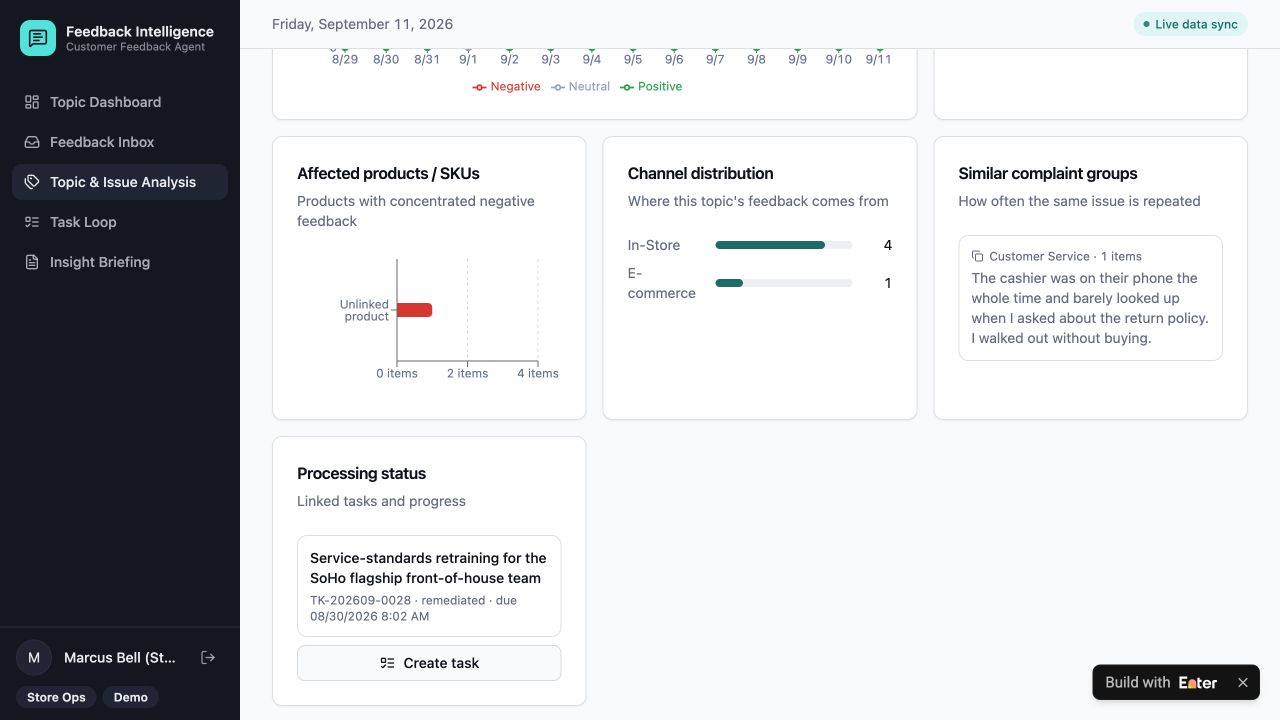
Through Processing status, open training task TK-202609-0028, owned by Marcus Bell. Its status is Overdue · Remediated: remediation progress is recorded, but formal closure is still outstanding.
4.3 Inspect what closure requires
Open Close and record resolution. A Resolution note is required before the task can close. In the captured example, the feedback is resolved but the training task remains open.
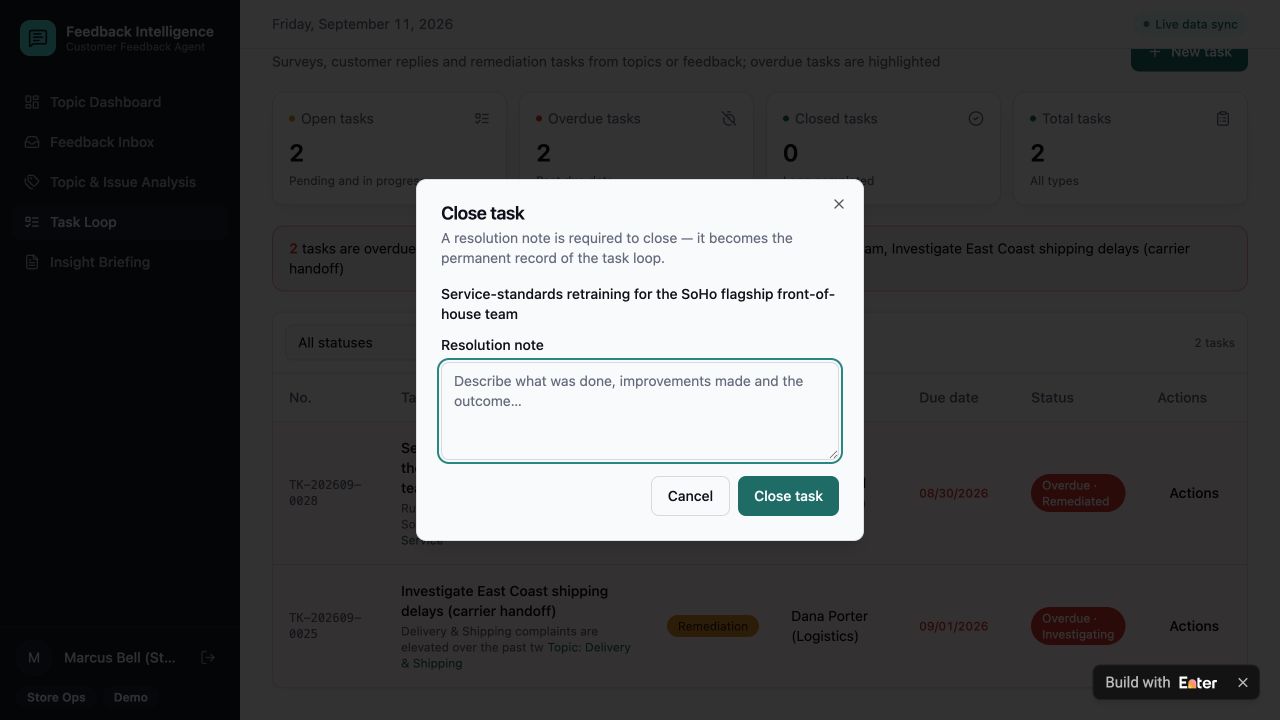
Step 5. Make both the complaint and the next action readable
In Preview → Select to Edit, use Visual Edit to organize topics, original feedback, and processing status.
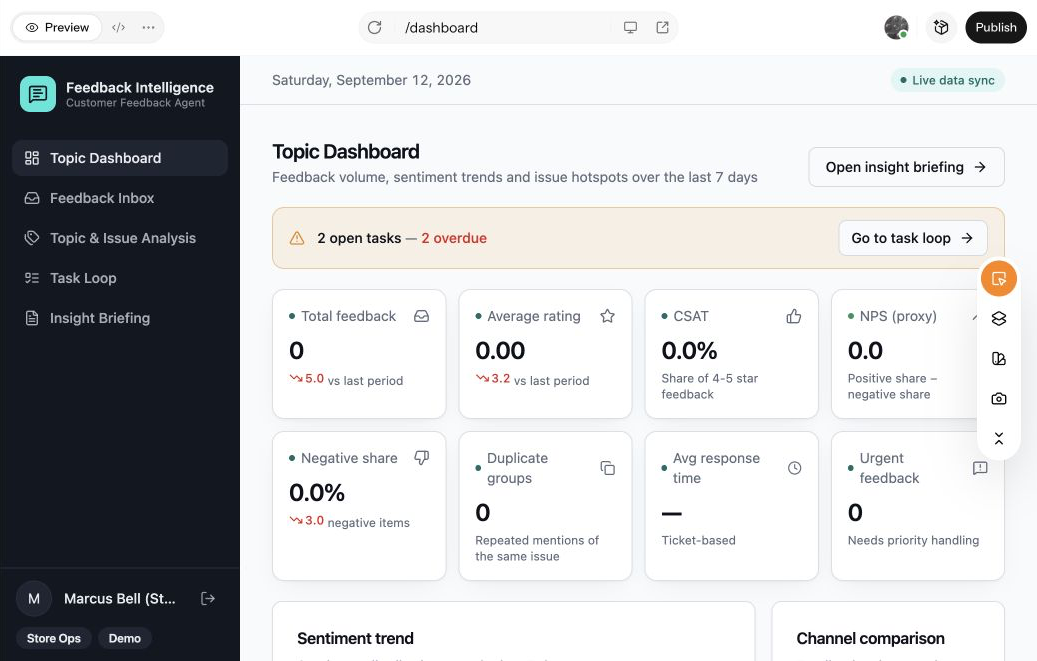
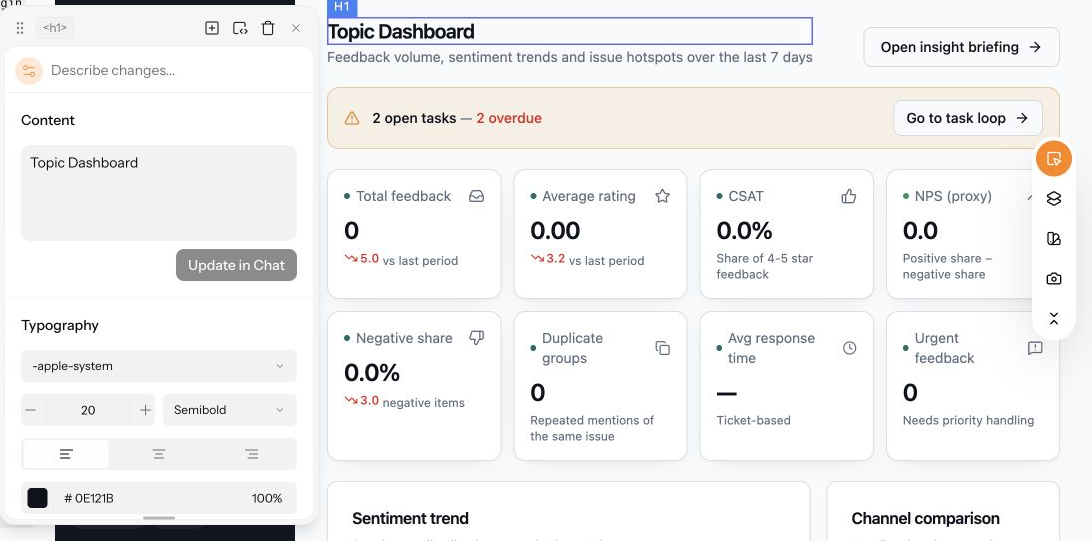
Select Topic Dashboard, then refine Content and Typography so feedback and task progress remain more prominent than decorative headings.
Test the desktop overview and mobile detail view. Publish a trial for operations and store leads, and ask them to trace one complaint through its original wording, task, and resolution requirement.
What this example demonstrates: a resolved complaint no longer hides unfinished internal work. It does not prove that service has improved. That conclusion still needs evidence from the remediation and what happens afterward.
Copy the starter prompt
Replace the feedback channels, classifications, responsible teams, closure requirements, and store-access rules. Adjust the region and language for your team.
Open the complete starter prompt
Create a Customer Feedback Intelligence workspace in Enter for a U.S.-based multi-store retailer. Help store operations teams turn multi-channel customer feedback into traceable topics, owned follow-up tasks, and documented resolutions.

[TARGET USERS]
- Store Operations: Read feedback for assigned stores, verify classifications, handle customers, and complete remediation work.
- Specialist Teams: Investigate product, logistics, pricing, or service issues assigned to them.
- Manager: Monitor recurring issues, assign responsibility, and review closure evidence.
- Administrator: Manage source imports, classification rules, users, and access scope.

[CORE WORKFLOW]
1. Collect feedback from stores, e-commerce, app reviews, and social channels; group it into understandable topics while retaining each original record.
2. Let users inspect the original wording, store, product, channel, timestamp, rating, sentiment, urgency, and classification confidence before accepting a conclusion.
3. Create or open a linked investigation, reply, survey, or remediation task with an owner, deadline, and clear requirements.
4. Track progress and overdue work. Require a resolution note describing the work and outcome before closing a task; keep its topic and feedback links accessible.

[CORE PAGES]
- Topic Dashboard: Feedback trends, priority topics, affected stores, overdue tasks, and direct links to evidence.
- Feedback Inbox: Searchable original records, filters, handling status, and a detail panel.
- Topic & Issue Analysis: Topic summaries, original evidence, related stores/products, similar complaints, and linked task progress.
- Task Loop: Owners, deadlines, task types, progress, overdue states, and closure records.
- Insight Briefing: Concise, evidence-linked summaries of issues, actions, and unresolved follow-ups.
- Role-appropriate data and account administration for imports, rules, permissions, and audit history.

[DATA AND BUSINESS RULES]
- Use stable IDs to link feedback, topics, stores, products, tasks, and resolution records.
- Preserve original text and source metadata. Do not replace evidence with an AI summary.
- Treat AI sentiment, urgency, and topic labels as editable classifications, not established facts. Show uncertainty and allow correction.
- Deduplicate transparently without losing source references. Never invent customer identities, product associations, or complaint details.
- Apply date and store filters consistently to counts, charts, evidence lists, and summaries. Show an explicit empty state when the selected period has no records.
- Separate feedback handling status, topic status, and task status. A resolved feedback record does not automatically close a remediation task.
- Enforce allowed transitions. Closure requires a permanent resolution note; unresolved work must remain visible.
- Customer replies, task closure, and other consequential actions require explicit user confirmation. Do not send messages automatically.
- Include a clearly labelled demo in which a service complaint is resolved but an associated training task is remediated and still awaiting documented closure.

[VISUAL DIRECTION AND DELIVERABLES]
- Use a calm, readable internal workspace with short summaries, visible original evidence, clear responsibility, and direct next-step links.
- Support desktop and mobile; long feedback should remain readable in detail views.
- Use realistic but synthetic demo records with consistent dates and IDs, and make the active role and store scope visible.
- Deliver a publishable demo with a complete topic-to-evidence-to-task-to-resolution journey.

Before building, provide a requirements summary, missing information, page architecture, data model, classification rules, role permissions, state transitions, and acceptance criteria. Do not begin generating pages yet.
5. Give everyone the right forecast version
Purchasing has ordered against Monday's forecast. A store manager updates the spreadsheet on Wednesday. By Friday, nobody can explain which number was used—or whether the manager's change was ever approved.
This tool separates where a forecast comes from, proposed human adjustments, and the version the business has actually published. The aim is not just to produce a number. It is to make that number explainable and usable by the next team.
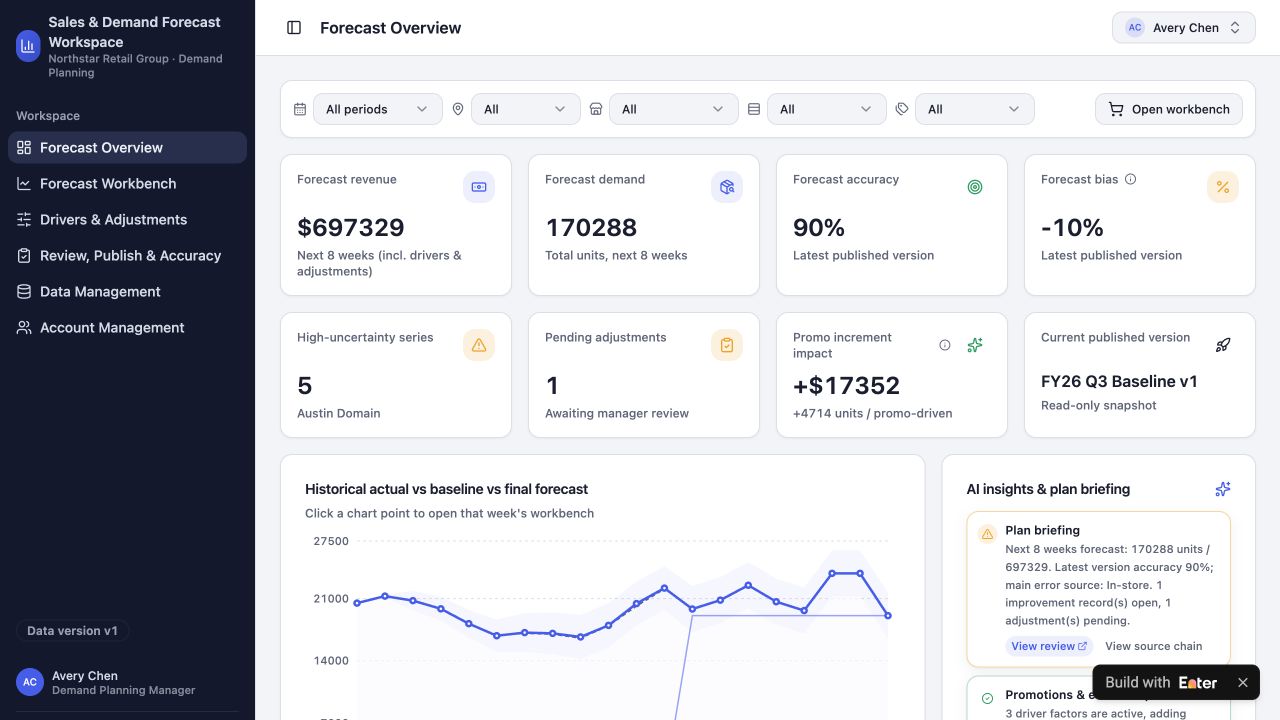
Step 1. Map the number's journey
Connect three stages:
- Form the forecast: begin with historical sales and make the effects of promotions, weather, and store events explicit.
- Review and publish: record the reasons for human adjustments, route them to a manager, and publish a named version for purchasing, replenishment, and stores.
- Compare later: once actual sales exist, review them against the version available at the time.
Start with the forecast input brief, or your own records. Define the stores, categories, daily or weekly cadence, relevant drivers, and review responsibilities. The history of a decision matters as much as the latest total.
Step 2. Generate the first version
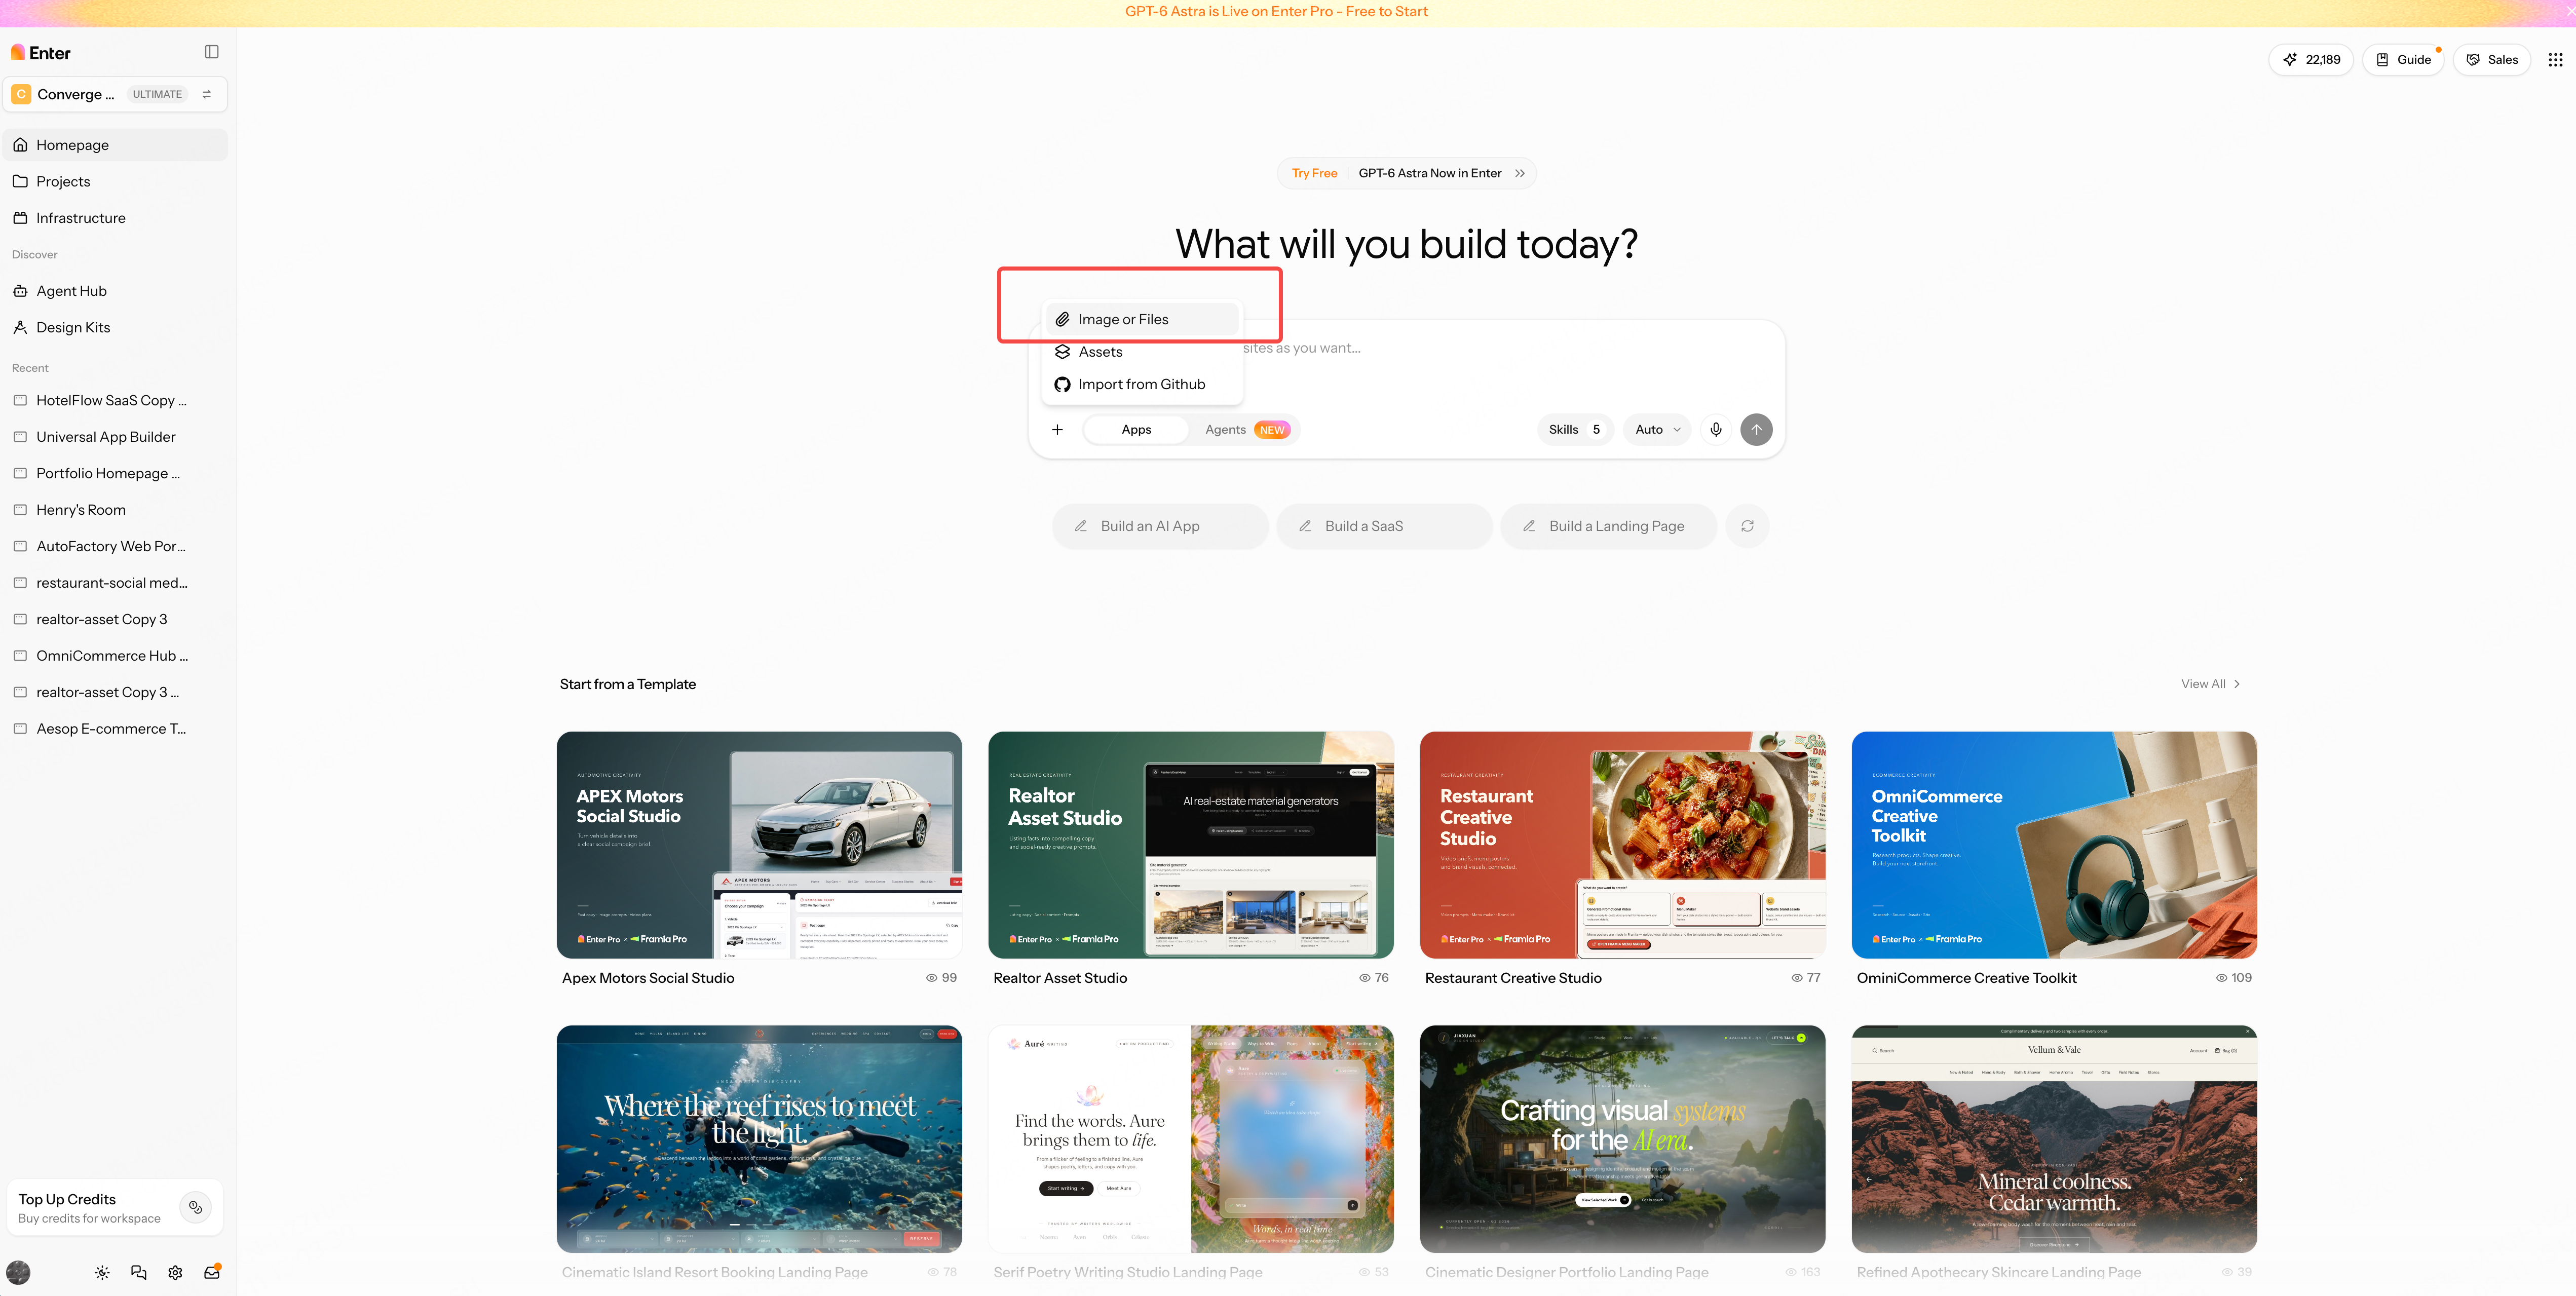
Open Enter, select New Project, upload with +, and submit the starter prompt. Review the forecast formula, version rules, and permissions before selecting Build Now.
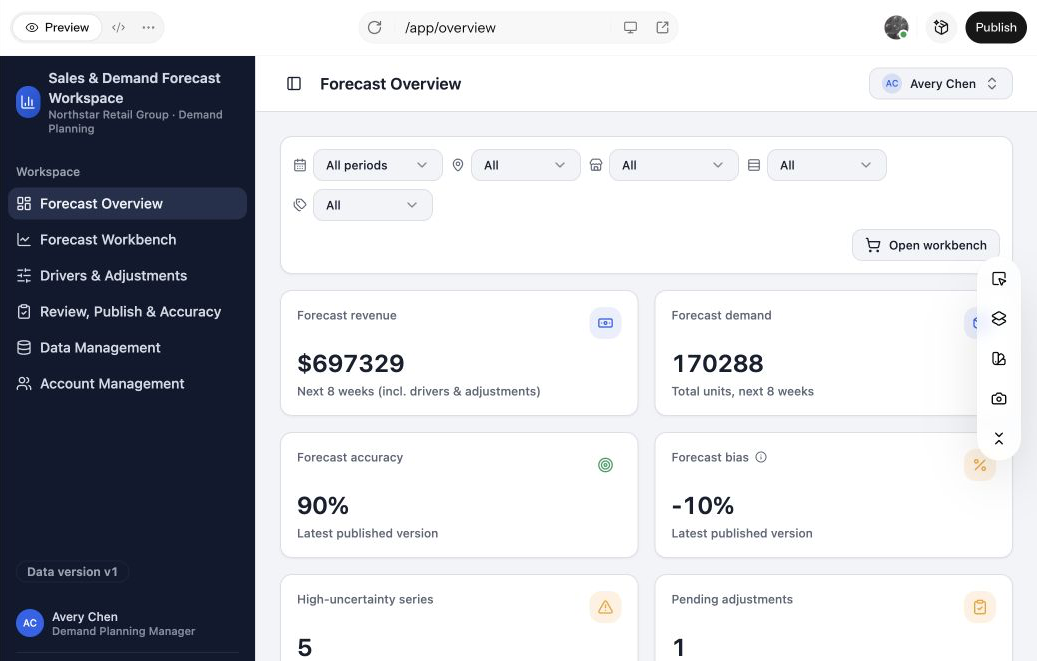
Step 3. Separate assumptions, proposals, and published numbers
3.1 Show why the forecast changed
If demand rises, purchasing needs to know whether that reflects normal trading or a one-off promotion. Show baseline demand separately from driver impacts and approved adjustments, with sources for each.
Show baseline demand, scoped driver impacts, and approved adjustments separately for the same store and week. Link each component to its source and assumptions. Prevent double-counting overlapping drivers and reconcile detailed and aggregate totals.
Replace “store and week” with your own planning scope and cadence, and list the drivers you actually use. Check that overlapping drivers are not counted twice and that detailed values reconcile to totals.
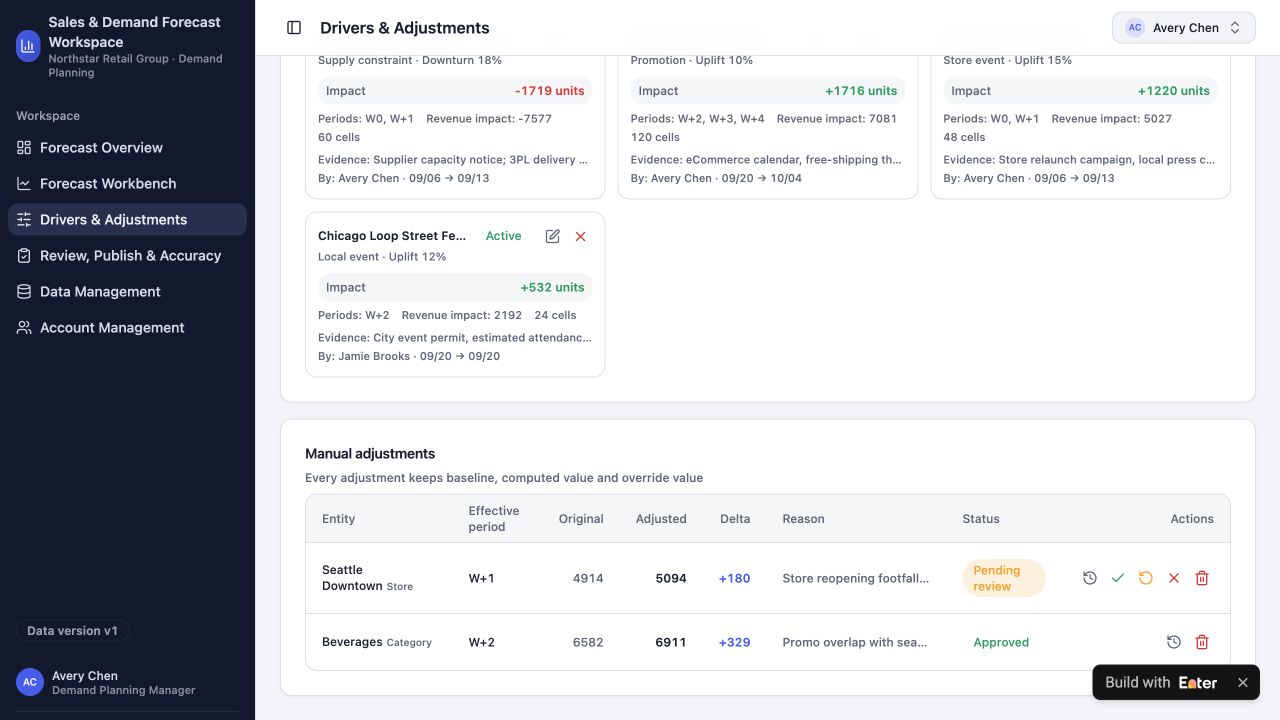
3.2 Make local judgment reviewable
A store manager may know something the baseline misses, such as stronger traffic after a reopening. Capture that knowledge as a proposal with before-and-after values and a reason—not as a silent overwrite.
Save manual overrides with before and after values, reason, submitter, store, week, and review status. Keep pending and rejected changes out of the current forecast. Recalculate affected totals only after explicit approval.
Specify who may propose changes, what justification is needed, and who reviews them. Pending or rejected changes must stay out of the current forecast; only approval should trigger recalculation.
3.3 Preserve the version people acted on
A draft can keep changing. A version already used for purchasing needs to remain fixed. Otherwise, the team ends up judging yesterday's decision against today's revised answer.
Publish an immutable named snapshot only after explicit confirmation. Save its period, inputs, publisher, and timestamp. Later draft changes must not alter it. Compare actuals only with an appropriate historical version and only for periods with observed actual data.
Set your publication cadence, version naming, and comparison periods. Later accuracy reviews should use observed actuals and the appropriate historical snapshot, never invented future results.
Step 4. Compare three numbers that mean different things
Select Avery Chen, the demand planning manager, and inspect Seattle Downtown. Use the demo's fixed W+1 · 09/13 period. “W+1” is the label in the captured example, not next week relative to the day you read this guide.
4.1 Reconcile the current forecast
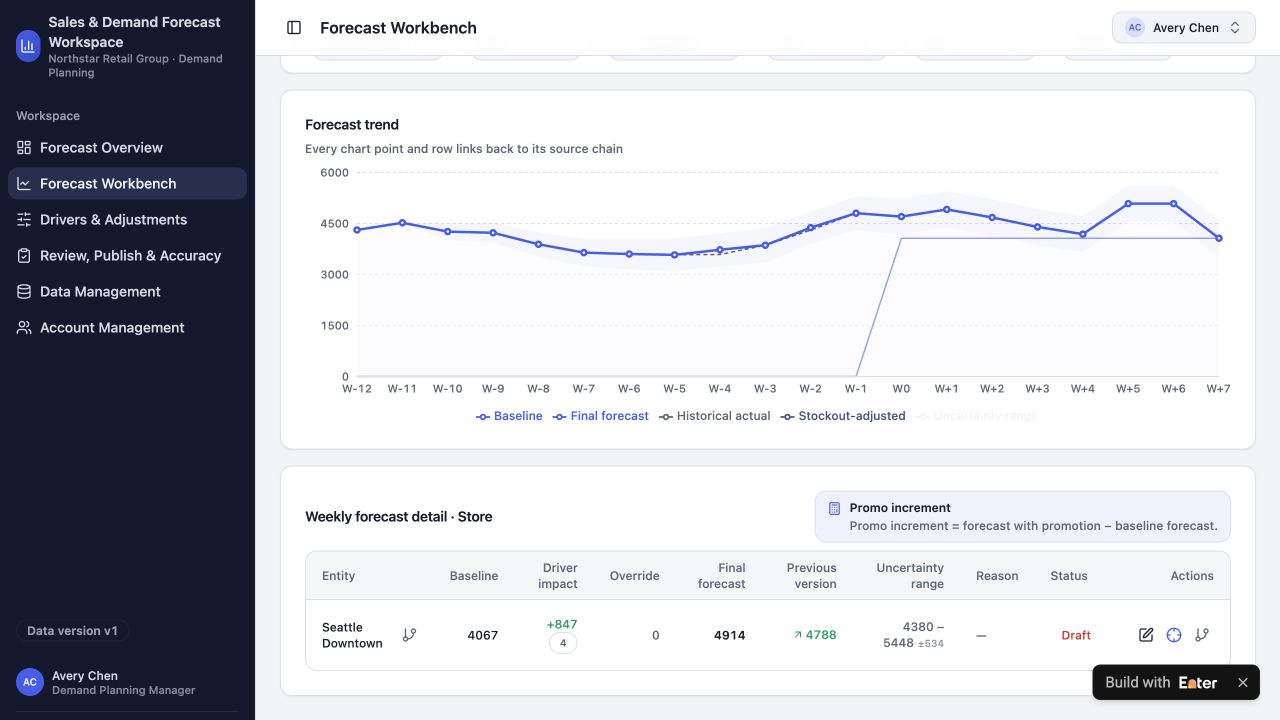
In Forecast Workbench, select the store, W+1 · 09/13, and the Store level. The current forecast is 4,914 = 4,067 baseline + 847 driver impact.
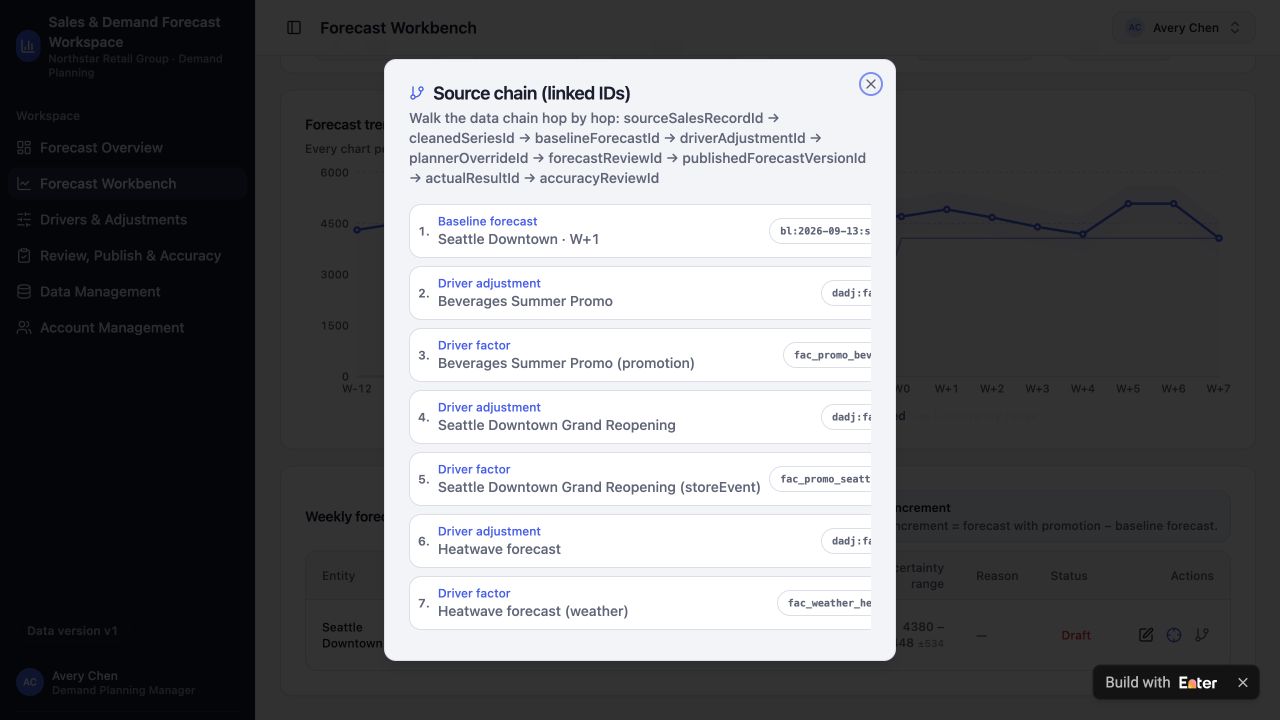
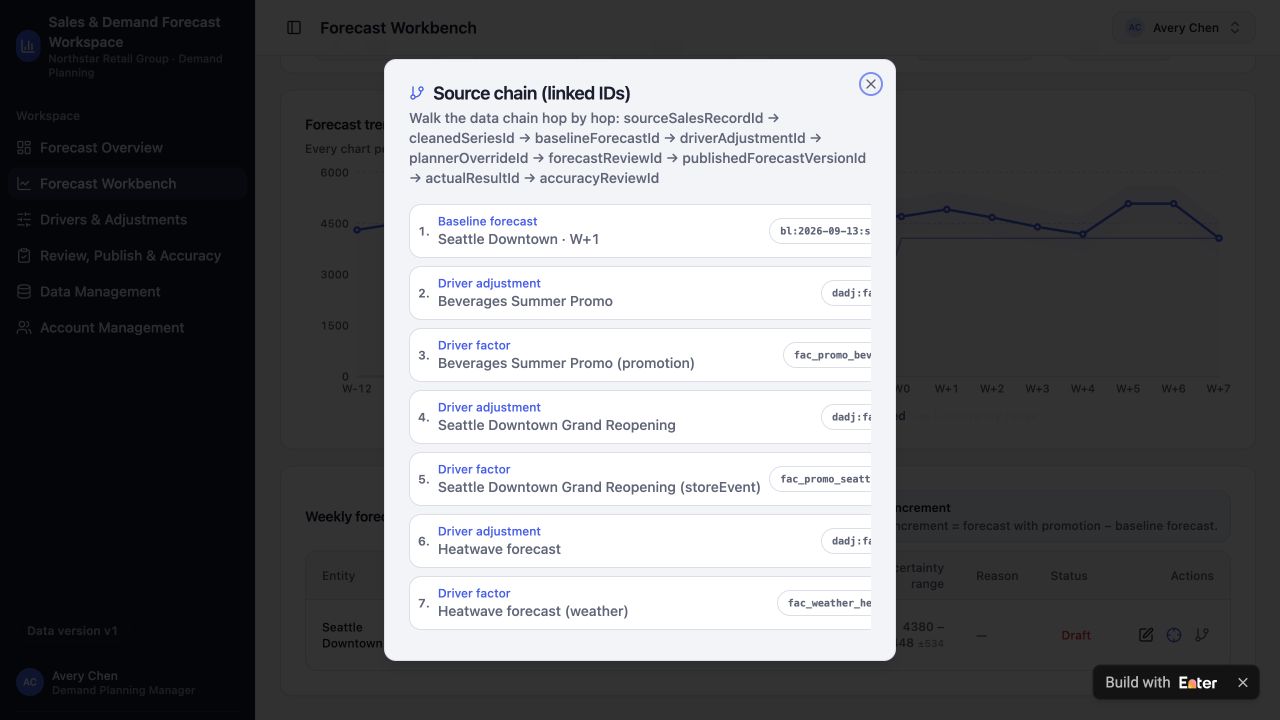
Select View source chain and inspect the beverage promotion, store reopening, weather, and other supporting factors shown in the example.
4.2 Inspect the proposed adjustment
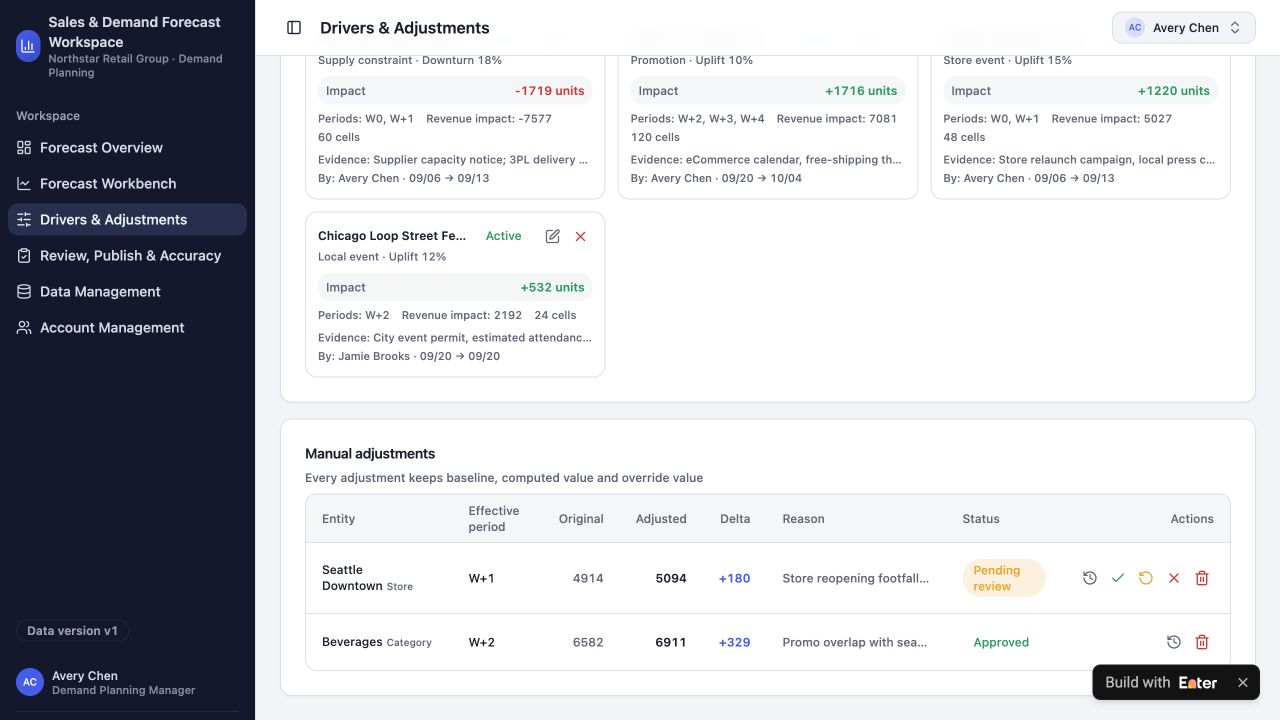
In Manual adjustments, find the +180 proposal: 4,914 → 5,094. It is Pending review, so the current forecast remains 4,914.
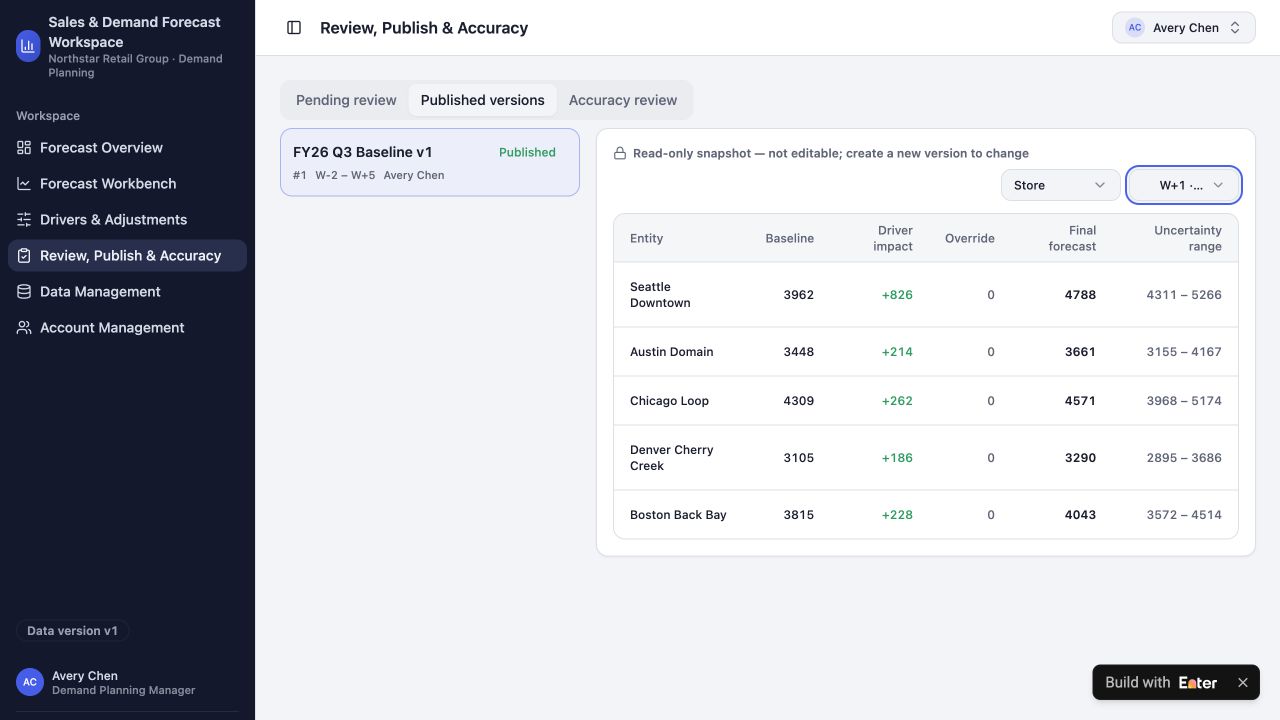
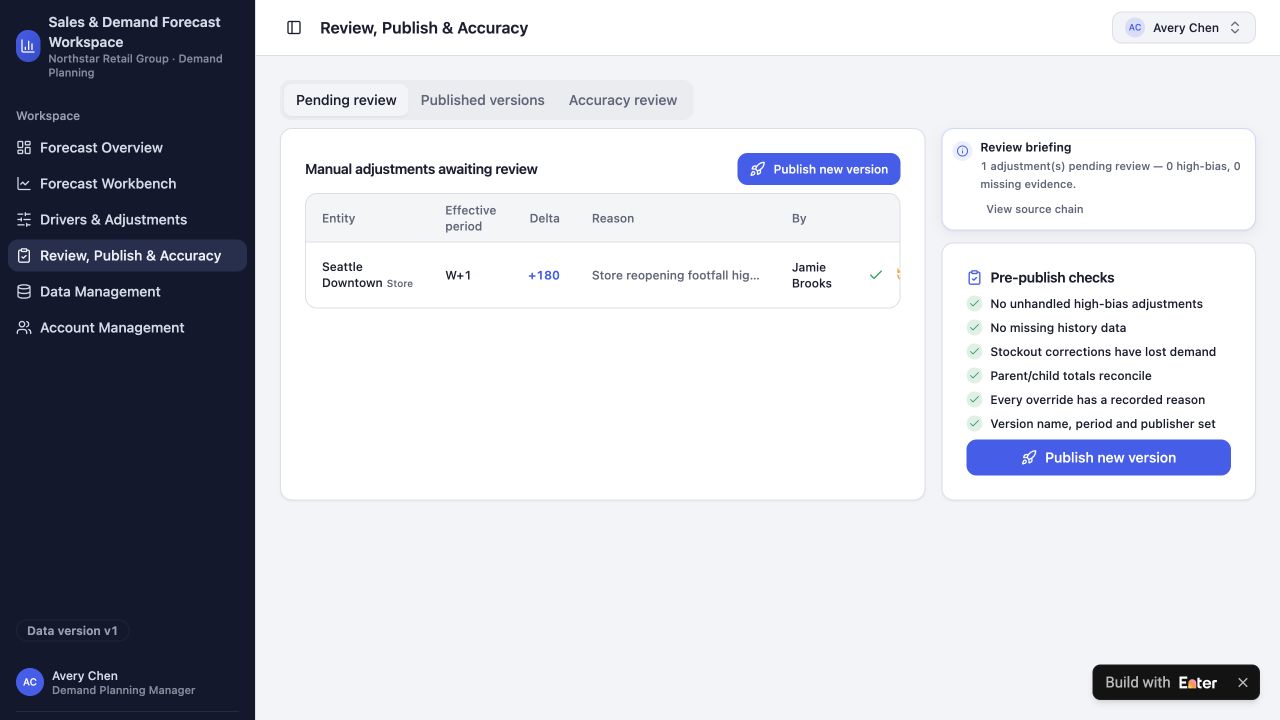
In Review, Publish & Accuracy → Pending review, find Jamie Brooks's request and inspect the approve, return, and reject options. Reviewing an adjustment and publishing a version are separate actions.
4.3 Check the published snapshot
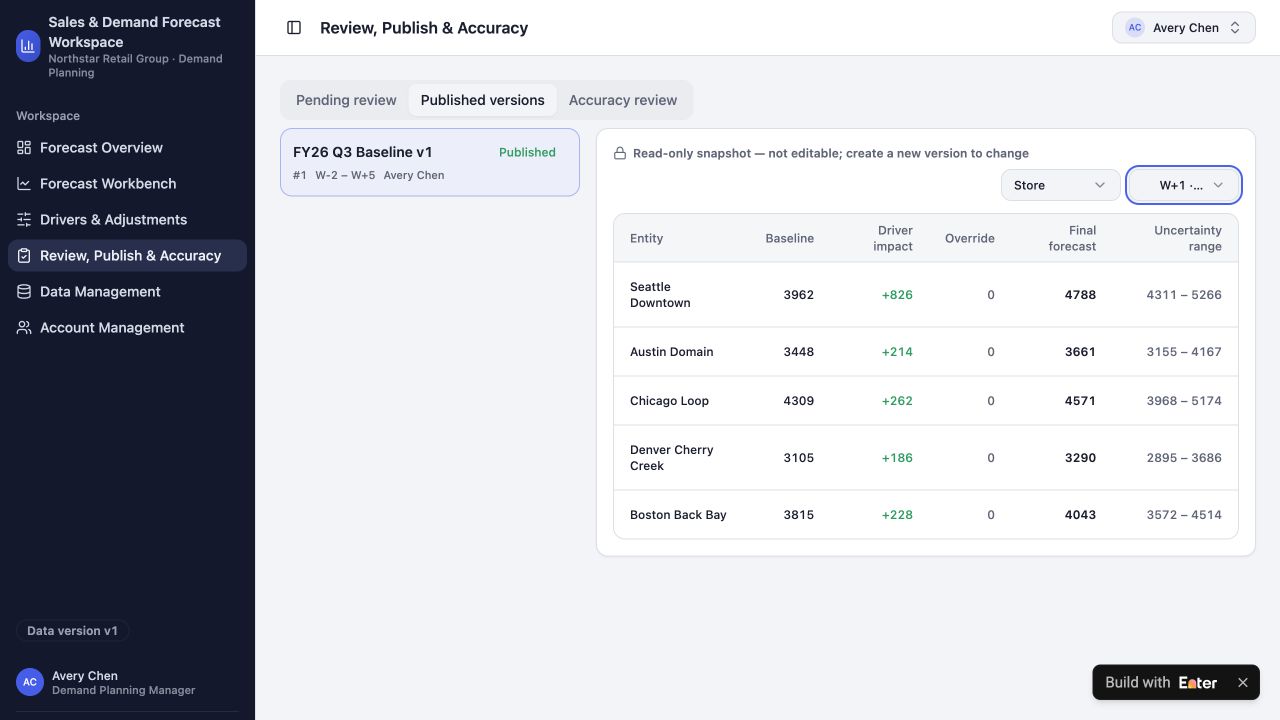
Open Published versions → FY26 Q3 Baseline v1. The same store and week show 4,788 in that historical snapshot, separate from the current draft and the pending proposal.
Step 5. Make the active version unmistakable
In Preview → Select to Edit, use Visual Edit to distinguish drafts, pending changes, and published forecasts.
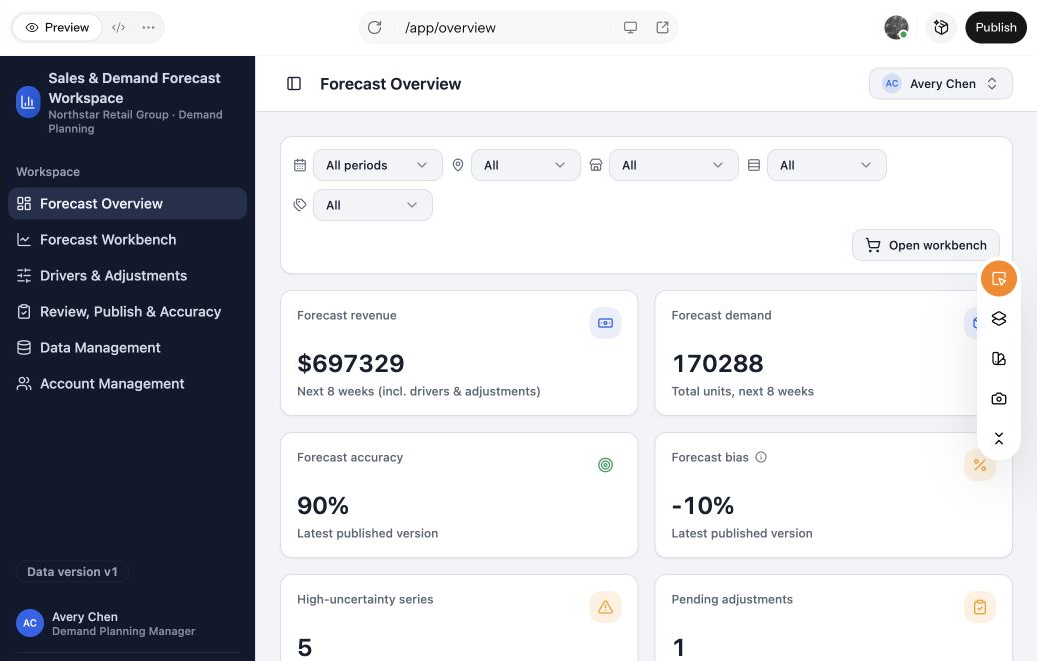
Select Forecast Overview and adjust Content and Typography. Highlight period and status, not just the largest number on the screen.
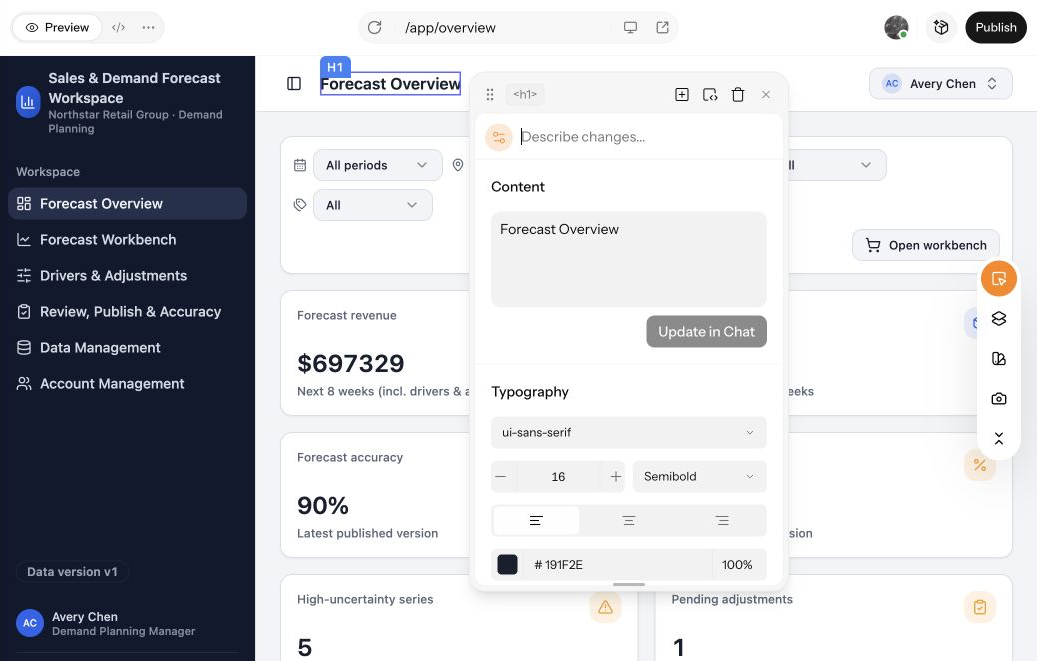
Check desktop and mobile, then use Publish to share the app with planners, managers, and purchasing. Publishing the application is not the same as publishing a business forecast: the forecast still needs its own review and version-publication process.
Ask each role to find the same published version. If they pick different numbers, the interface or workflow still needs work.
What this example demonstrates: 4,788, 4,914, and 5,094 can coexist without ambiguity because each has a different status and purpose. That gives the team a shared basis for decisions and later review. It does not establish that the forecast is more accurate.
Copy the starter prompt
Set the planning cadence, store and category scope, business drivers, review roles, and publication schedule. Replace the Seattle Downtown demo if needed, and adapt region, currency, and language.
Open the complete starter prompt
Create a Sales & Demand Forecast Workspace in Enter for a U.S.-based multi-store retailer. Make every forecast explainable from historical demand through business drivers and approved human adjustments, and preserve reviewed, published versions for later accuracy measurement.

[TARGET USERS]
- Planner: Inspect demand, investigate drivers, and submit justified adjustments.
- Demand Planning Manager: Review adjustments, check consistency, and publish forecast versions.
- Business Viewer: Read forecasts for authorized stores, categories, and channels.
- Administrator: Maintain history, stockout records, calendars, model settings, users, and access scope.

[CORE WORKFLOW]
1. Build a transparent weekly baseline from historical sales and explicitly documented stockout corrections.
2. Apply scoped promotion, holiday, weather, store-event, and supply-constraint drivers with visible evidence and incremental impact.
3. Allow a planner to propose an override with before/after values, reason, owner, and effective period. Keep it separate until reviewed.
4. Let a manager approve, return, or reject adjustments, run pre-publish checks, and publish an immutable named snapshot.
5. When actual results become available, compare them with the forecast version available at that time, investigate bias, and record improvement actions.

[CORE PAGES]
- Forecast Overview: Forecast units and revenue, uncertainty, pending adjustments, current published version, and evidence-linked insights.
- Forecast Workbench: Filters for week, region, store, channel, category, and level; trends; baseline, driver impact, approved override, final forecast, previous version, and uncertainty.
- Drivers & Adjustments: Driver evidence and scope, calculated impact, proposed overrides, reasons, status, and revision history.
- Review, Publish & Accuracy: Pending reviews, pre-publish checks, read-only version snapshots, and actual-versus-forecast analysis.
- Data Management: Sales history, stockouts, calendar events, product/store hierarchy, model inputs, and quality checks.
- Account Management: Scoped roles and review/publish permissions.

[DATA AND BUSINESS RULES]
- Final forecast = baseline + driver impact + approved override. Pending and rejected overrides must not affect the current final forecast.
- Use stable IDs to connect source sales, cleaned series, baseline, driver adjustments, planner overrides, review decisions, published versions, actuals, and accuracy reviews.
- Show formulas, units, period, scope, and data freshness. Label the difference between sales constrained by stockouts and estimated unconstrained demand.
- Prevent double-counting overlapping drivers. Document additive or multiplicative assumptions and show rounding explicitly.
- Reconcile parent and child totals across SKU, category, store, region, and channel.
- Preserve published snapshots and their publisher, timestamp, period, and inputs. Changing a draft must never alter a historical version.
- Calculate accuracy and bias only for periods with actual observations. Explain zero-actual cases and never fabricate future actuals or claim guaranteed precision.
- Keep forecasting, approval, publishing, and actual execution separate; no automatic business approval or publication.
- Include one demo for Seattle Downtown, W+1: a current forecast of 4,914, a pending +180 proposal to 5,094, and a separate published snapshot of 4,788. Clearly label these as distinct states.

[VISUAL DIRECTION AND DELIVERABLES]
- Use a clear planning workspace with readable trend charts, compact comparisons, visible status labels, and direct source-chain links.
- Support desktop and mobile without hiding essential values or actions.
- Use clearly labelled demo data with consistent IDs and dates, USD revenue, and U.S. date conventions.
- Deliver a publishable demo with a traceable single-store, single-week journey.

Before building, provide a requirements summary, missing information, page architecture, data model, forecast formulas, role permissions, state transitions, and acceptance criteria. Do not begin generating pages yet.
Start with one decision your team already makes
Across these examples, the same principle applies: automate repeatable steps while keeping the evidence, the decision, the owner, and the outcome connected.
For slow-moving stock, that means preserving the reasoning behind a markdown. For store performance, it means distinguishing completed tasks from improved results. For replenishment, it means keeping a partial delivery open. For feedback, it means separating a customer response from internal remediation. For forecasting, it means protecting the version people acted on.
Choose one recurring task. Give Enter the context and the rules, including where a person needs to confirm the next action. Review the plan and test one record all the way through before asking the team to use it.
You do not need to automate everything at once. Start with a repeatable calculation, classification, or follow-up process. Check that it behaves as intended, handles exceptions, and gives the next person enough context to continue the work.
